|
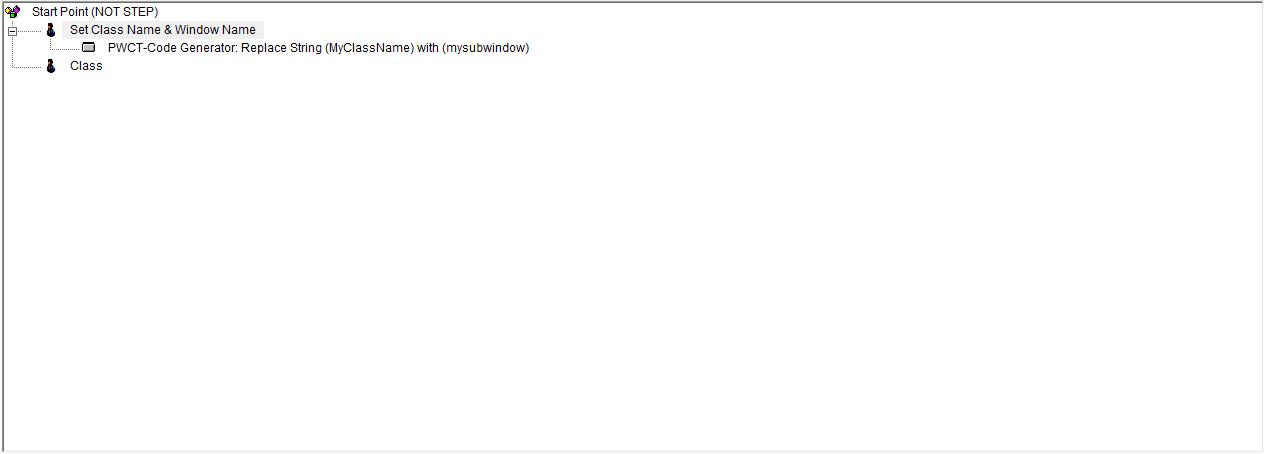
PWCT 1.9 Art Documentation ( https://doublesvsoop.sourceforge.net ) Free and Open-Source Software ( GNU General Public License ) _____________________________________________________________________________________ Table of contents 1 - Introduction 2 - Implementation steps 3 - Final Steps Tree 1 - Introduction In this lesson we are going to learn how to develop large applications using HarbourPWCT (Part 4) In this part of our lesson we will create a (Sub Window) template to be used later in our development The (Sub Window) template is a (Server Extension) and it's Class based. This template uses the component (CG Replace String) to enable us to change the (class name) and the (window name) quickly. When you use this template to change the class name you will modify only the step ( PWCT-Code Generator: Replace String (MyClassName) with (mysubwindow) ) Where (mysubwindow) is the class name To change the window name you will modify only the step ( Data cWindowName Init Value "SubWindowName" ) Developing applications this way will enable you to create many objects of the same class And you can use these objects at the same time (displaying the same window more than once) and each object of our class have its own window name stored in the property (cWindowName) All what you need is to create new object and assign a different window name to the property (cWindowName) then call the method (ShowWindow) to dispaly the window.
Since this is a (Server Extension) to use it you need to generate the source code file (CTRL+R) Then to add this extension to your application you need to call the generated source code file And this can be done using the component (Set procedure to) 2 - Implementation Steps
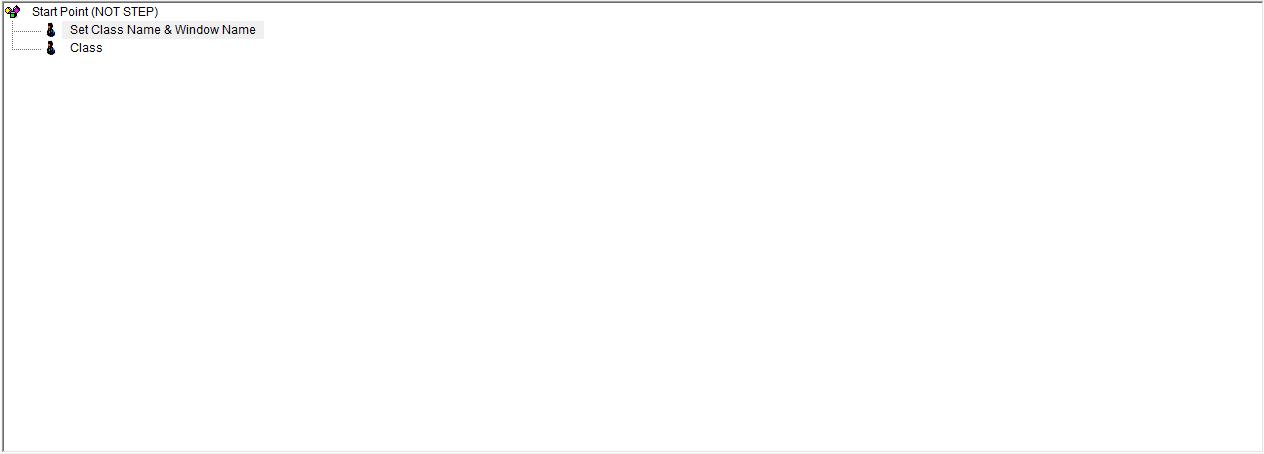
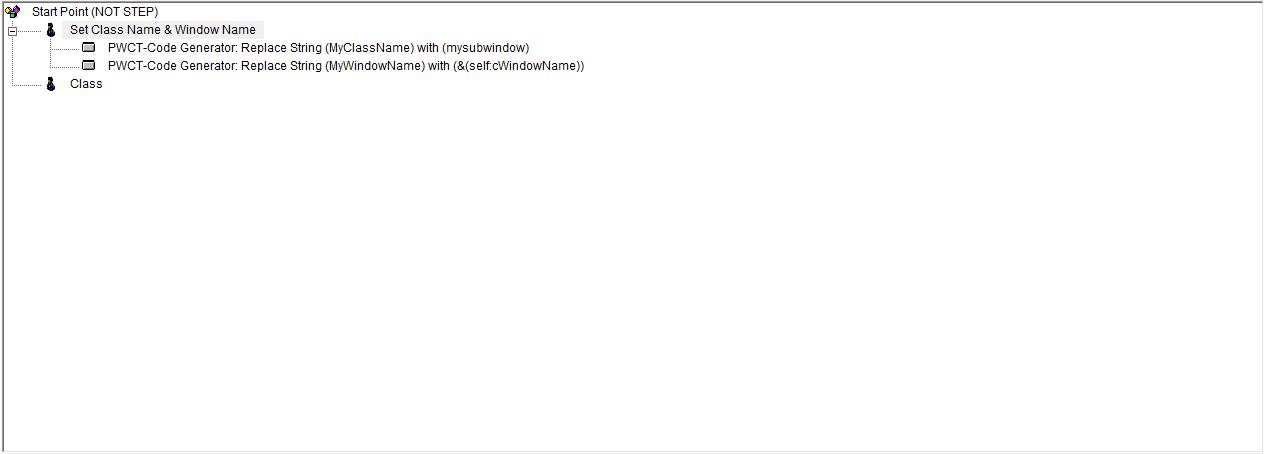
Fig. (1) Goal Desginer - Steps Tree Select the step (Set Class Name & Window Name) We will start now new interaction process to generate new steps to our steps tree. The slow way (Using Mouse): 1 - Click Interact to open the components browser 2 - Select the domain (PWCT - Code Generator) 3 - Select the component (CG Replace String) The fast way (Using Keyboard shortcuts): 1 - Get the component using its name by typing (CG Replace String) Note : Stop typing when you see the required component is selected
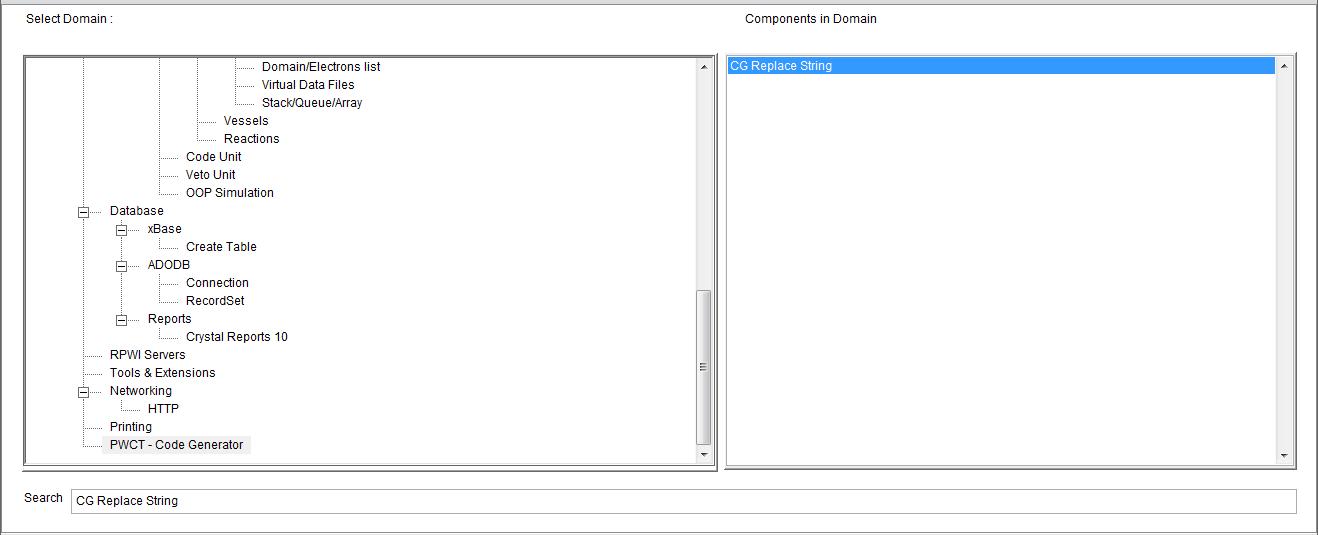
Fig. (2) Component Browser – Select the component (CG Replace String) After selecting the component click Ok or press ENTER
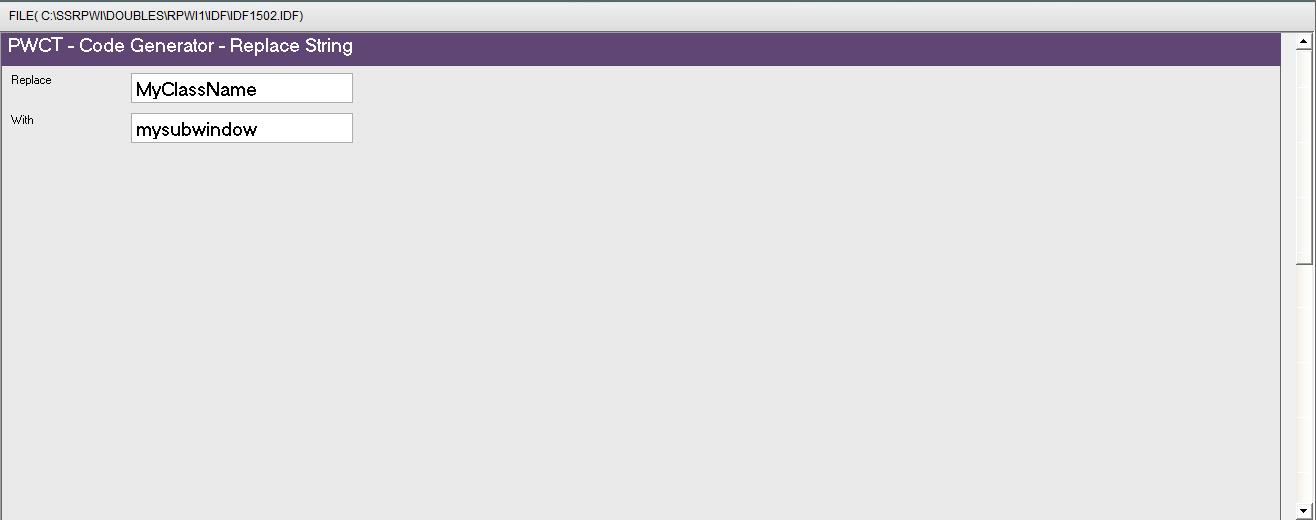
Fig. (3) Interaction page - Set the properties and enter the required data as in the image above
Fig. (4) Goal Desginer - Steps Tree Select the step (Set Class Name & Window Name) We will start now new interaction process to generate new steps to our steps tree. The slow way (Using Mouse): 1 - Click Interact to open the components browser 2 - Select the domain (PWCT - Code Generator) 3 - Select the component (CG Replace String) The fast way (Using Keyboard shortcuts): 1 - Get the component using its name by typing (CG Replace String) Note : Stop typing when you see the required component is selected
Fig. (5) Component Browser – Select the component (CG Replace String) After selecting the component click Ok or press ENTER
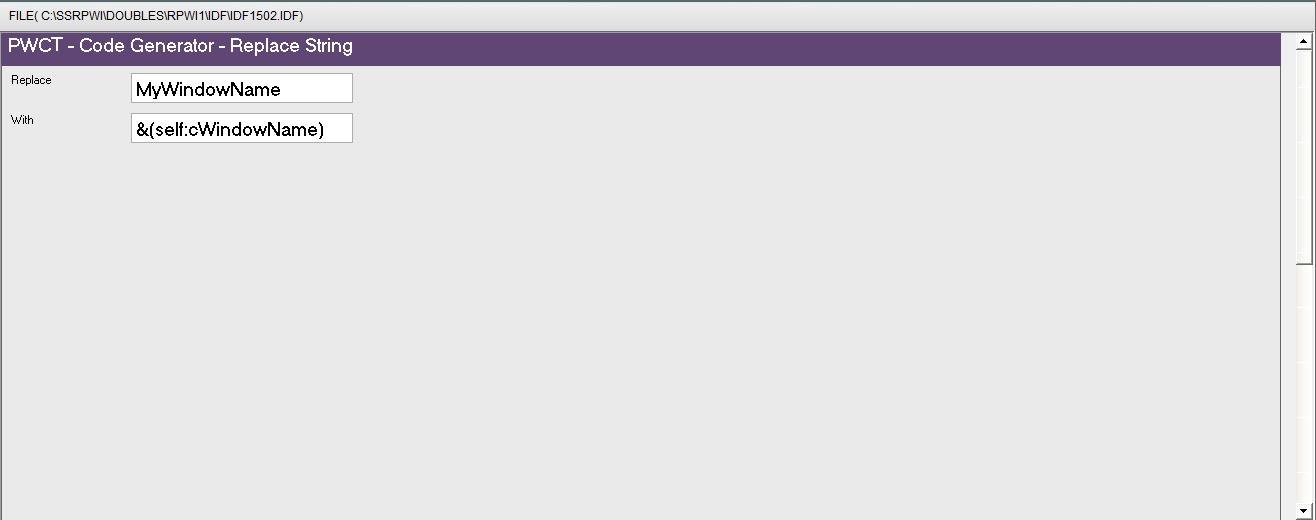
Fig. (6) Interaction page - Set the properties and enter the required data as in the image above
Fig. (7) Goal Desginer - Steps Tree Select the step (Class) We will start now new interaction process to generate new steps to our steps tree. The slow way (Using Mouse): 1 - Click Interact to open the components browser 2 - Select the domain (Object Oriented Programming (OOP)) 3 - Select the component (Define Class) The fast way (Using Keyboard shortcuts): 1 - Get the component using its name by typing (Define Class) Note : Stop typing when you see the required component is selected
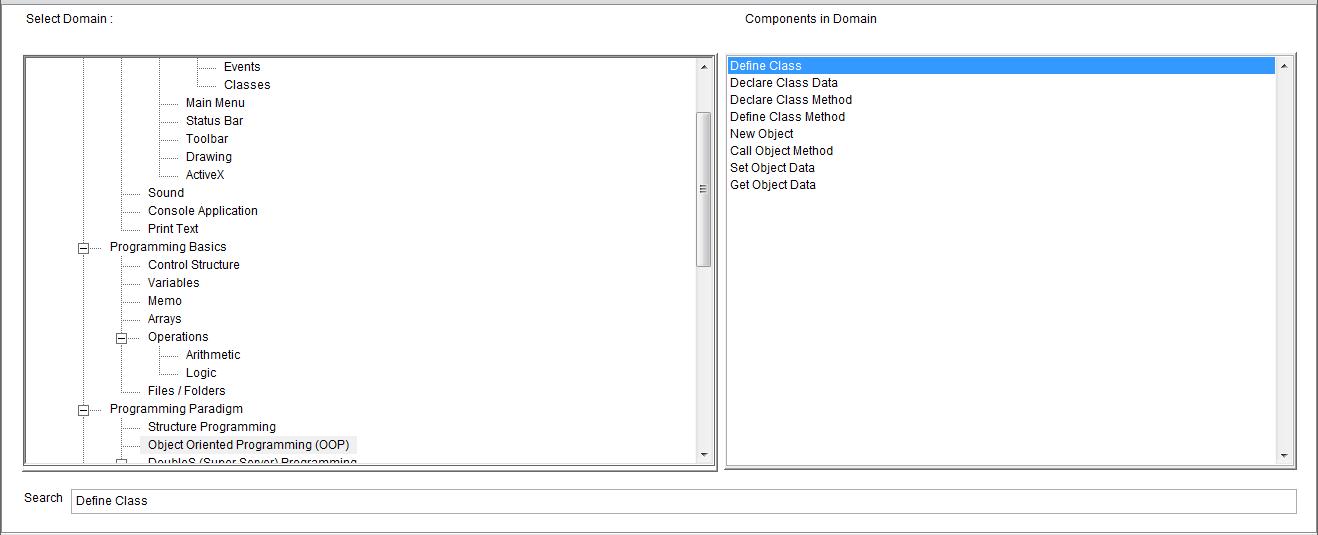
Fig. (8) Component Browser – Select the component (Define Class) After selecting the component click Ok or press ENTER
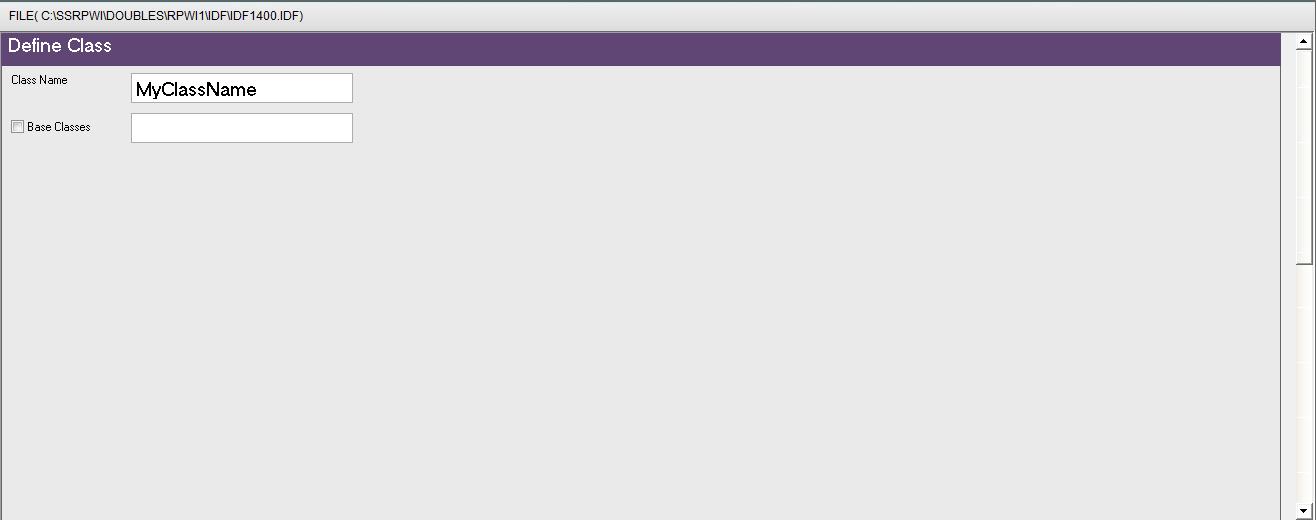
Fig. (9) Interaction page - Set the properties and enter the required data as in the image above
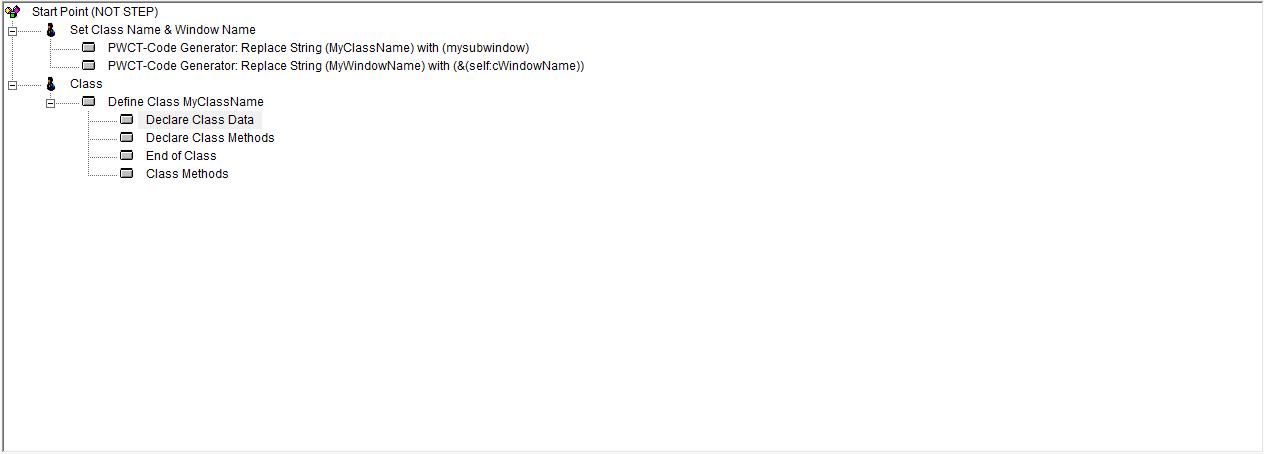
Fig. (10) Goal Desginer - Steps Tree Select the step (Declare Class Data) We will start now new interaction process to generate new steps to our steps tree. The slow way (Using Mouse): 1 - Click Interact to open the components browser 2 - Select the domain (Object Oriented Programming (OOP)) 3 - Select the component (Declare Class Data) The fast way (Using Keyboard shortcuts): 1 - Get the component using its name by typing (Declare Class Data) Note : Stop typing when you see the required component is selected
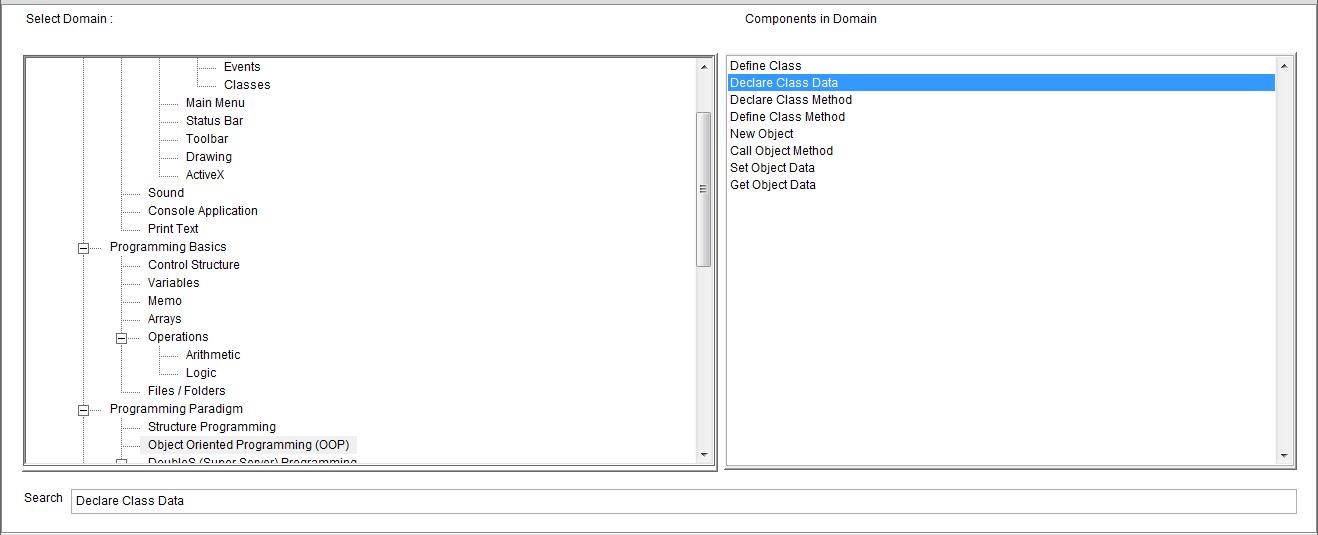
Fig. (11) Component Browser – Select the component (Declare Class Data) After selecting the component click Ok or press ENTER
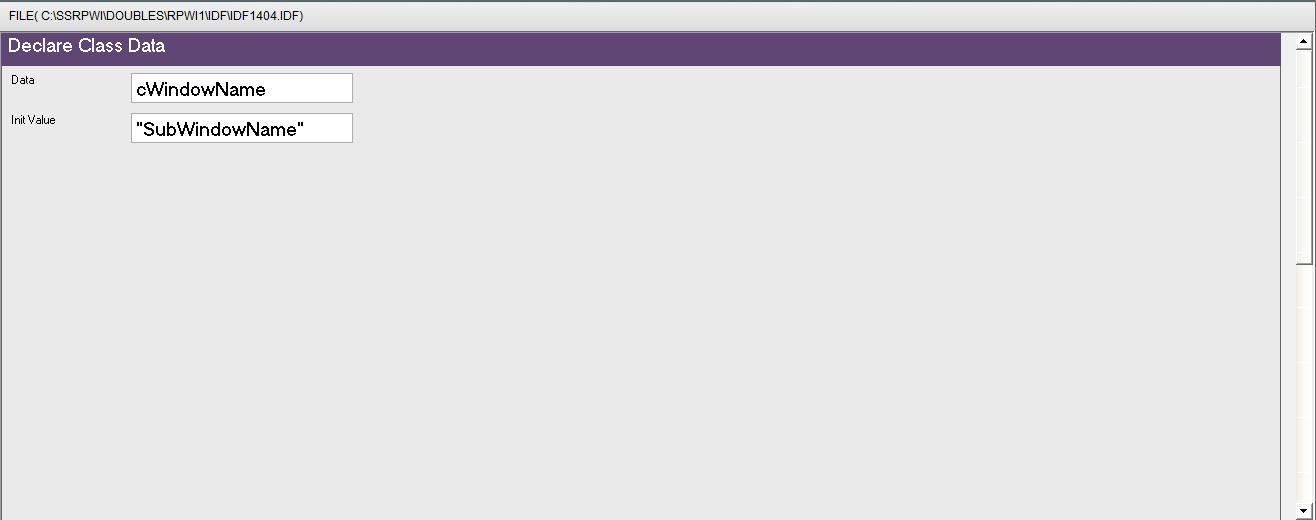
Fig. (12) Interaction page - Set the properties and enter the required data as in the image above
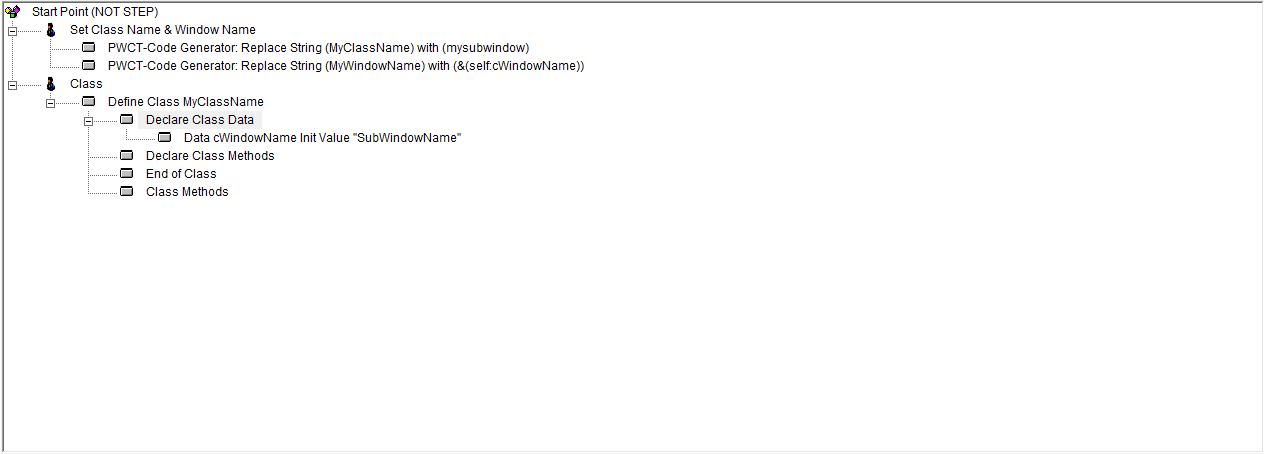
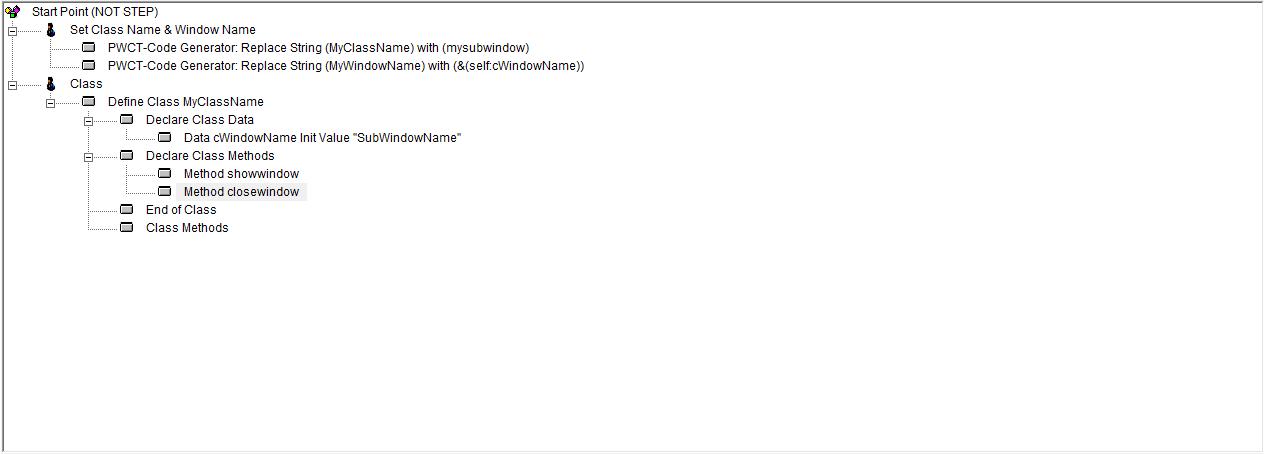
Fig. (13) Goal Desginer - Steps Tree Select the step (Declare Class Methods) We will start now new interaction process to generate new steps to our steps tree. The slow way (Using Mouse): 1 - Click Interact to open the components browser 2 - Select the domain (Object Oriented Programming (OOP)) 3 - Select the component (Declare Class Method) The fast way (Using Keyboard shortcuts): 1 - Get the component using its name by typing (Declare Class Method) Note : Stop typing when you see the required component is selected
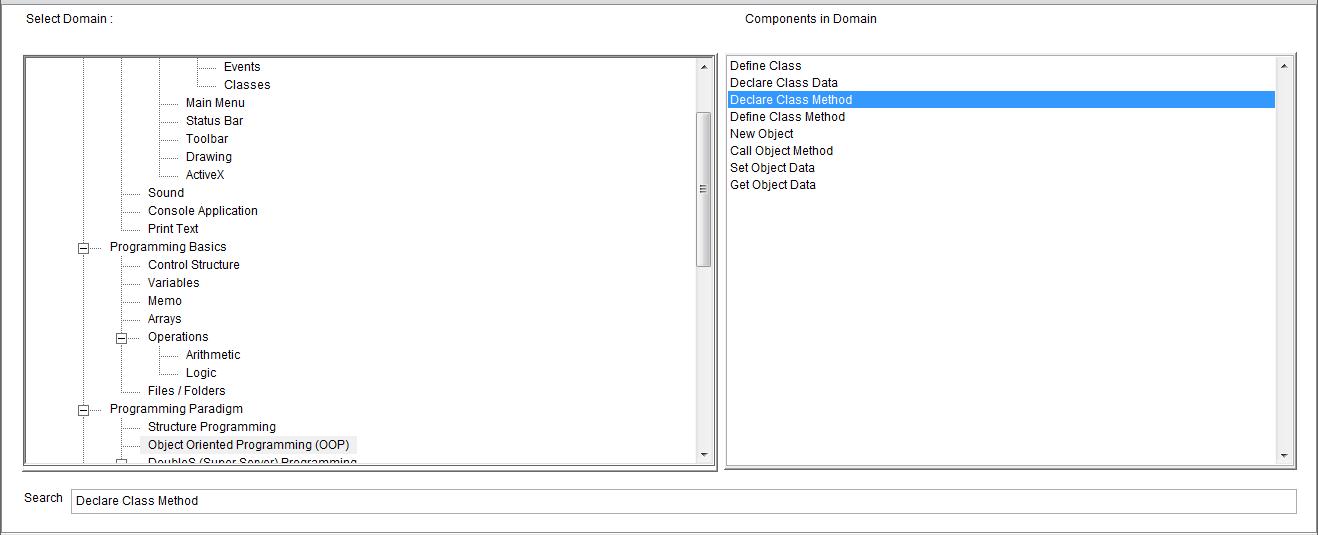
Fig. (14) Component Browser – Select the component (Declare Class Method) After selecting the component click Ok or press ENTER
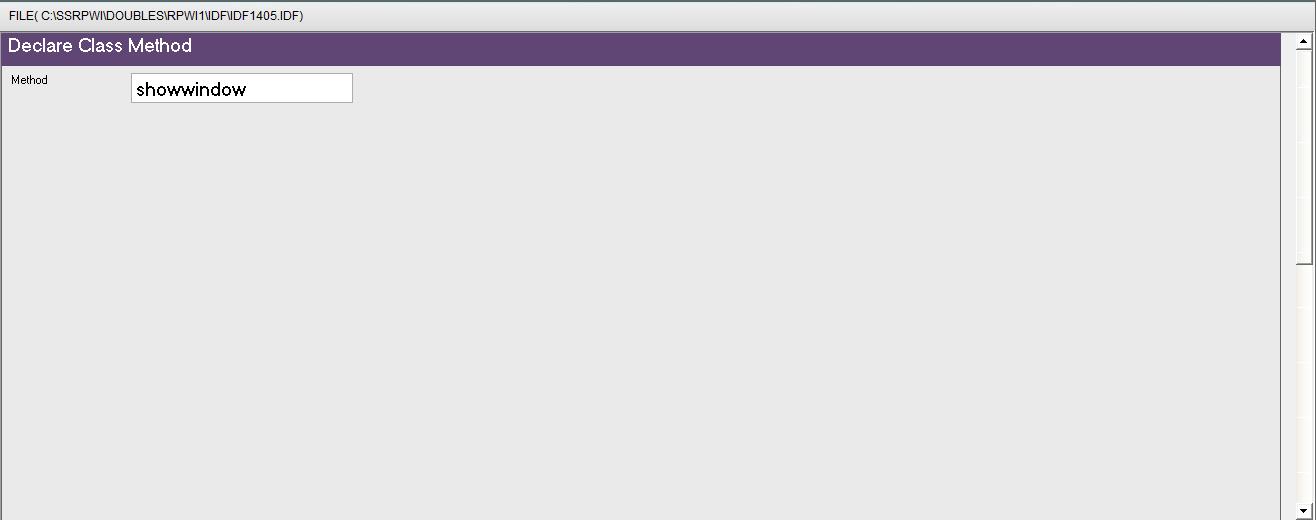
Fig. (15) Interaction page - Set the properties and enter the required data as in the image above
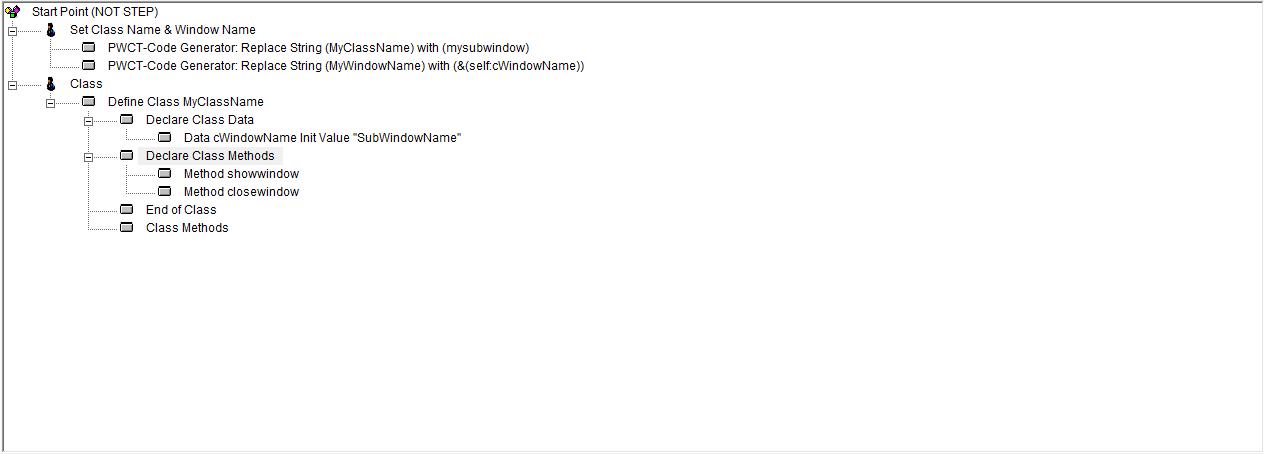
Fig. (16) Goal Desginer - Steps Tree Select the step (Declare Class Methods) We will start now new interaction process to generate new steps to our steps tree. The slow way (Using Mouse): 1 - Click Interact to open the components browser 2 - Select the domain (Object Oriented Programming (OOP)) 3 - Select the component (Declare Class Method) The fast way (Using Keyboard shortcuts): 1 - Get the component using its name by typing (Declare Class Method) Note : Stop typing when you see the required component is selected
Fig. (17) Component Browser – Select the component (Declare Class Method) After selecting the component click Ok or press ENTER
Fig. (18) Interaction page - Set the properties and enter the required data as in the image above
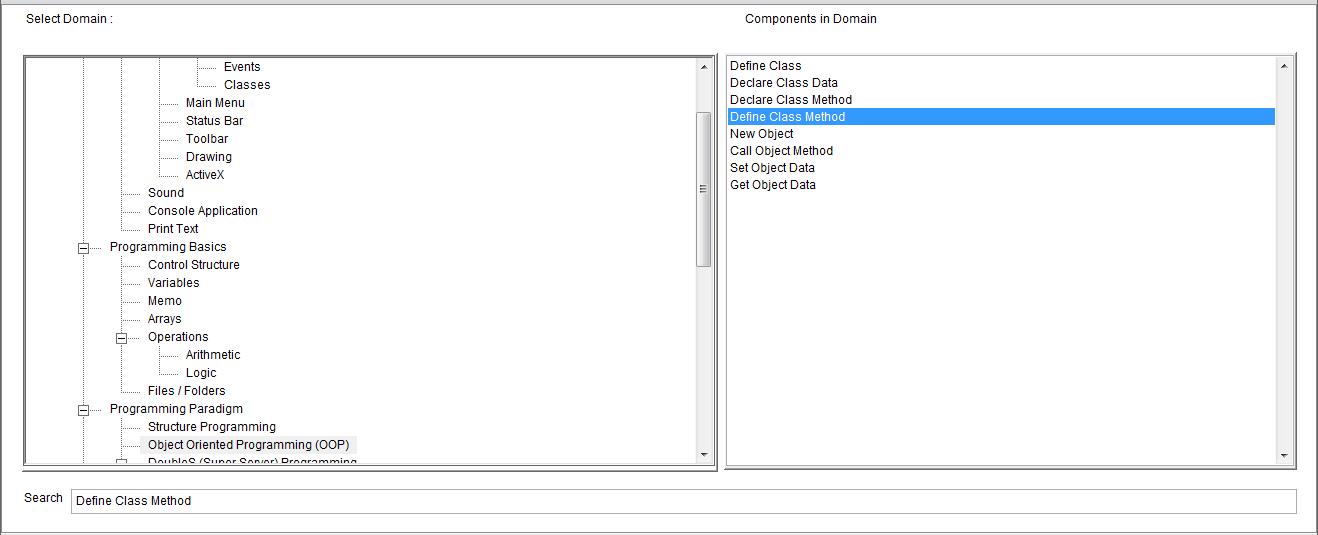
Fig. (19) Goal Desginer - Steps Tree Select the step (Class Methods) We will start now new interaction process to generate new steps to our steps tree. The slow way (Using Mouse): 1 - Click Interact to open the components browser 2 - Select the domain (Object Oriented Programming (OOP)) 3 - Select the component (Define Class Method) The fast way (Using Keyboard shortcuts): 1 - Get the component using its name by typing (Define Class Method) Note : Stop typing when you see the required component is selected
Fig. (20) Component Browser – Select the component (Define Class Method) After selecting the component click Ok or press ENTER
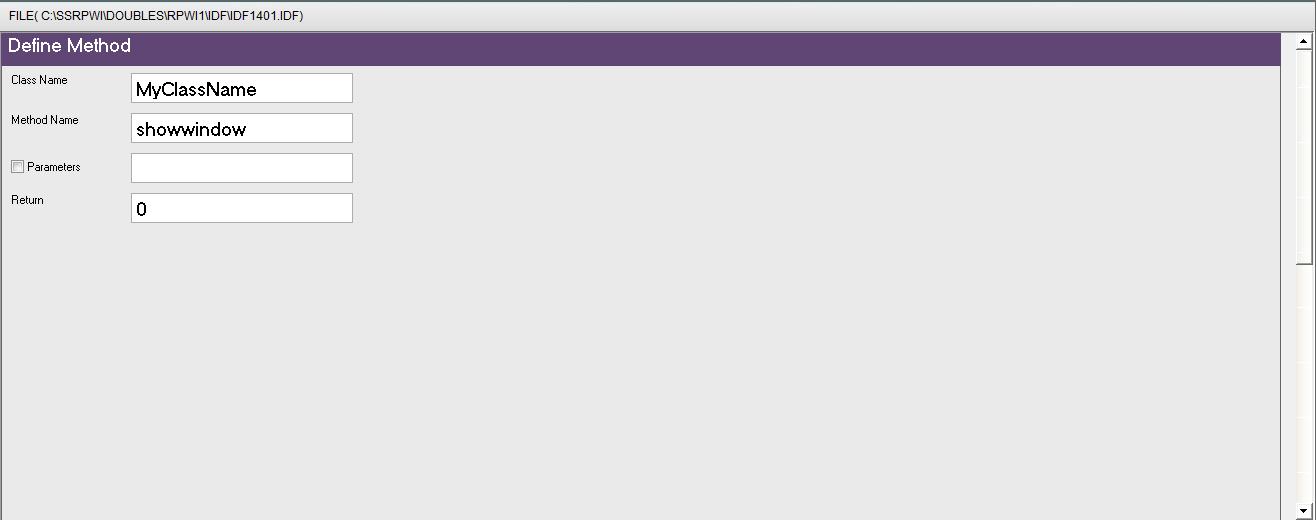
Fig. (21) Interaction page - Set the properties and enter the required data as in the image above
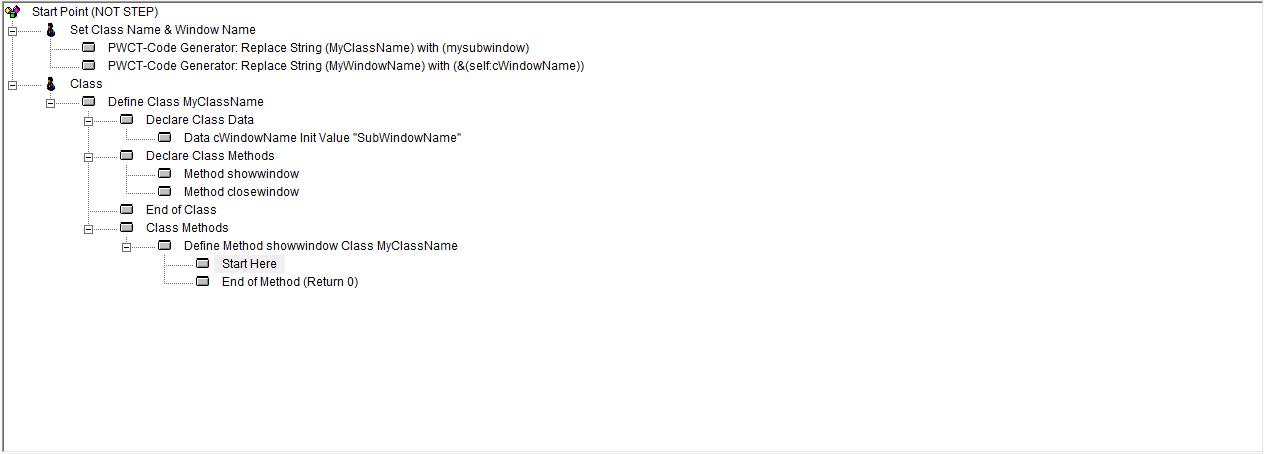
Fig. (22) Goal Desginer - Steps Tree Select the step (Start Here) We will start now new interaction process to generate new steps to our steps tree. The slow way (Using Mouse): 1 - Click Interact to open the components browser 2 - Select the domain (Windows) 3 - Select the component (Define New Window) The fast way (Using Keyboard shortcuts): 1 - Get the component using its name by typing (Define New Window) Note : Stop typing when you see the required component is selected
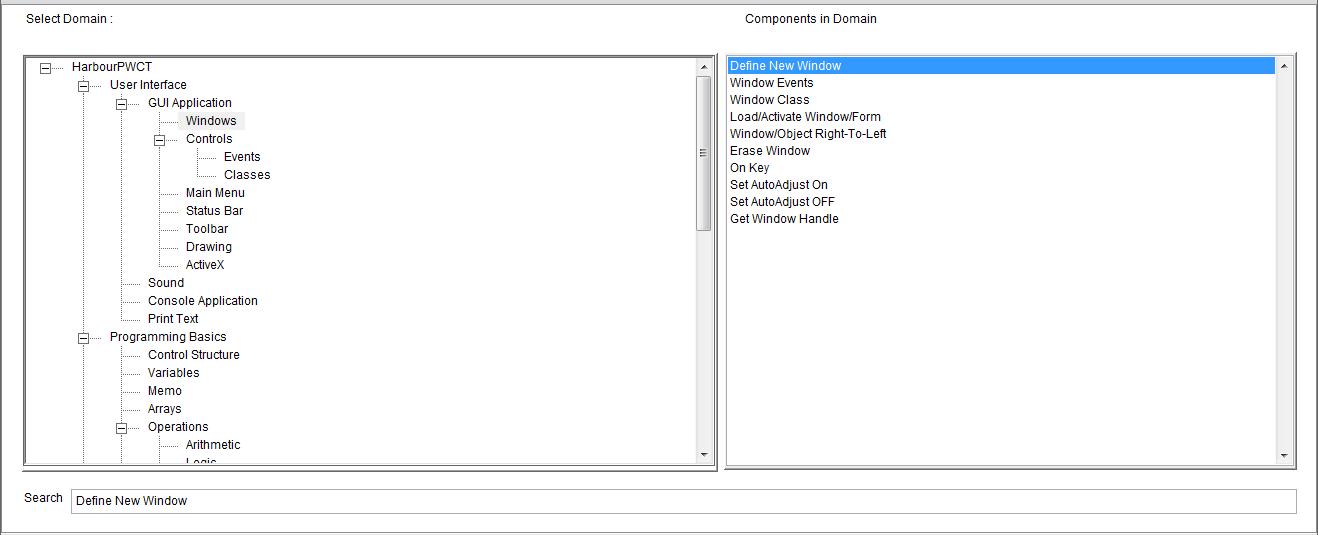
Fig. (23) Component Browser – Select the component (Define New Window) After selecting the component click Ok or press ENTER
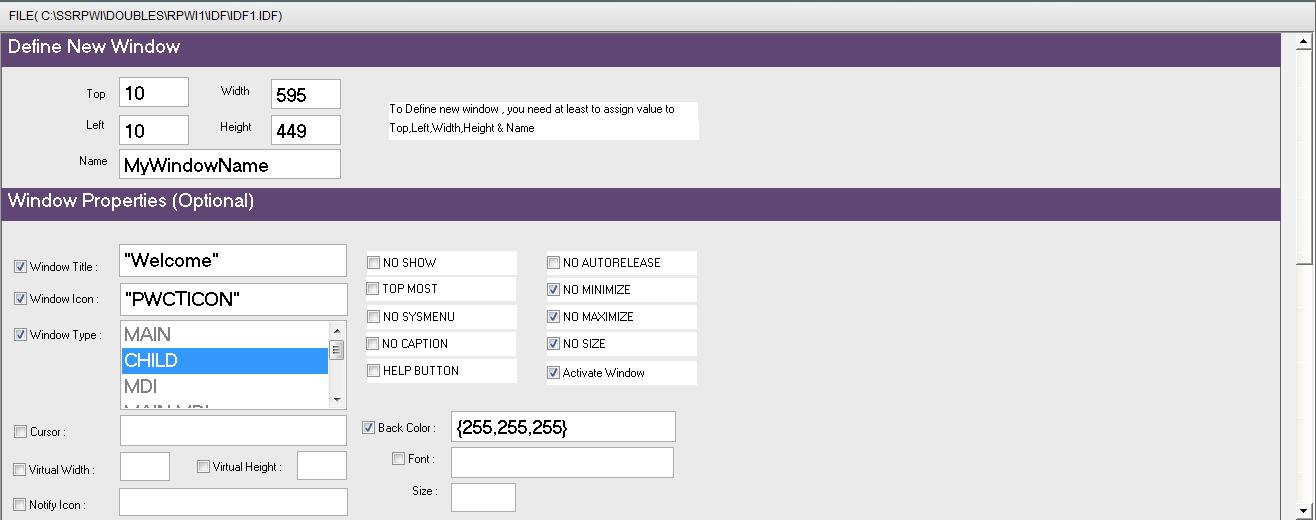
Fig. (24) Interaction page - Set the properties and enter the required data as in the image above
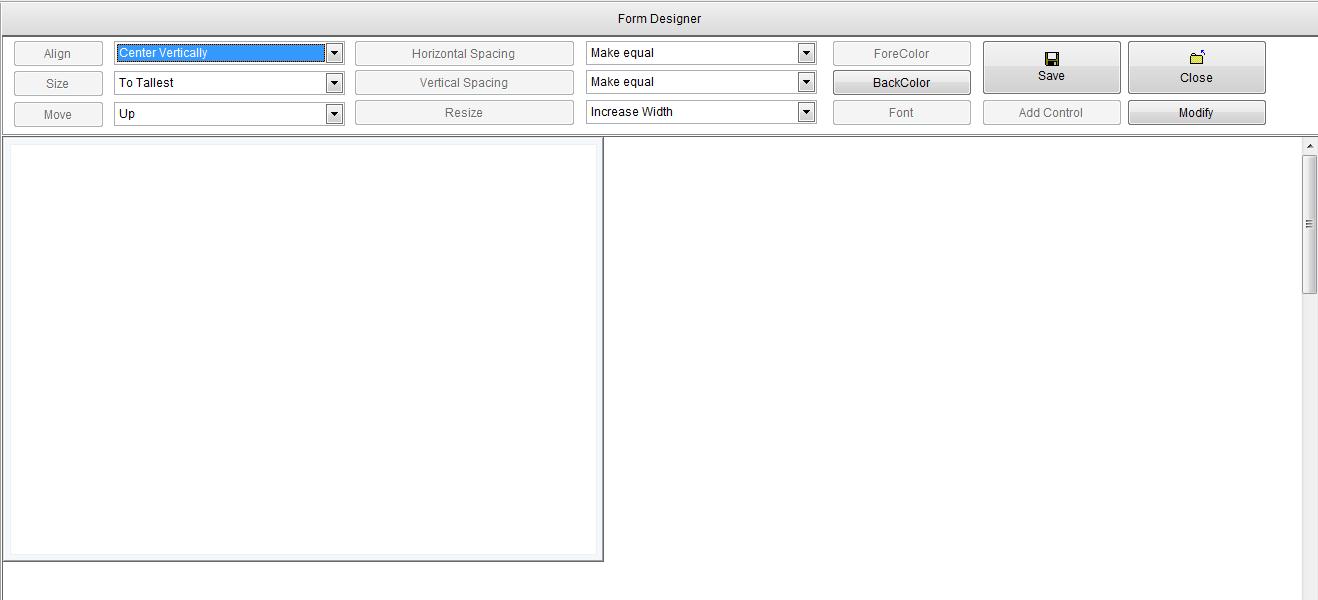
Fig. (25) Form Designer
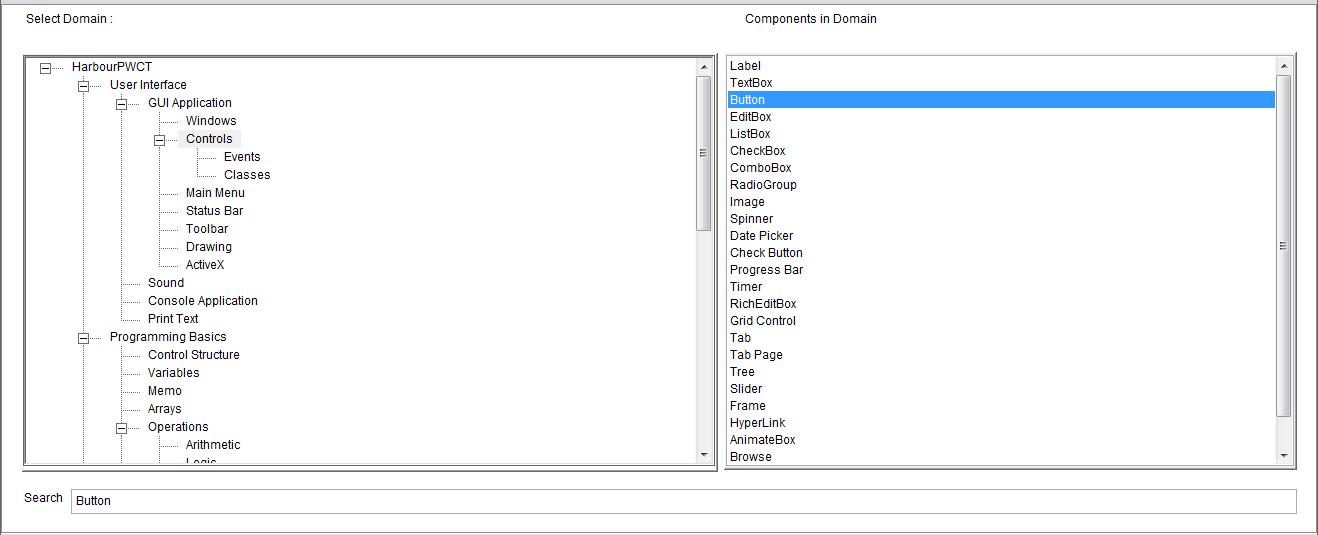
Fig. (26) Goal Desginer - Steps Tree Select the step (Window Controls) We will start now new interaction process to generate new steps to our steps tree. The slow way (Using Mouse): 1 - Click Interact to open the components browser 2 - Select the domain (Controls) 3 - Select the component (Button) The fast way (Using Keyboard shortcuts): 1 - Get the component using its name by typing (Button) Note : Stop typing when you see the required component is selected
Fig. (27) Component Browser – Select the component (Button) After selecting the component click Ok or press ENTER
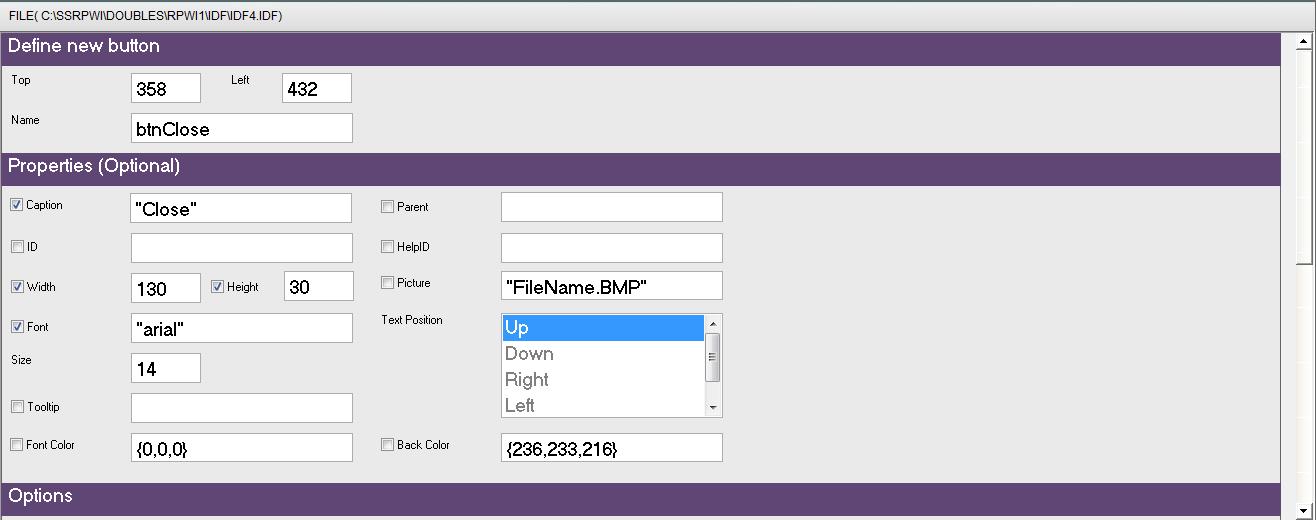
Fig. (28) Interaction page - Set the properties and enter the required data as in the image above
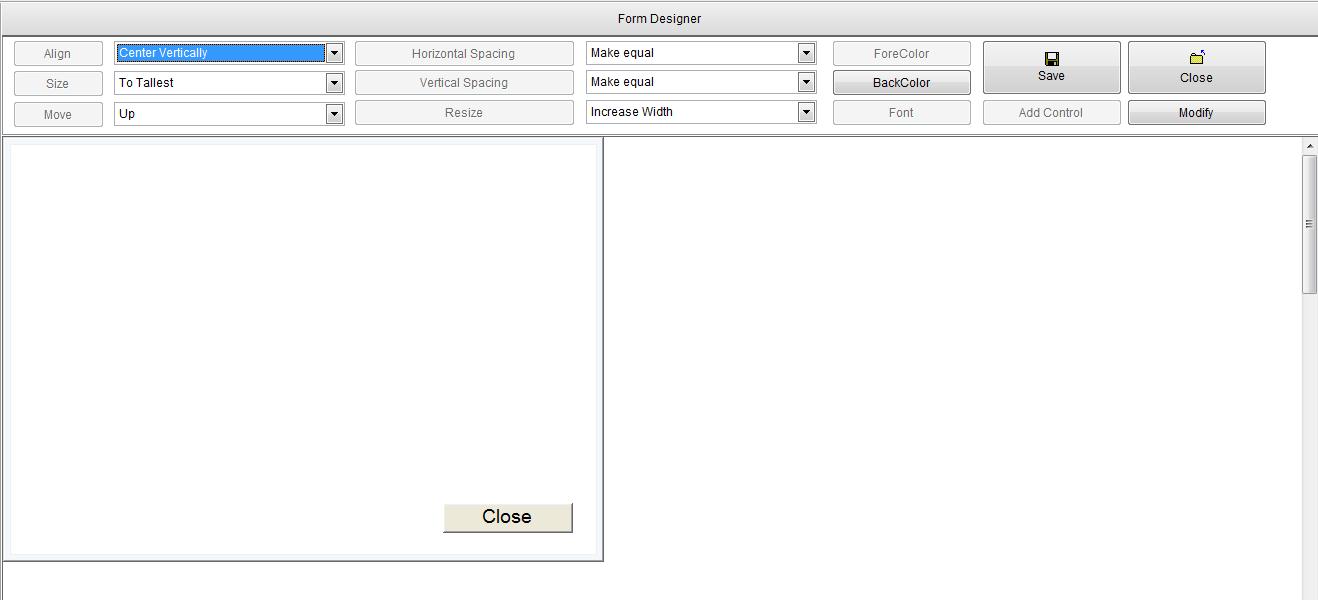
Fig. (29) Form Designer
Fig. (30) Goal Desginer - Steps Tree Select the step (Button Events) We will start now new interaction process to generate new steps to our steps tree. The slow way (Using Mouse): 1 - Click Interact to open the components browser 2 - Select the domain (Events) 3 - Select the component (Button Events) The fast way (Using Keyboard shortcuts): 1 - Get the component using its name by typing (Button Events) Note : Stop typing when you see the required component is selected
Fig. (31) Component Browser – Select the component (Button Events) After selecting the component click Ok or press ENTER
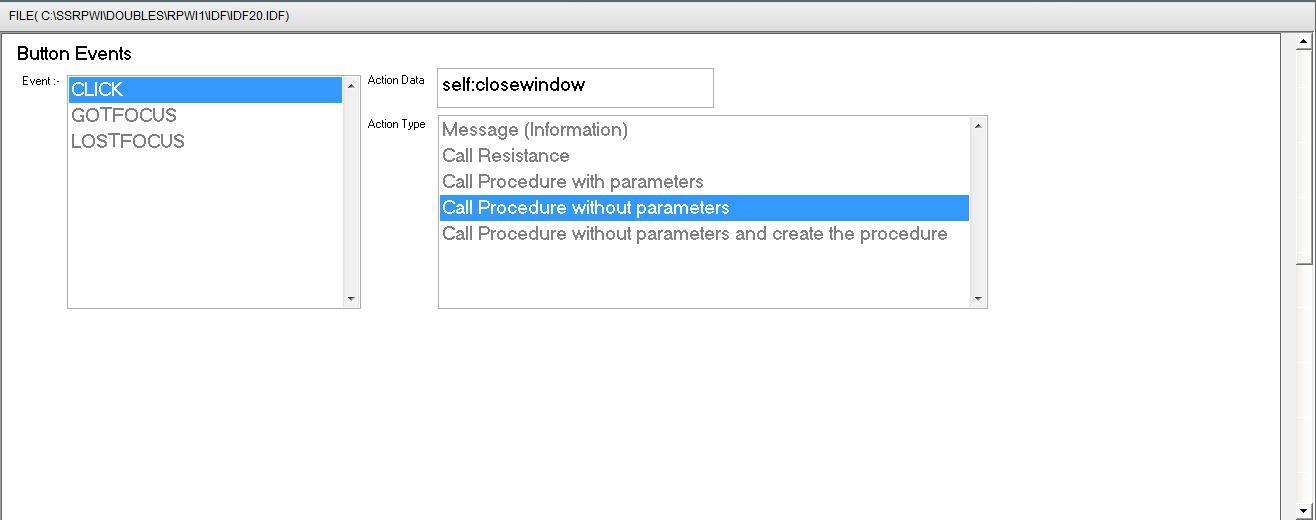
Fig. (32) Interaction page - Set the properties and enter the required data as in the image above
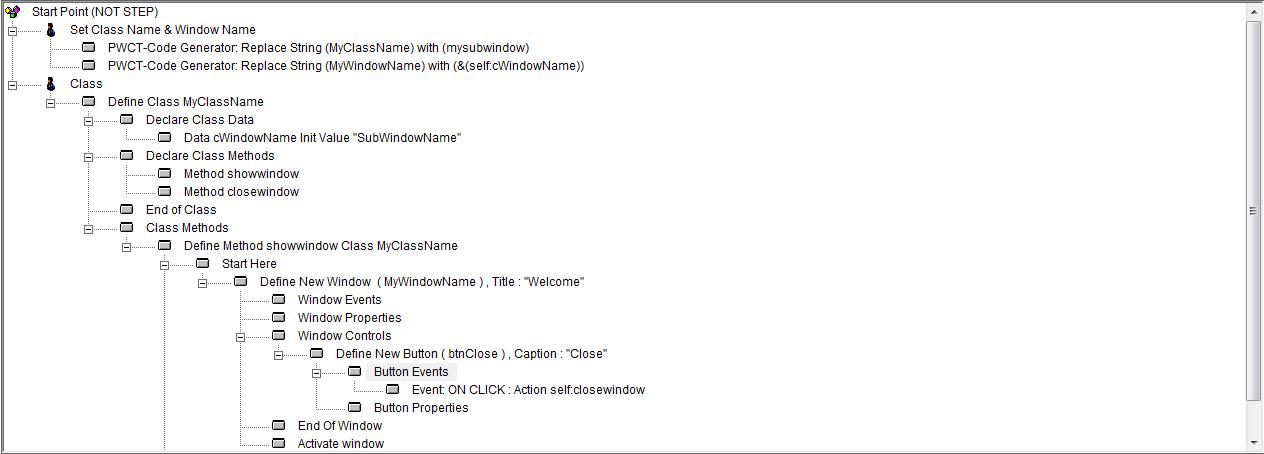
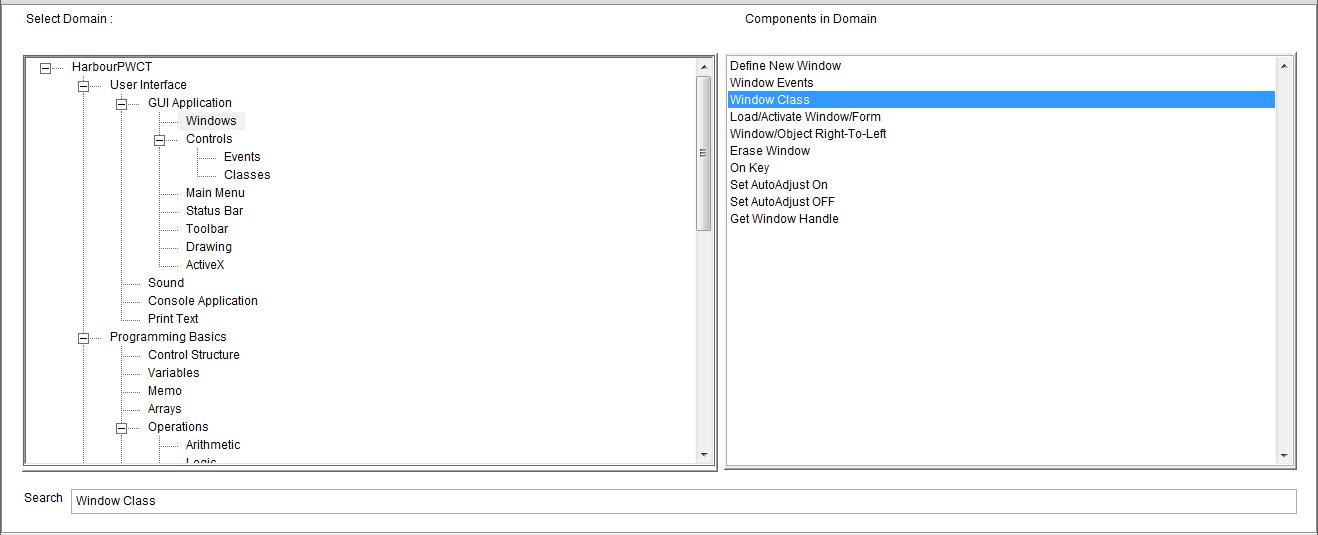
Fig. (33) Goal Desginer - Steps Tree Select the step (Define New Window ( MyWindowName ) , Title : "Welcome") We will start now new interaction process to generate new steps to our steps tree. The slow way (Using Mouse): 1 - Click Interact to open the components browser 2 - Select the domain (Windows) 3 - Select the component (Window Class) The fast way (Using Keyboard shortcuts): 1 - Get the component using its name by typing (Window Class) Note : Stop typing when you see the required component is selected
Fig. (34) Component Browser – Select the component (Window Class) After selecting the component click Ok or press ENTER
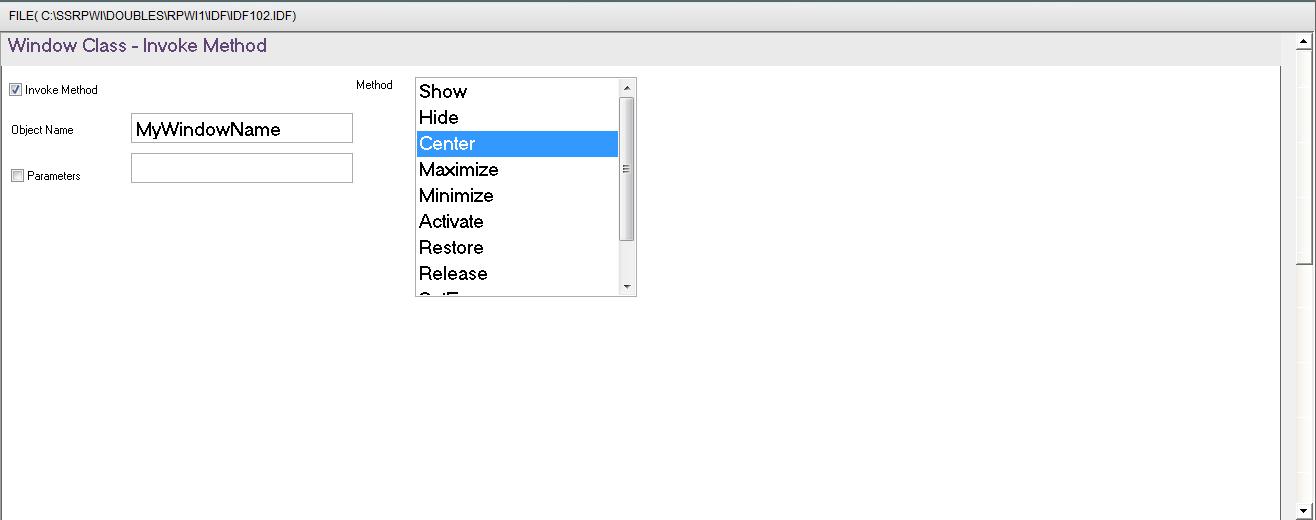
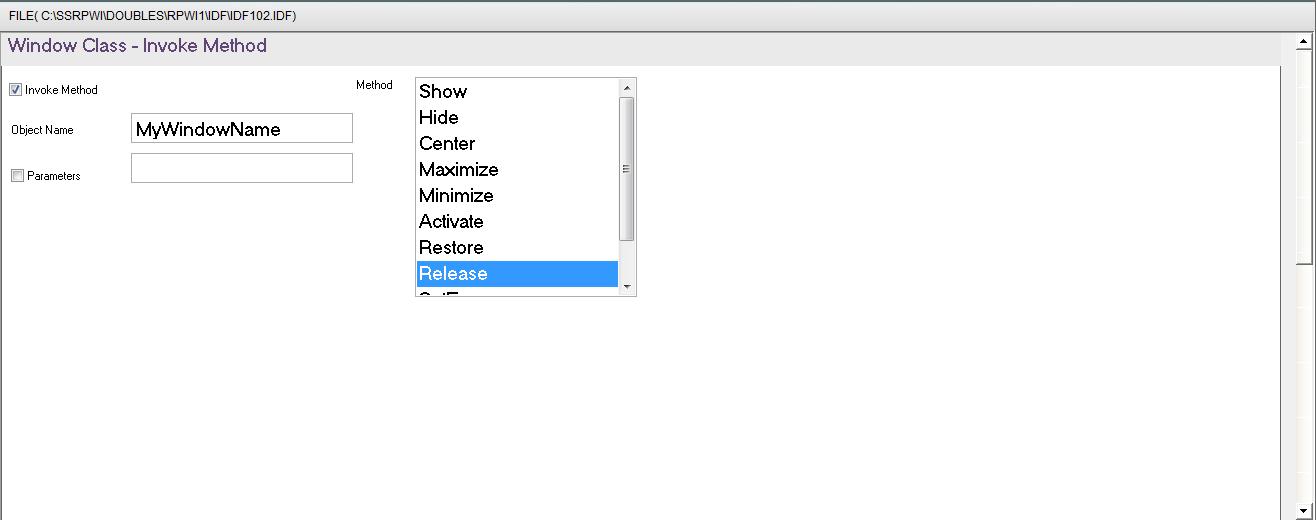
Fig. (35) Interaction page - Set the properties and enter the required data as in the image above
Fig. (36) Interaction page - Set the properties and enter the required data as in the image above
Fig. (37) Interaction page - Set the properties and enter the required data as in the image above
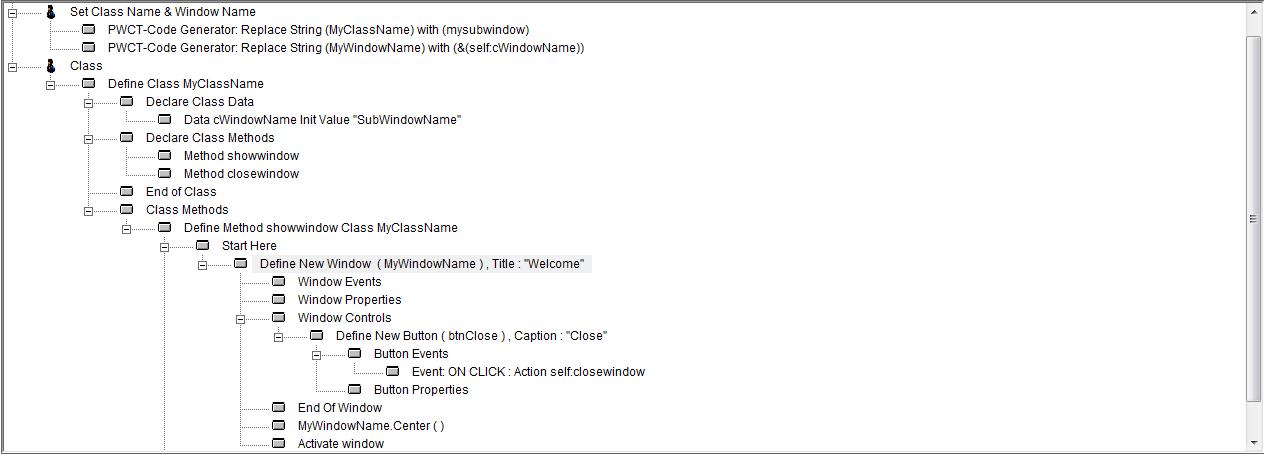
Fig. (38) Form Designer
Fig. (39) Goal Desginer - Steps Tree Select the step (Class Methods) We will start now new interaction process to generate new steps to our steps tree. The slow way (Using Mouse): 1 - Click Interact to open the components browser 2 - Select the domain (Object Oriented Programming (OOP)) 3 - Select the component (Define Class Method) The fast way (Using Keyboard shortcuts): 1 - Get the component using its name by typing (Define Class Method) Note : Stop typing when you see the required component is selected
Fig. (40) Component Browser – Select the component (Define Class Method) After selecting the component click Ok or press ENTER
Fig. (41) Interaction page - Set the properties and enter the required data as in the image above
Fig. (42) Goal Desginer - Steps Tree Select the step (Start Here) We will start now new interaction process to generate new steps to our steps tree. The slow way (Using Mouse): 1 - Click Interact to open the components browser 2 - Select the domain (Windows) 3 - Select the component (Window Class) The fast way (Using Keyboard shortcuts): 1 - Get the component using its name by typing (Window Class) Note : Stop typing when you see the required component is selected
Fig. (43) Component Browser – Select the component (Window Class) After selecting the component click Ok or press ENTER
Fig. (44) Interaction page - Set the properties and enter the required data as in the image above
Fig. (45) Interaction page - Set the properties and enter the required data as in the image above
Fig. (46) Interaction page - Set the properties and enter the required data as in the image above
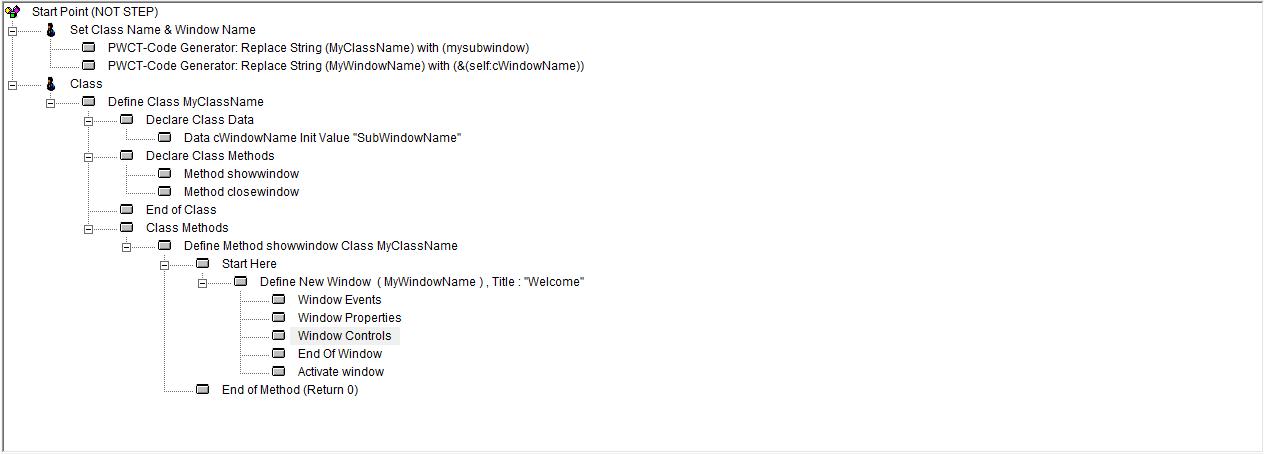
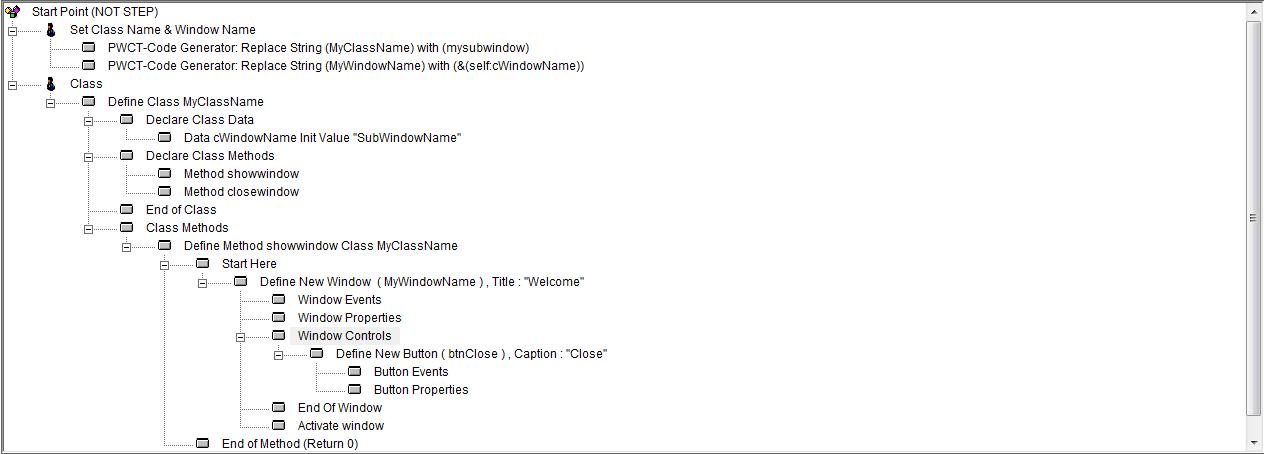
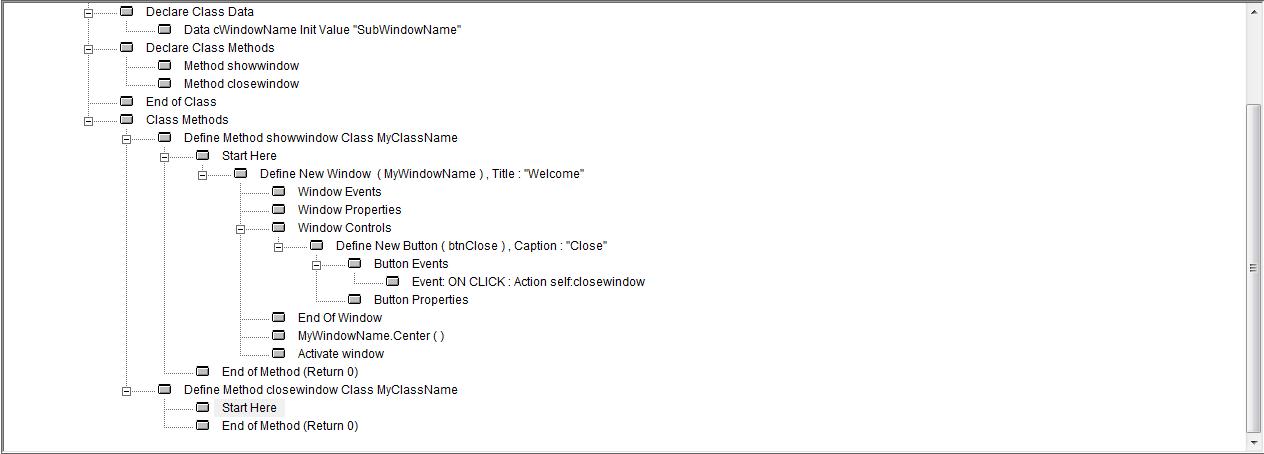
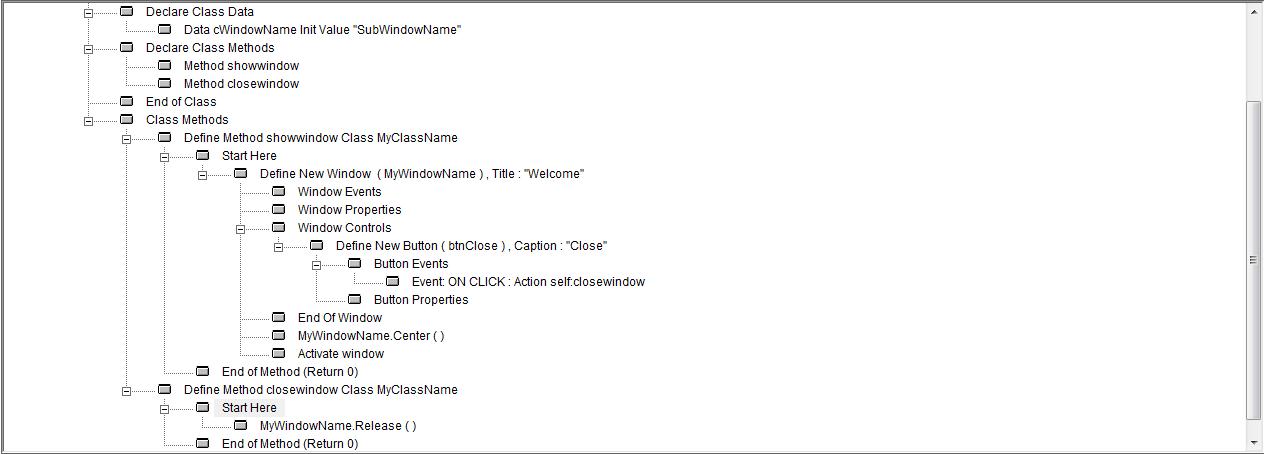
Fig. (47) Goal Desginer - Final Steps Tree 3 - Final Steps Tree Set Class Name & Window Name PWCT-Code Generator: Replace String (MyClassName) with (mysubwindow) PWCT-Code Generator: Replace String (MyWindowName) with (&(self:cWindowName)) Class Define Class MyClassName Declare Class Data Data cWindowName Init Value "SubWindowName" Declare Class Methods Method showwindow Method closewindow End of Class Class Methods Define Method showwindow Class MyClassName Start Here Define New Window ( MyWindowName ) , Title : "Welcome" Window Events Window Properties Window Controls Define New Button ( btnClose ) , Caption : "Close" Button Events Event: ON CLICK : Action self:closewindow Button Properties End Of Window MyWindowName.Center ( ) Activate window End of Method (Return 0) Define Method closewindow Class MyClassName Start Here MyWindowName.Release ( ) End of Method (Return 0)
|