|
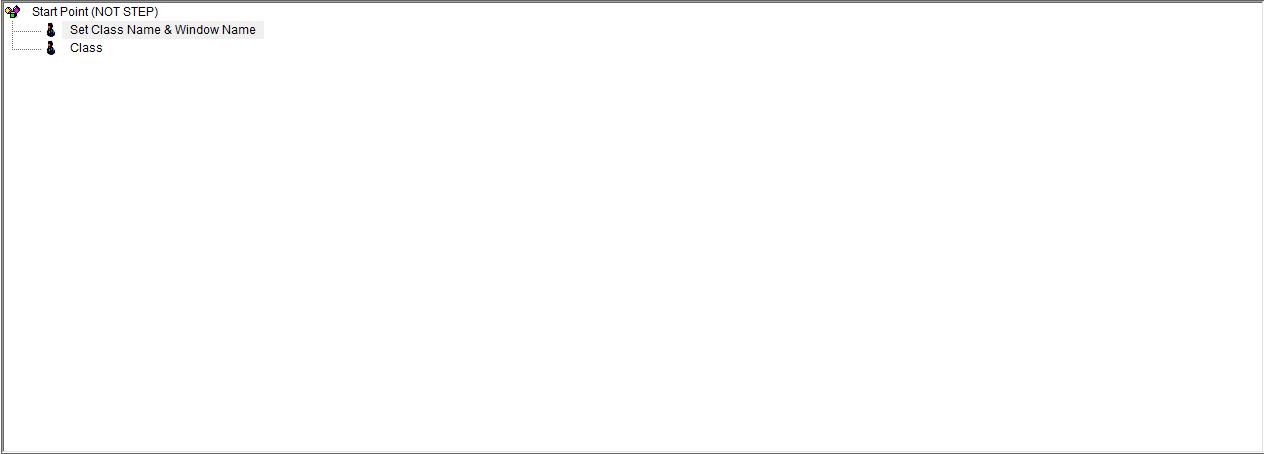
PWCT 1.9 Art Documentation ( https://doublesvsoop.sourceforge.net ) Free and Open-Source Software ( GNU General Public License ) _____________________________________________________________________________________ Table of contents 1 - Introduction 2 - Implementation steps 3 - Final Steps Tree 1 - Introduction In this lesson we are going to create (Access Report With Filter - Child Class) template. 2 - Implementation Steps
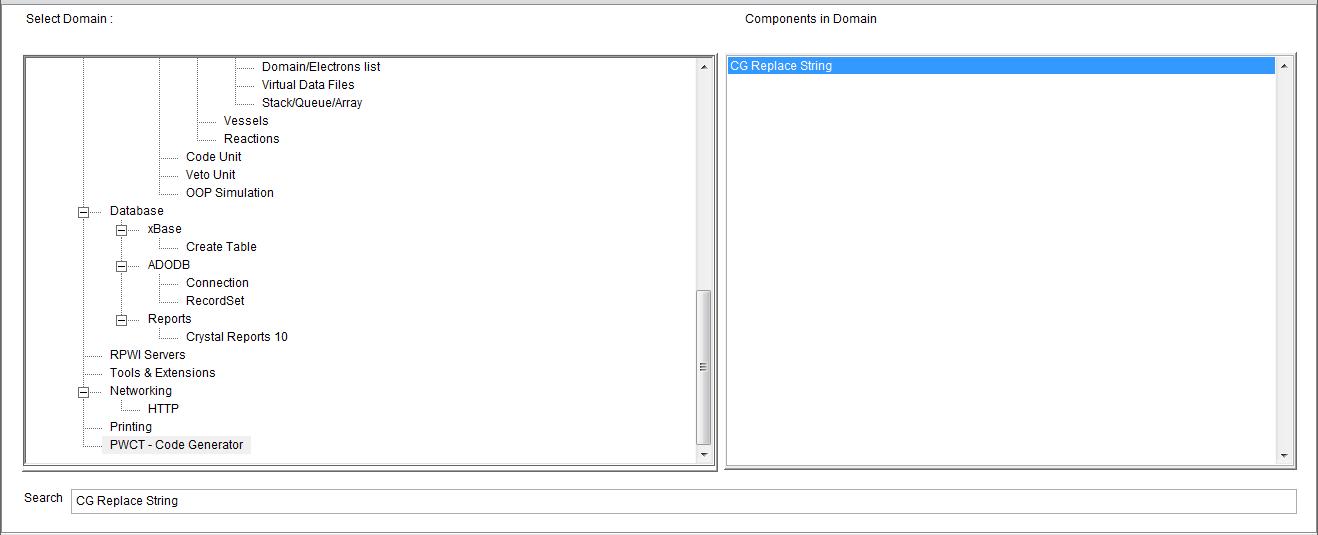
Fig. (1) Goal Desginer - Steps Tree Select the step (Set Class Name & Window Name) We will start now new interaction process to generate new steps to our steps tree. The slow way (Using Mouse): 1 - Click Interact to open the components browser 2 - Select the domain (PWCT - Code Generator) 3 - Select the component (CG Replace String) The fast way (Using Keyboard shortcuts): 1 - Get the component using its name by typing (CG Replace String) Note : Stop typing when you see the required component is selected
Fig. (2) Component Browser – Select the component (CG Replace String) After selecting the component click Ok or press ENTER
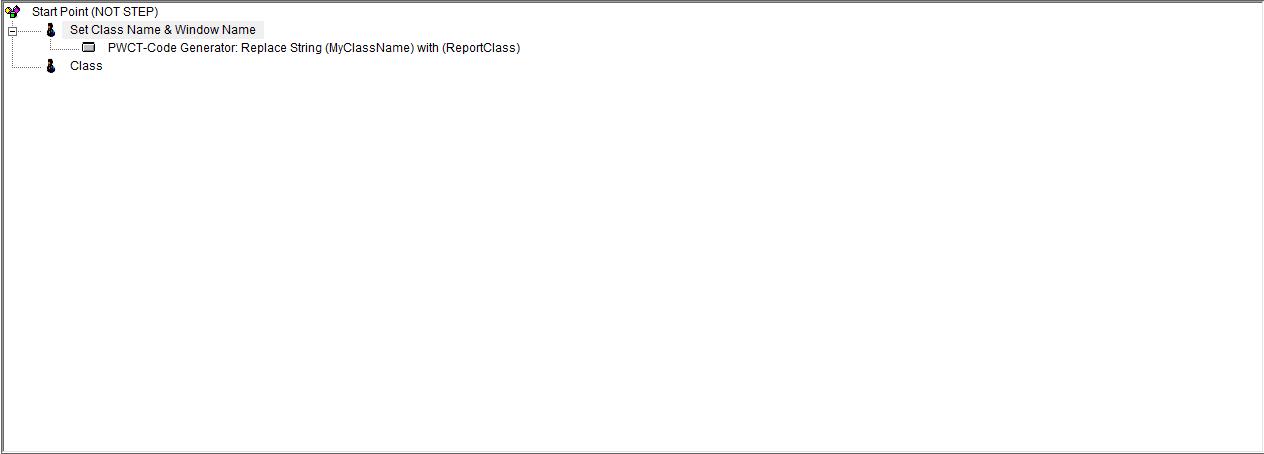
Fig. (3) Interaction page - Set the properties and enter the required data as in the image above
Fig. (4) Goal Desginer - Steps Tree Select the step (Set Class Name & Window Name) We will start now new interaction process to generate new steps to our steps tree. The slow way (Using Mouse): 1 - Click Interact to open the components browser 2 - Select the domain (PWCT - Code Generator) 3 - Select the component (CG Replace String) The fast way (Using Keyboard shortcuts): 1 - Get the component using its name by typing (CG Replace String) Note : Stop typing when you see the required component is selected
Fig. (5) Component Browser – Select the component (CG Replace String) After selecting the component click Ok or press ENTER
Fig. (6) Interaction page - Set the properties and enter the required data as in the image above
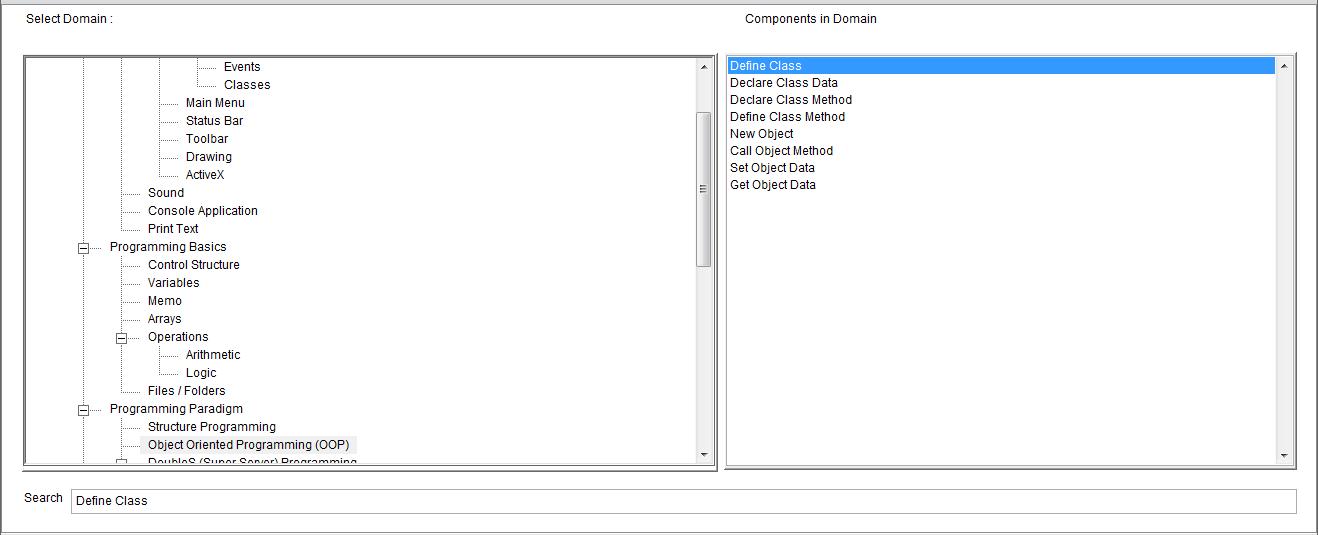
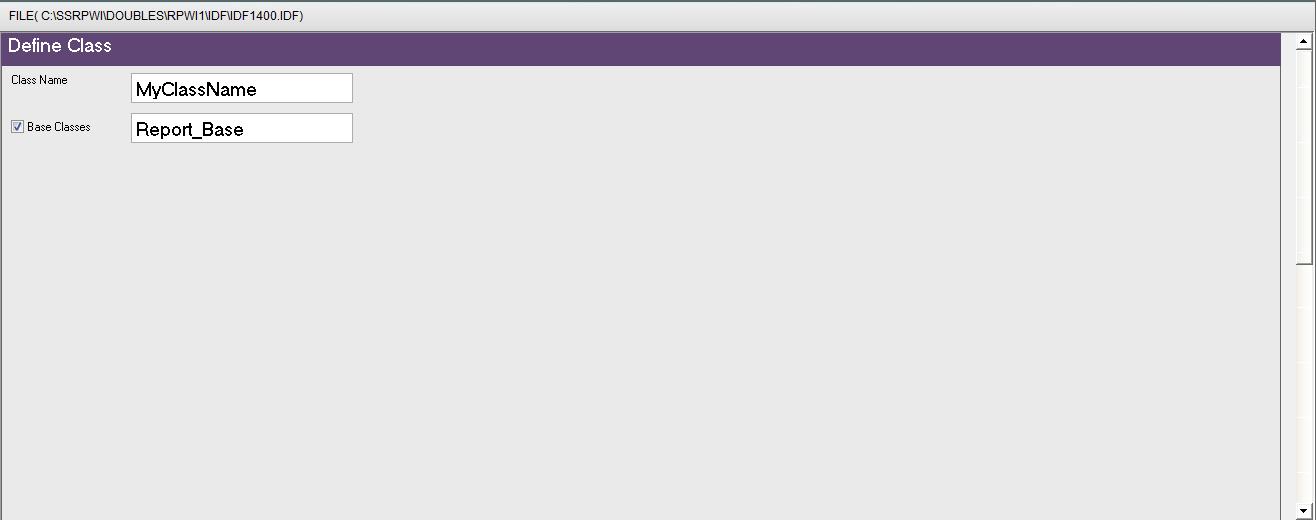
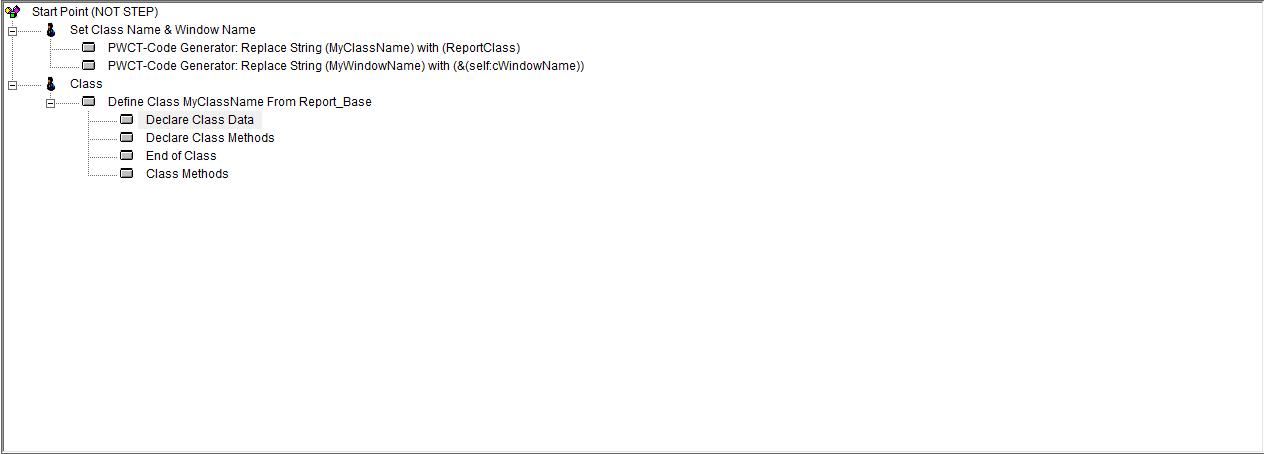
Fig. (7) Goal Desginer - Steps Tree Select the step (Class) We will start now new interaction process to generate new steps to our steps tree. The slow way (Using Mouse): 1 - Click Interact to open the components browser 2 - Select the domain (Object Oriented Programming (OOP)) 3 - Select the component (Define Class) The fast way (Using Keyboard shortcuts): 1 - Get the component using its name by typing (Define Class) Note : Stop typing when you see the required component is selected
Fig. (8) Component Browser – Select the component (Define Class) After selecting the component click Ok or press ENTER
Fig. (9) Interaction page - Set the properties and enter the required data as in the image above
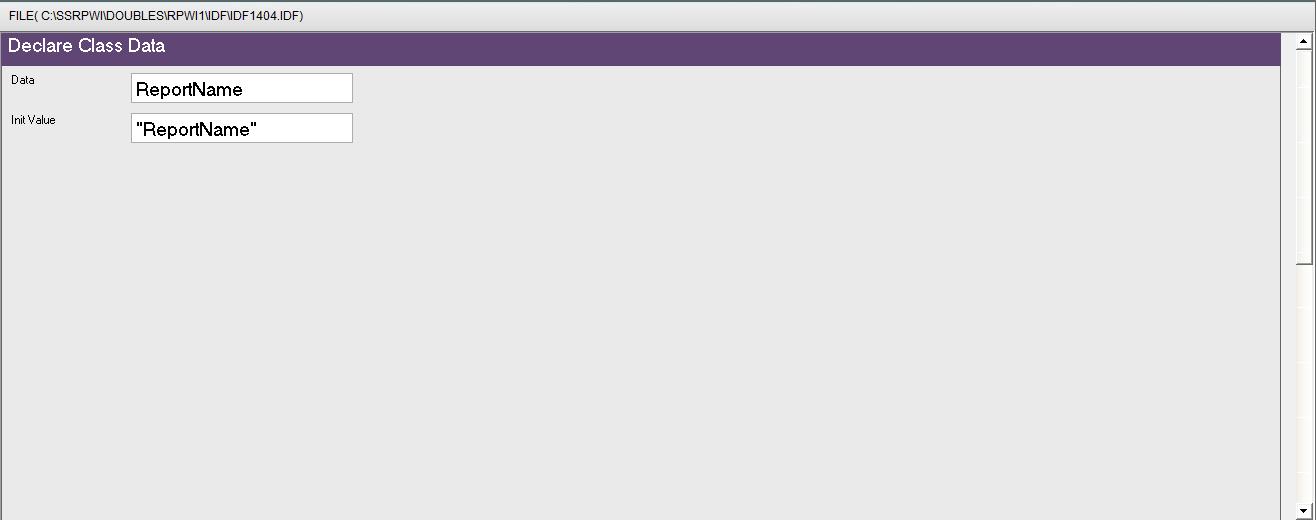
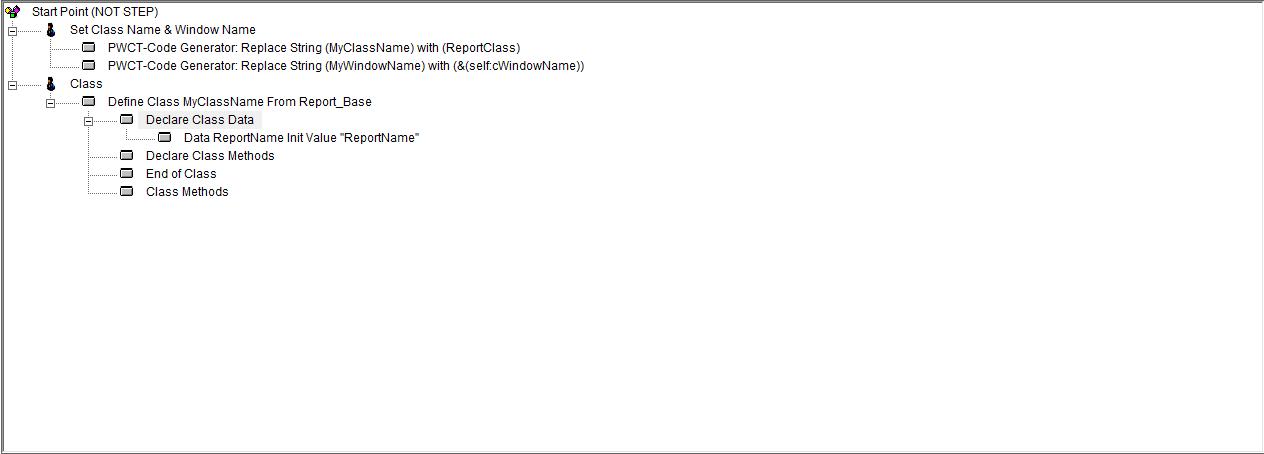
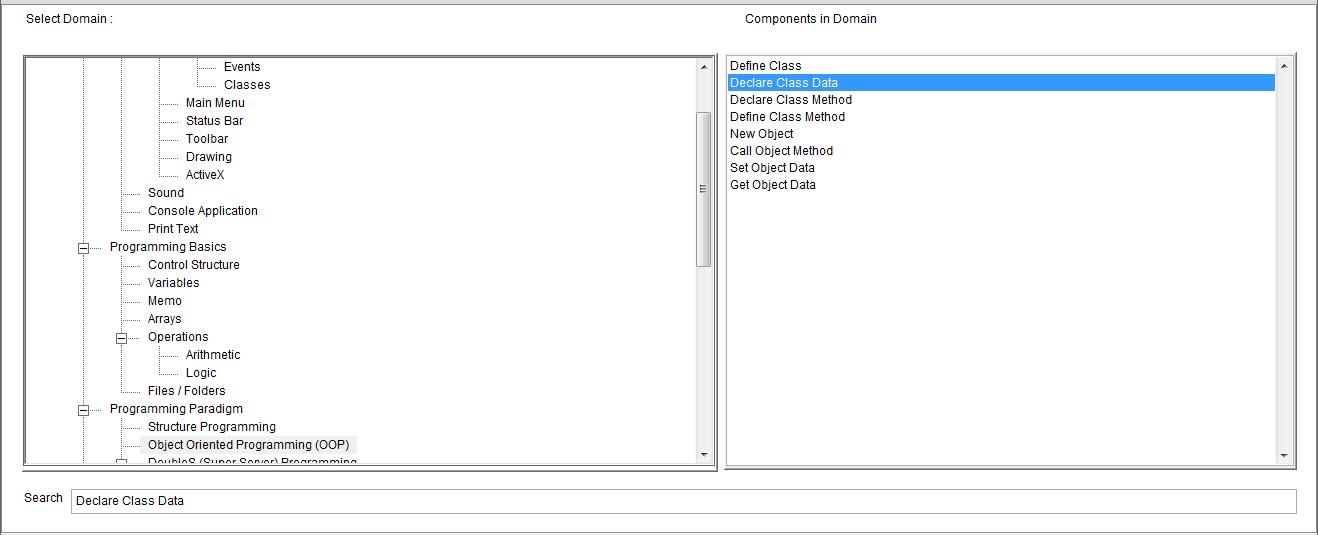
Fig. (10) Goal Desginer - Steps Tree Select the step (Declare Class Data) We will start now new interaction process to generate new steps to our steps tree. The slow way (Using Mouse): 1 - Click Interact to open the components browser 2 - Select the domain (Object Oriented Programming (OOP)) 3 - Select the component (Declare Class Data) The fast way (Using Keyboard shortcuts): 1 - Get the component using its name by typing (Declare Class Data) Note : Stop typing when you see the required component is selected
Fig. (11) Component Browser – Select the component (Declare Class Data) After selecting the component click Ok or press ENTER
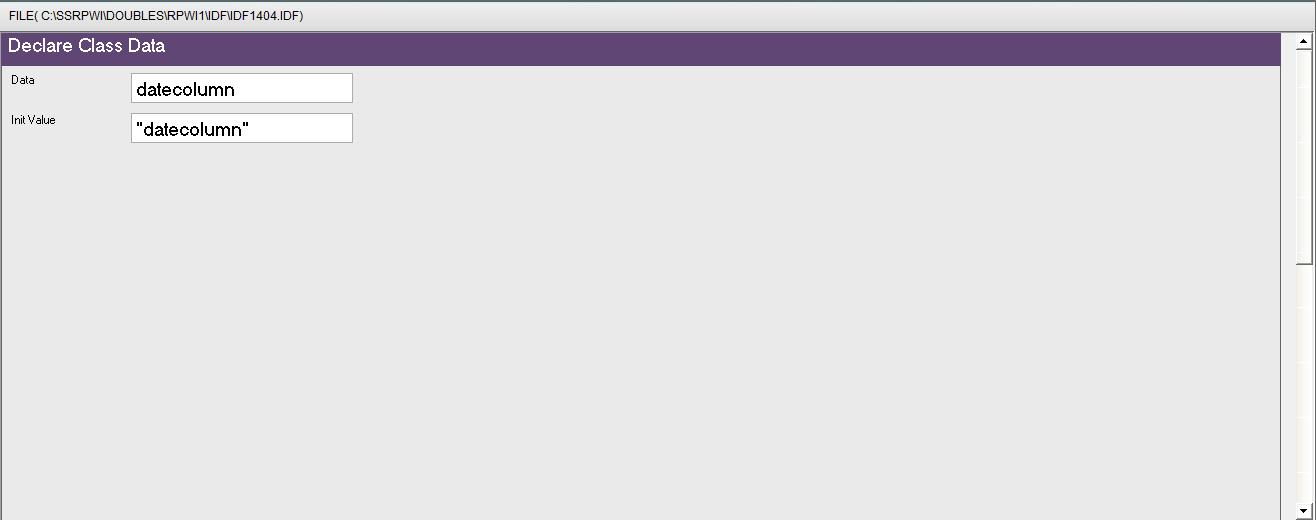
Fig. (12) Interaction page - Set the properties and enter the required data as in the image above
Fig. (13) Goal Desginer - Steps Tree Select the step (Declare Class Data) We will start now new interaction process to generate new steps to our steps tree. The slow way (Using Mouse): 1 - Click Interact to open the components browser 2 - Select the domain (Object Oriented Programming (OOP)) 3 - Select the component (Declare Class Data) The fast way (Using Keyboard shortcuts): 1 - Get the component using its name by typing (Declare Class Data) Note : Stop typing when you see the required component is selected
Fig. (14) Component Browser – Select the component (Declare Class Data) After selecting the component click Ok or press ENTER
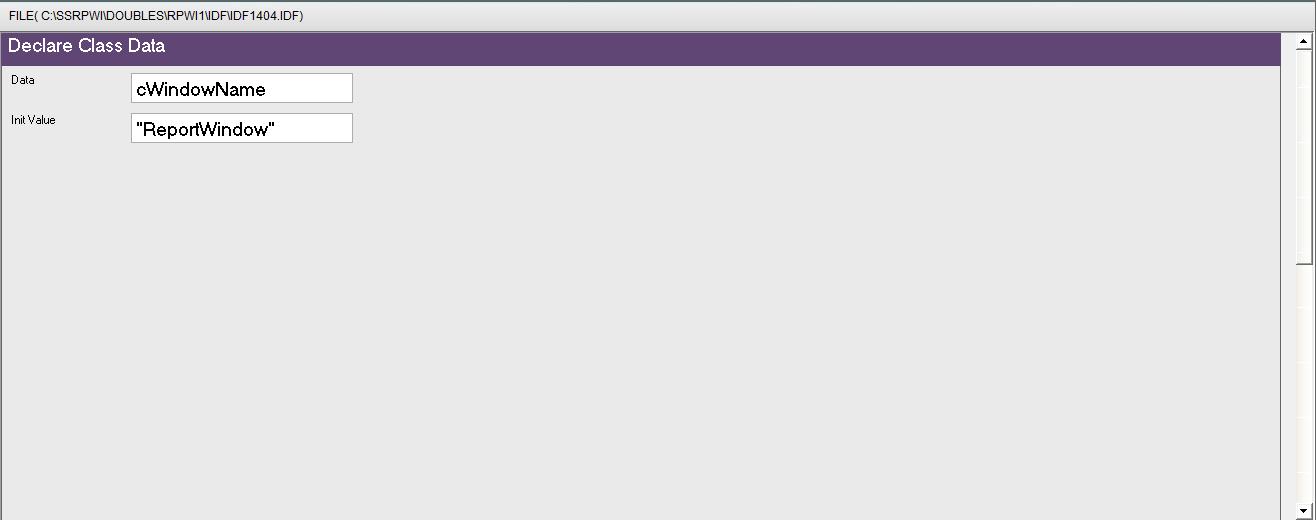
Fig. (15) Interaction page - Set the properties and enter the required data as in the image above
Fig. (16) Goal Desginer - Steps Tree Select the step (Declare Class Data) We will start now new interaction process to generate new steps to our steps tree. The slow way (Using Mouse): 1 - Click Interact to open the components browser 2 - Select the domain (Object Oriented Programming (OOP)) 3 - Select the component (Declare Class Data) The fast way (Using Keyboard shortcuts): 1 - Get the component using its name by typing (Declare Class Data) Note : Stop typing when you see the required component is selected
Fig. (17) Component Browser – Select the component (Declare Class Data) After selecting the component click Ok or press ENTER
Fig. (18) Interaction page - Set the properties and enter the required data as in the image above
Fig. (19) Goal Desginer - Steps Tree Select the step (Declare Class Data) We will start now new interaction process to generate new steps to our steps tree. The slow way (Using Mouse): 1 - Click Interact to open the components browser 2 - Select the domain (Object Oriented Programming (OOP)) 3 - Select the component (Declare Class Data) The fast way (Using Keyboard shortcuts): 1 - Get the component using its name by typing (Declare Class Data) Note : Stop typing when you see the required component is selected
Fig. (20) Component Browser – Select the component (Declare Class Data) After selecting the component click Ok or press ENTER
Fig. (21) Interaction page - Set the properties and enter the required data as in the image above
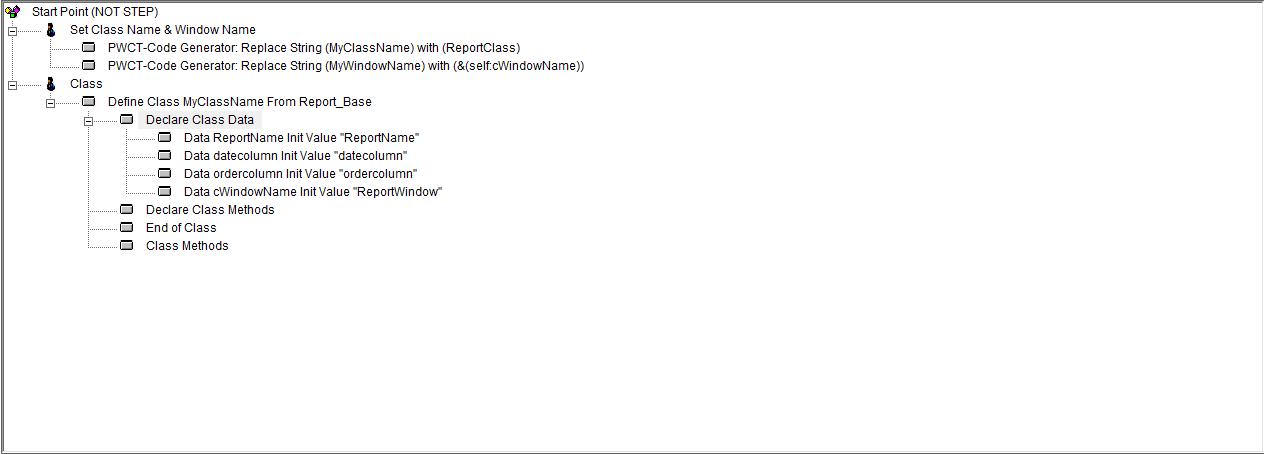
Fig. (22) Goal Desginer - Steps Tree Select the step (Declare Class Methods) We will start now new interaction process to generate new steps to our steps tree. The slow way (Using Mouse): 1 - Click Interact to open the components browser 2 - Select the domain (Object Oriented Programming (OOP)) 3 - Select the component (Declare Class Method) The fast way (Using Keyboard shortcuts): 1 - Get the component using its name by typing (Declare Class Method) Note : Stop typing when you see the required component is selected
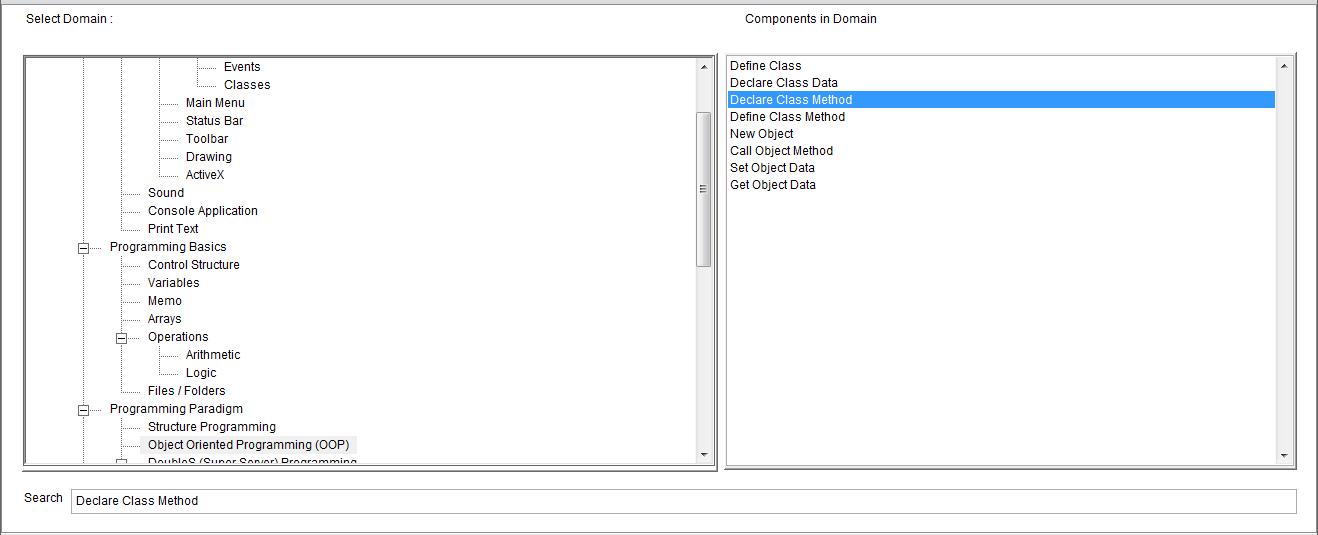
Fig. (23) Component Browser – Select the component (Declare Class Method) After selecting the component click Ok or press ENTER
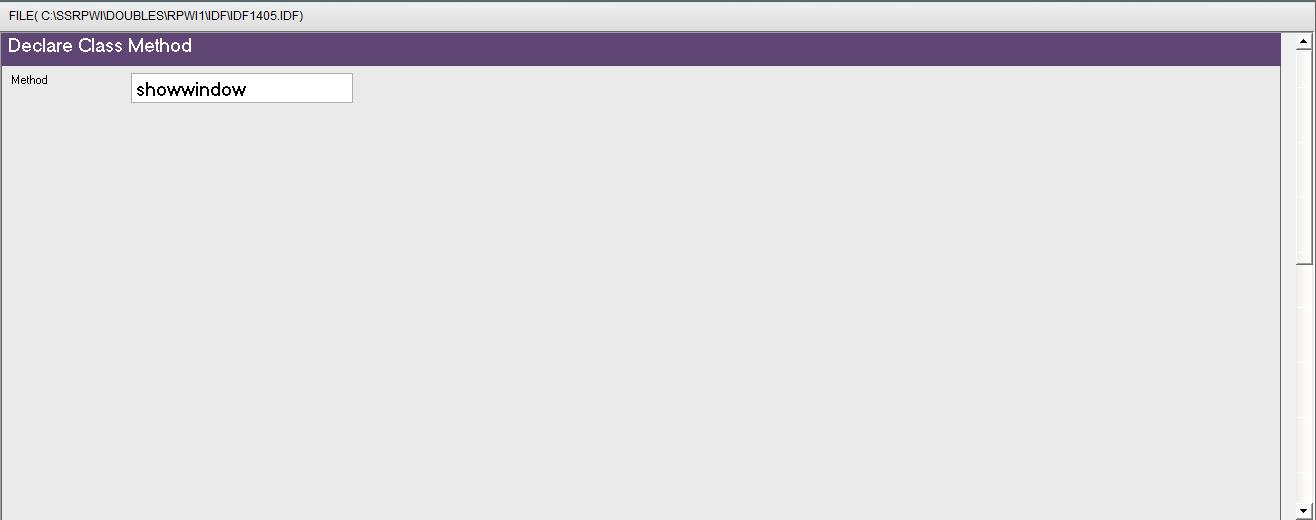
Fig. (24) Interaction page - Set the properties and enter the required data as in the image above
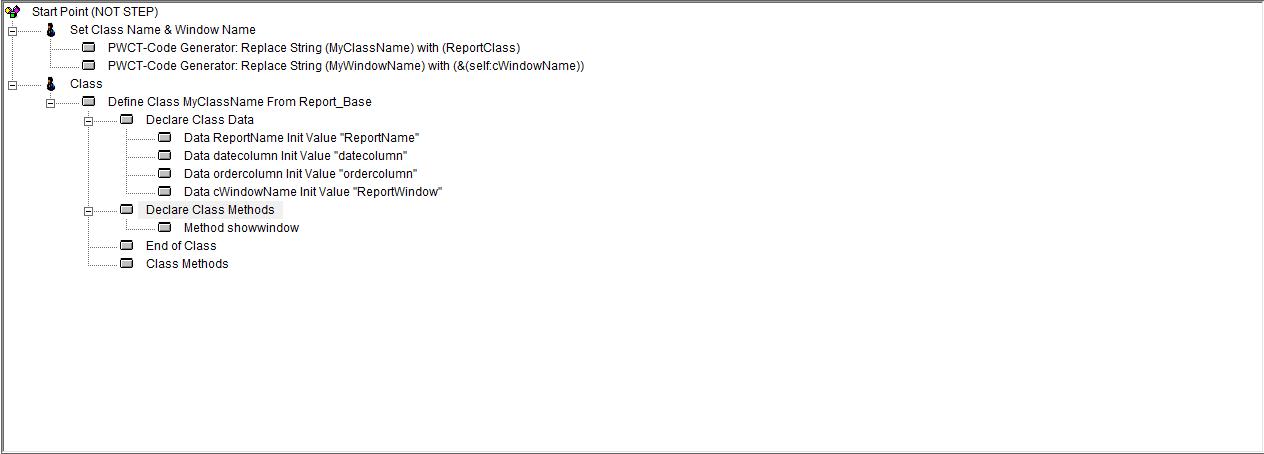
Fig. (25) Goal Desginer - Steps Tree Select the step (Declare Class Methods) We will start now new interaction process to generate new steps to our steps tree. The slow way (Using Mouse): 1 - Click Interact to open the components browser 2 - Select the domain (Object Oriented Programming (OOP)) 3 - Select the component (Declare Class Method) The fast way (Using Keyboard shortcuts): 1 - Get the component using its name by typing (Declare Class Method) Note : Stop typing when you see the required component is selected
Fig. (26) Component Browser – Select the component (Declare Class Method) After selecting the component click Ok or press ENTER
Fig. (27) Interaction page - Set the properties and enter the required data as in the image above
Fig. (28) Goal Desginer - Steps Tree Select the step (Declare Class Methods) We will start now new interaction process to generate new steps to our steps tree. The slow way (Using Mouse): 1 - Click Interact to open the components browser 2 - Select the domain (Object Oriented Programming (OOP)) 3 - Select the component (Declare Class Method) The fast way (Using Keyboard shortcuts): 1 - Get the component using its name by typing (Declare Class Method) Note : Stop typing when you see the required component is selected
Fig. (29) Component Browser – Select the component (Declare Class Method) After selecting the component click Ok or press ENTER
Fig. (30) Interaction page - Set the properties and enter the required data as in the image above
Fig. (31) Goal Desginer - Steps Tree Select the step (Declare Class Methods) We will start now new interaction process to generate new steps to our steps tree. The slow way (Using Mouse): 1 - Click Interact to open the components browser 2 - Select the domain (Object Oriented Programming (OOP)) 3 - Select the component (Declare Class Method) The fast way (Using Keyboard shortcuts): 1 - Get the component using its name by typing (Declare Class Method) Note : Stop typing when you see the required component is selected
Fig. (32) Component Browser – Select the component (Declare Class Method) After selecting the component click Ok or press ENTER
Fig. (33) Interaction page - Set the properties and enter the required data as in the image above
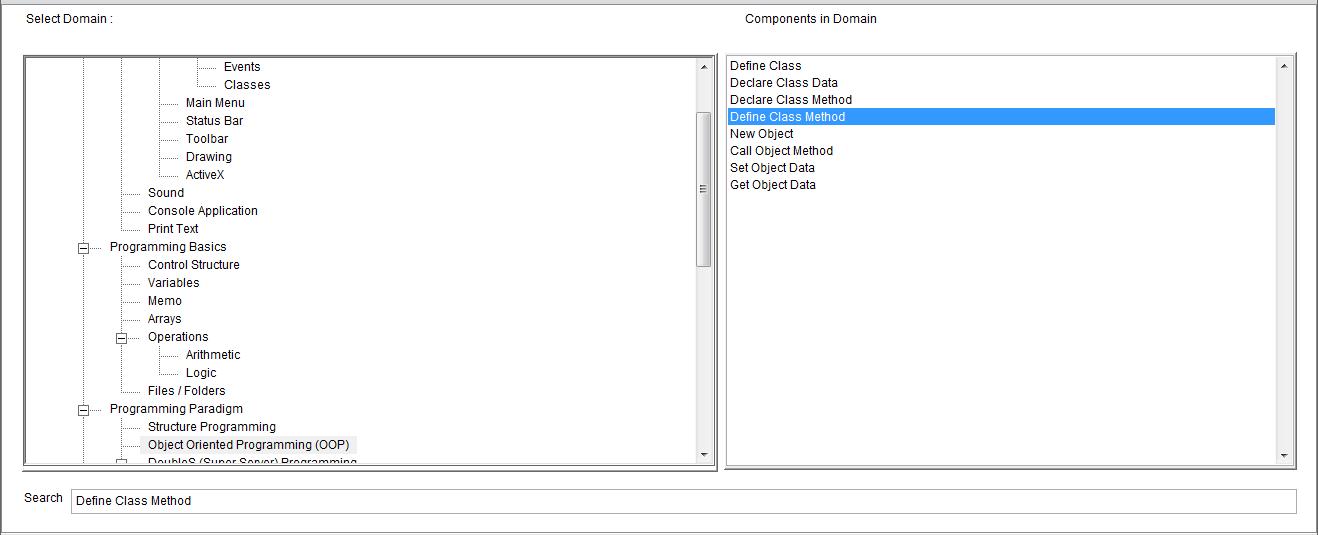
Fig. (34) Goal Desginer - Steps Tree Select the step (Class Methods) We will start now new interaction process to generate new steps to our steps tree. The slow way (Using Mouse): 1 - Click Interact to open the components browser 2 - Select the domain (Object Oriented Programming (OOP)) 3 - Select the component (Define Class Method) The fast way (Using Keyboard shortcuts): 1 - Get the component using its name by typing (Define Class Method) Note : Stop typing when you see the required component is selected
Fig. (35) Component Browser – Select the component (Define Class Method) After selecting the component click Ok or press ENTER
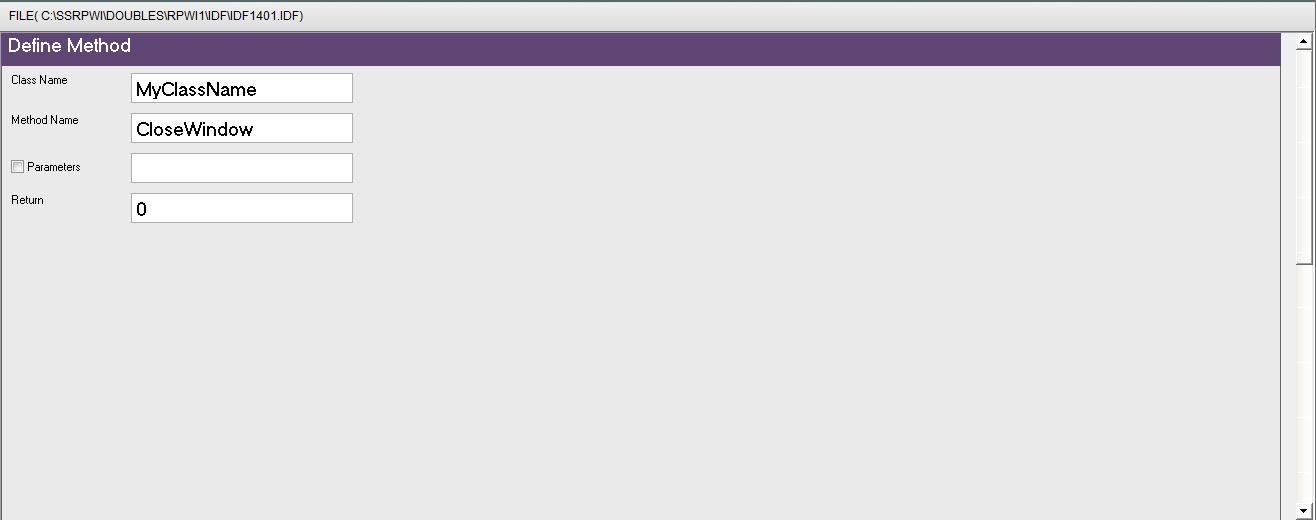
Fig. (36) Interaction page - Set the properties and enter the required data as in the image above
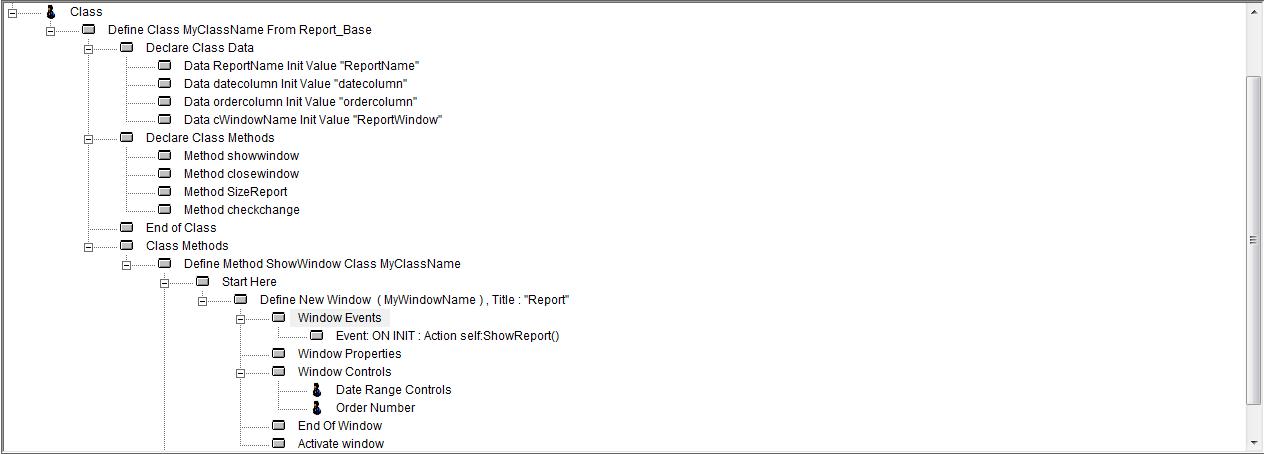
Fig. (37) Goal Desginer - Steps Tree Select the step (Start Here) We will start now new interaction process to generate new steps to our steps tree. The slow way (Using Mouse): 1 - Click Interact to open the components browser 2 - Select the domain (Windows) 3 - Select the component (Define New Window) The fast way (Using Keyboard shortcuts): 1 - Get the component using its name by typing (Define New Window) Note : Stop typing when you see the required component is selected
Fig. (38) Component Browser – Select the component (Define New Window) After selecting the component click Ok or press ENTER
Fig. (39) Interaction page - Set the properties and enter the required data as in the image above
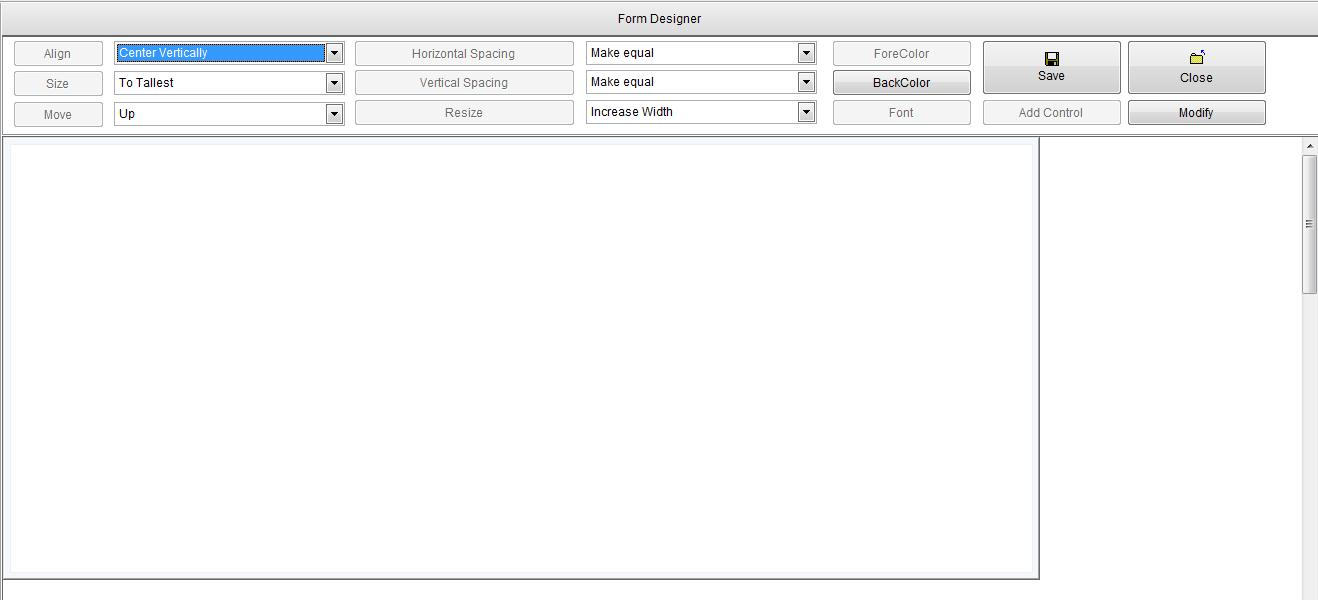
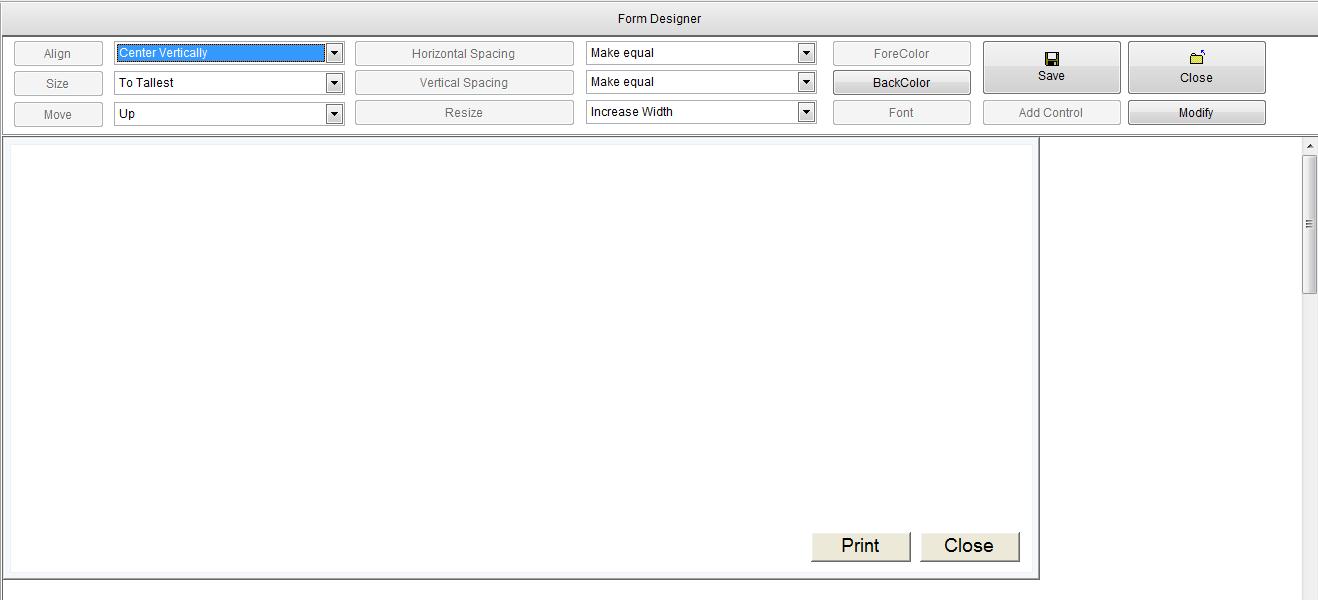
Fig. (40) Form Designer
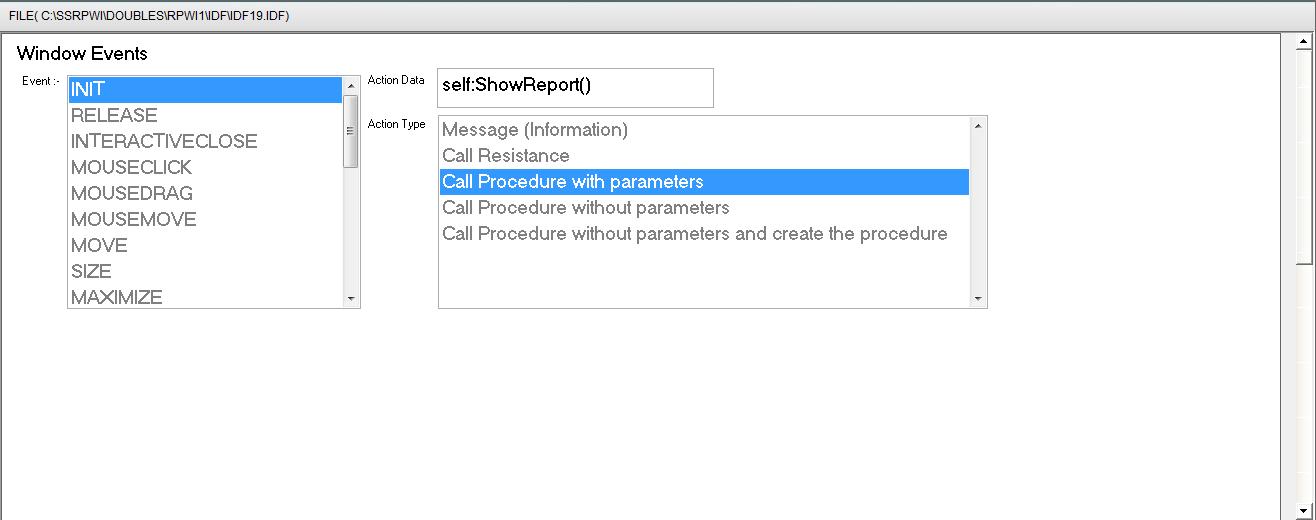
Fig. (41) Goal Desginer - Steps Tree Select the step (Window Events) We will start now new interaction process to generate new steps to our steps tree. The slow way (Using Mouse): 1 - Click Interact to open the components browser 2 - Select the domain (Windows) 3 - Select the component (Window Events) The fast way (Using Keyboard shortcuts): 1 - Get the component using its name by typing (Window Events) Note : Stop typing when you see the required component is selected
Fig. (42) Component Browser – Select the component (Window Events) After selecting the component click Ok or press ENTER
Fig. (43) Interaction page - Set the properties and enter the required data as in the image above
Fig. (44) Form Designer
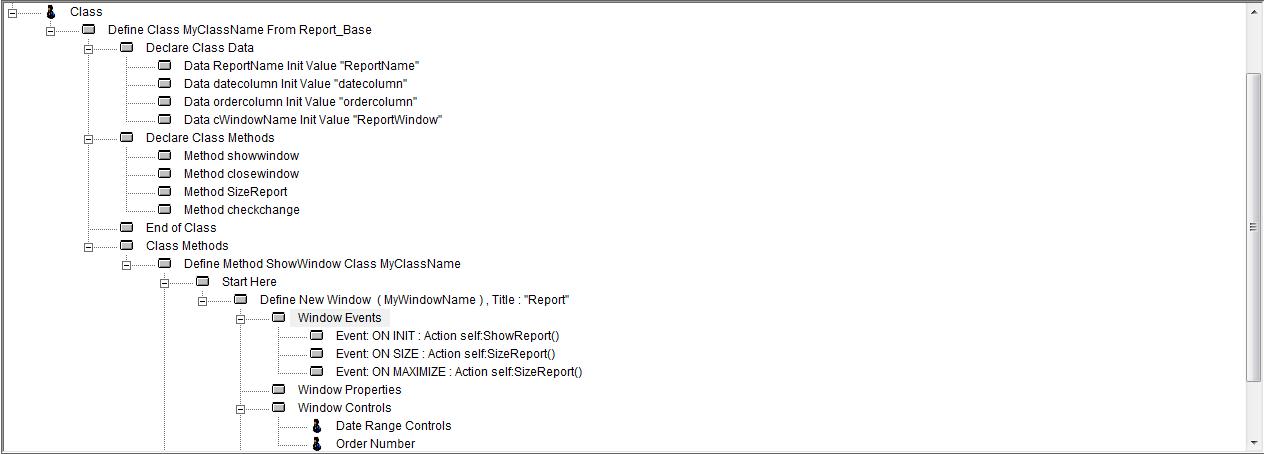
Fig. (45) Goal Desginer - Steps Tree Select the step (Window Events) We will start now new interaction process to generate new steps to our steps tree. The slow way (Using Mouse): 1 - Click Interact to open the components browser 2 - Select the domain (Windows) 3 - Select the component (Window Events) The fast way (Using Keyboard shortcuts): 1 - Get the component using its name by typing (Window Events) Note : Stop typing when you see the required component is selected
Fig. (46) Component Browser – Select the component (Window Events) After selecting the component click Ok or press ENTER
Fig. (47) Interaction page - Set the properties and enter the required data as in the image above
Fig. (48) Form Designer
Fig. (49) Goal Desginer - Steps Tree Select the step (Window Events) We will start now new interaction process to generate new steps to our steps tree. The slow way (Using Mouse): 1 - Click Interact to open the components browser 2 - Select the domain (Windows) 3 - Select the component (Window Events) The fast way (Using Keyboard shortcuts): 1 - Get the component using its name by typing (Window Events) Note : Stop typing when you see the required component is selected
Fig. (50) Component Browser – Select the component (Window Events) After selecting the component click Ok or press ENTER
Fig. (51) Interaction page - Set the properties and enter the required data as in the image above
Fig. (52) Form Designer
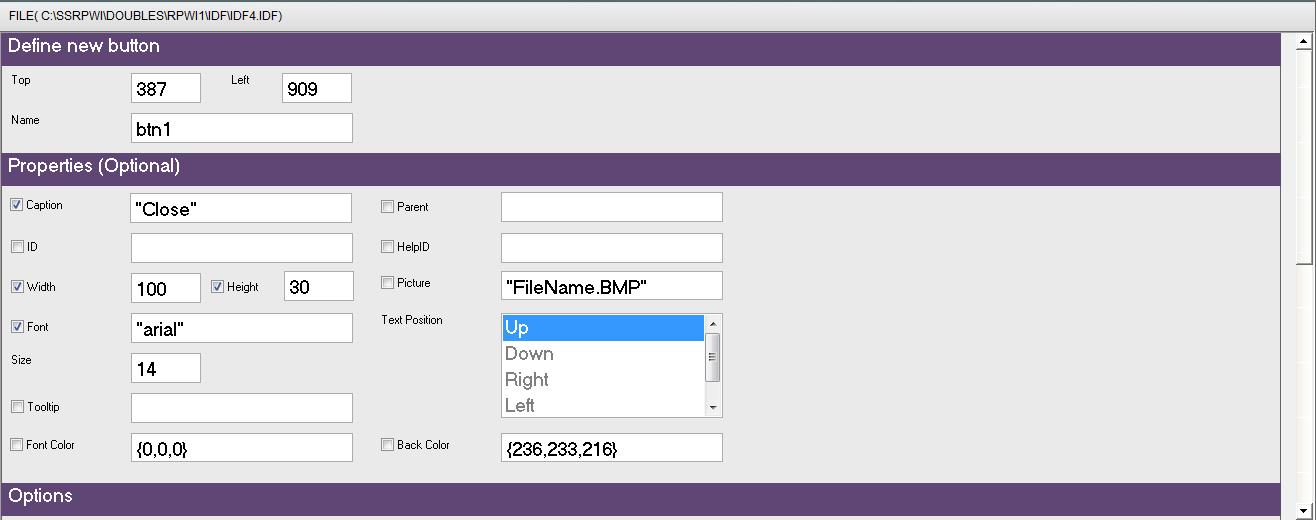
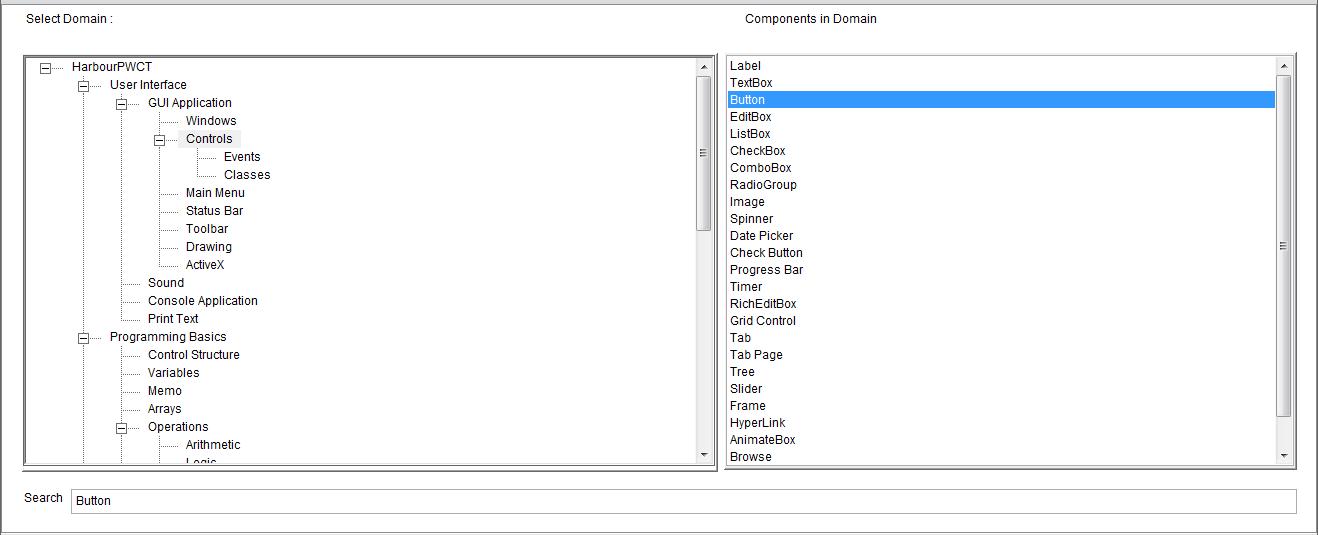
Fig. (53) Goal Desginer - Steps Tree Select the step (Window Controls) We will start now new interaction process to generate new steps to our steps tree. The slow way (Using Mouse): 1 - Click Interact to open the components browser 2 - Select the domain (Controls) 3 - Select the component (Button) The fast way (Using Keyboard shortcuts): 1 - Get the component using its name by typing (Button) Note : Stop typing when you see the required component is selected
Fig. (54) Component Browser – Select the component (Button) After selecting the component click Ok or press ENTER
Fig. (55) Interaction page - Set the properties and enter the required data as in the image above
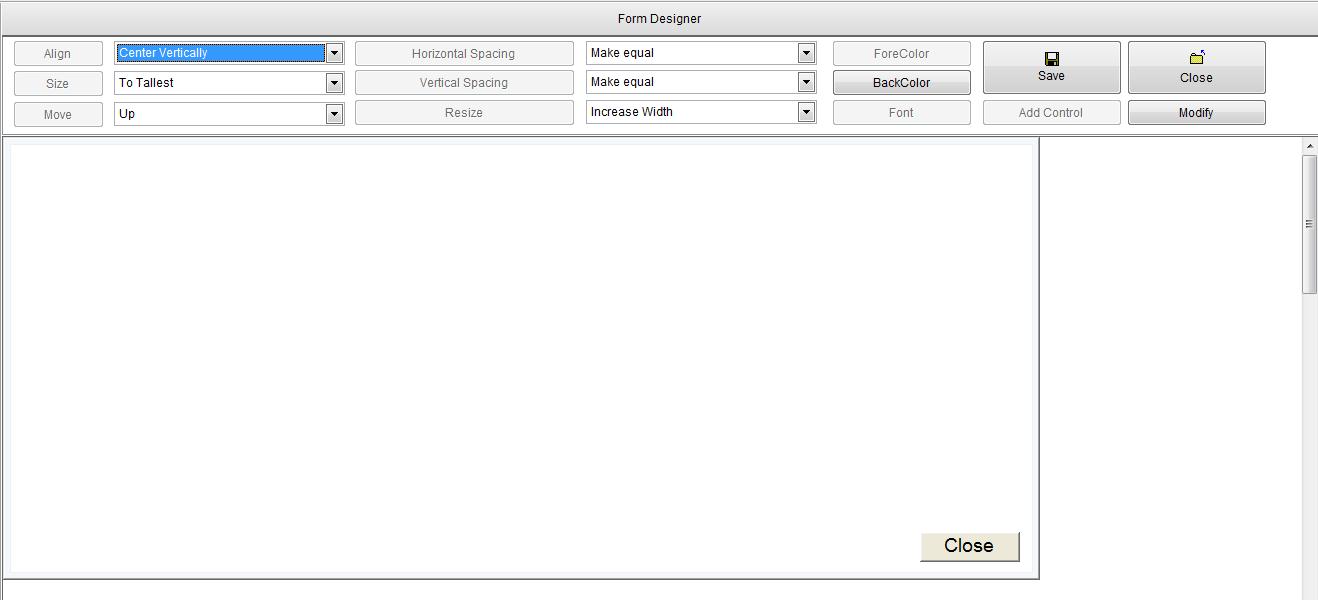
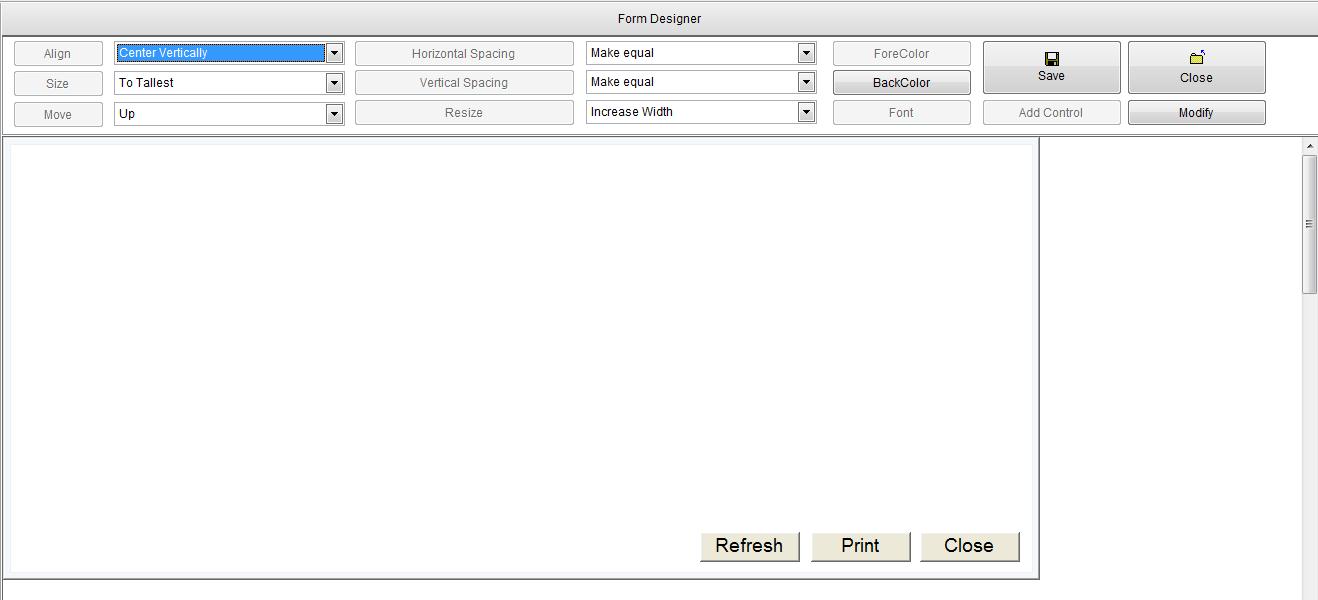
Fig. (56) Form Designer
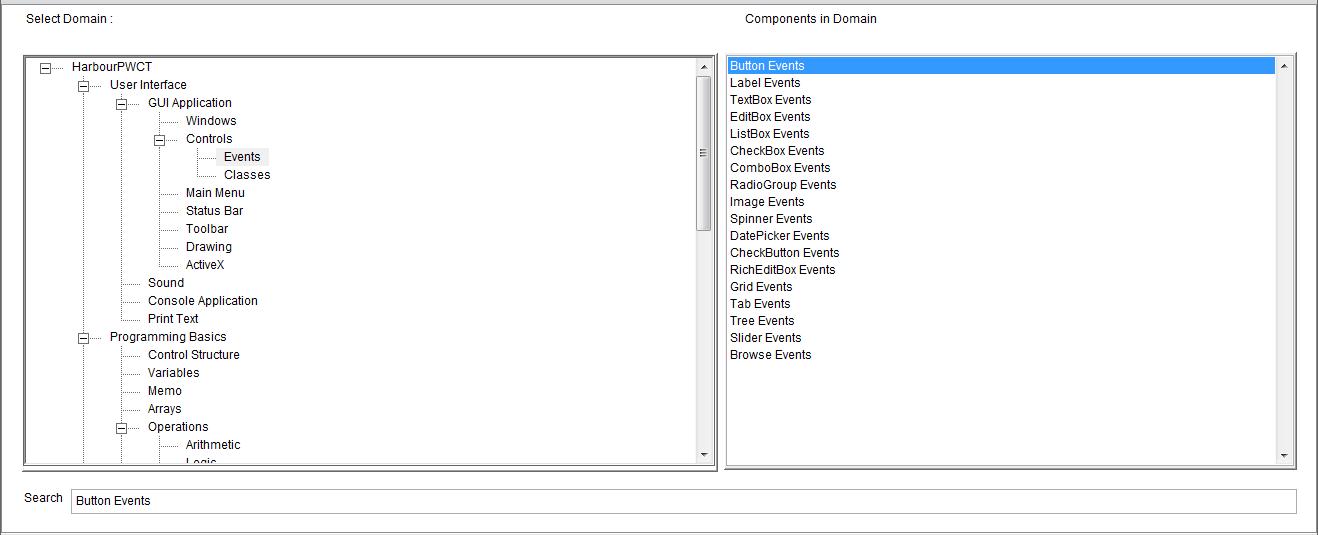
Fig. (57) Goal Desginer - Steps Tree Select the step (Button Events) We will start now new interaction process to generate new steps to our steps tree. The slow way (Using Mouse): 1 - Click Interact to open the components browser 2 - Select the domain (Events) 3 - Select the component (Button Events) The fast way (Using Keyboard shortcuts): 1 - Get the component using its name by typing (Button Events) Note : Stop typing when you see the required component is selected
Fig. (58) Component Browser – Select the component (Button Events) After selecting the component click Ok or press ENTER
Fig. (59) Interaction page - Set the properties and enter the required data as in the image above
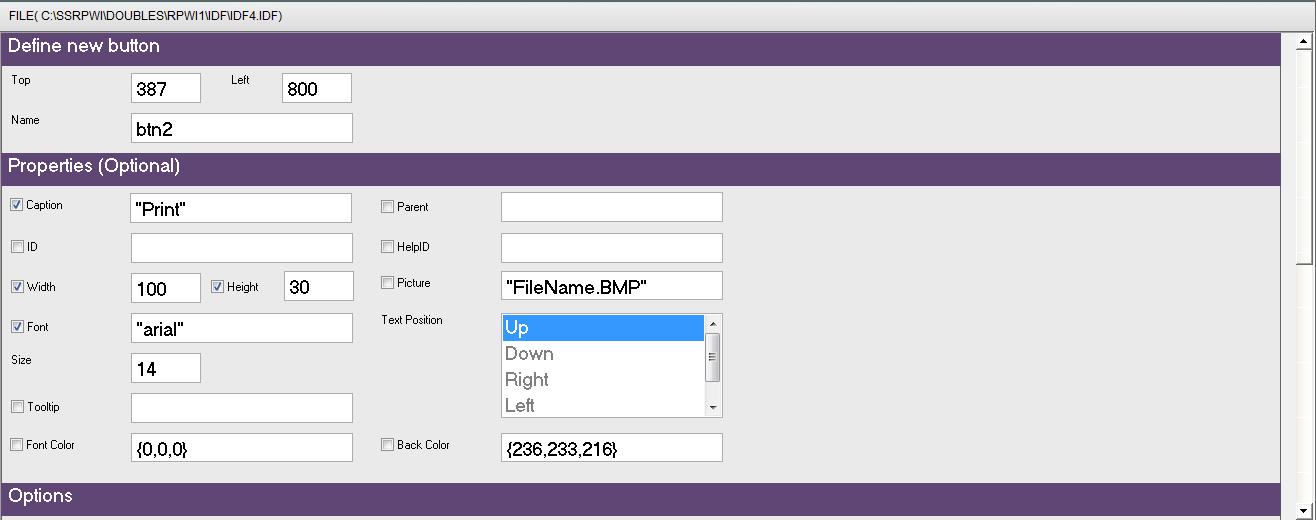
Fig. (60) Goal Desginer - Steps Tree Select the step (Window Controls) We will start now new interaction process to generate new steps to our steps tree. The slow way (Using Mouse): 1 - Click Interact to open the components browser 2 - Select the domain (Controls) 3 - Select the component (Button) The fast way (Using Keyboard shortcuts): 1 - Get the component using its name by typing (Button) Note : Stop typing when you see the required component is selected
Fig. (61) Component Browser – Select the component (Button) After selecting the component click Ok or press ENTER
Fig. (62) Interaction page - Set the properties and enter the required data as in the image above
Fig. (63) Form Designer
Fig. (64) Goal Desginer - Steps Tree Select the step (Button Events) We will start now new interaction process to generate new steps to our steps tree. The slow way (Using Mouse): 1 - Click Interact to open the components browser 2 - Select the domain (Events) 3 - Select the component (Button Events) The fast way (Using Keyboard shortcuts): 1 - Get the component using its name by typing (Button Events) Note : Stop typing when you see the required component is selected
Fig. (65) Component Browser – Select the component (Button Events) After selecting the component click Ok or press ENTER
Fig. (66) Interaction page - Set the properties and enter the required data as in the image above
Fig. (67) Goal Desginer - Steps Tree Select the step (Window Controls) We will start now new interaction process to generate new steps to our steps tree. The slow way (Using Mouse): 1 - Click Interact to open the components browser 2 - Select the domain (Controls) 3 - Select the component (Button) The fast way (Using Keyboard shortcuts): 1 - Get the component using its name by typing (Button) Note : Stop typing when you see the required component is selected
Fig. (68) Component Browser – Select the component (Button) After selecting the component click Ok or press ENTER
Fig. (69) Interaction page - Set the properties and enter the required data as in the image above
Fig. (70) Form Designer
Fig. (71) Goal Desginer - Steps Tree Select the step (Button Events) We will start now new interaction process to generate new steps to our steps tree. The slow way (Using Mouse): 1 - Click Interact to open the components browser 2 - Select the domain (Events) 3 - Select the component (Button Events) The fast way (Using Keyboard shortcuts): 1 - Get the component using its name by typing (Button Events) Note : Stop typing when you see the required component is selected
Fig. (72) Component Browser – Select the component (Button Events) After selecting the component click Ok or press ENTER
Fig. (73) Interaction page - Set the properties and enter the required data as in the image above
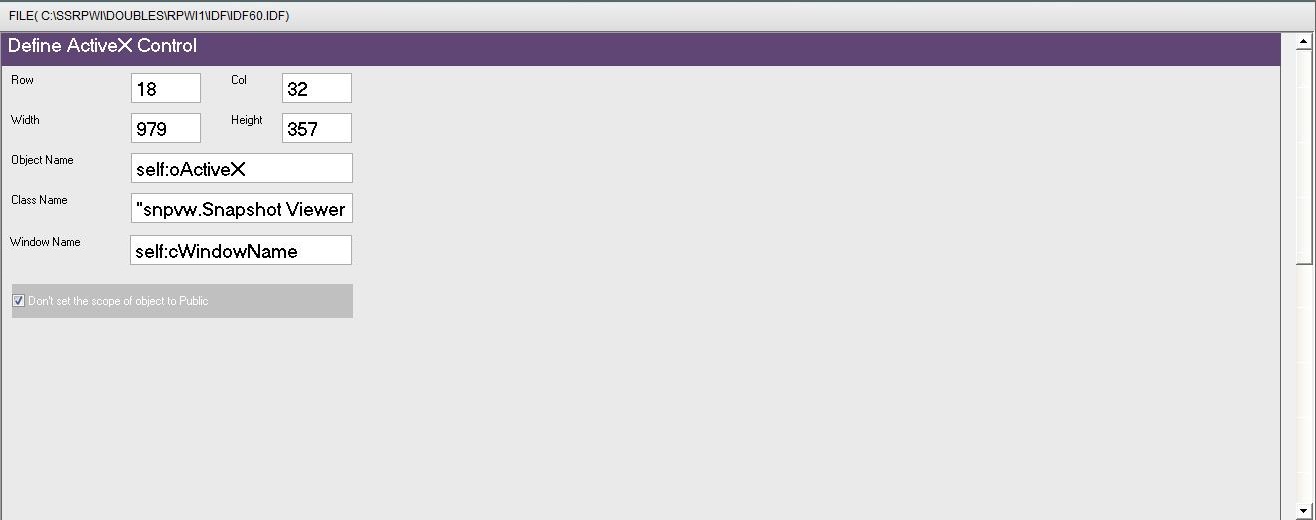
Fig. (74) Goal Desginer - Steps Tree Select the step (Window Controls) We will start now new interaction process to generate new steps to our steps tree. The slow way (Using Mouse): 1 - Click Interact to open the components browser 2 - Select the domain (ActiveX) 3 - Select the component (Define ActiveX control) The fast way (Using Keyboard shortcuts): 1 - Get the component using its name by typing (Define ActiveX control) Note : Stop typing when you see the required component is selected
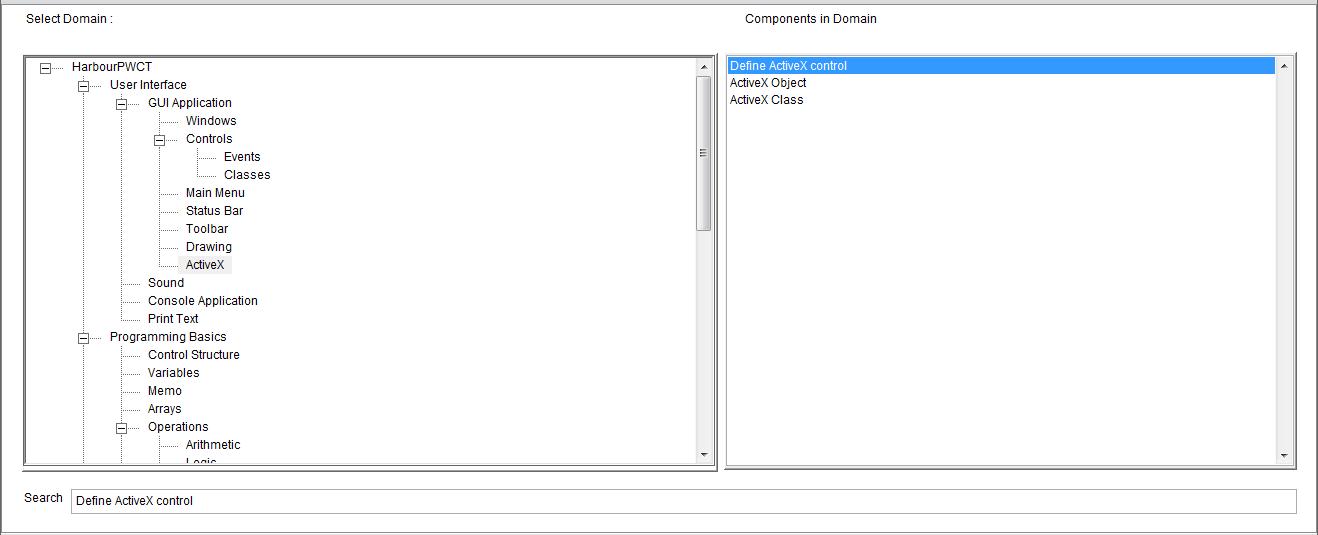
Fig. (75) Component Browser – Select the component (Define ActiveX control) After selecting the component click Ok or press ENTER
Fig. (76) Interaction page - Set the properties and enter the required data as in the image above
Fig. (77) Form Designer
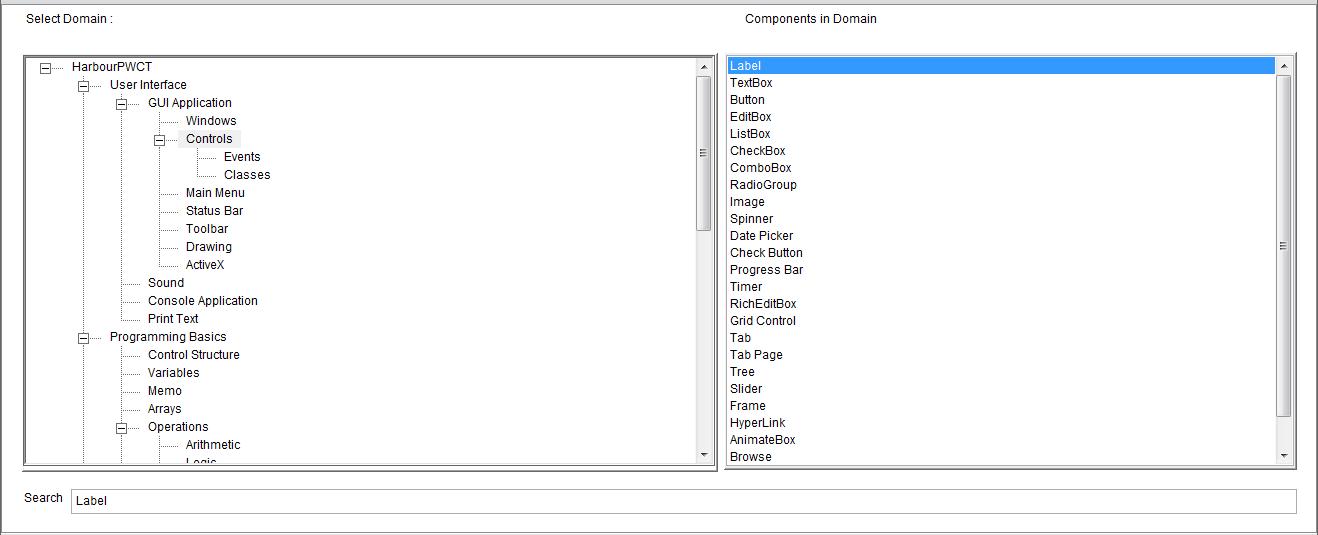
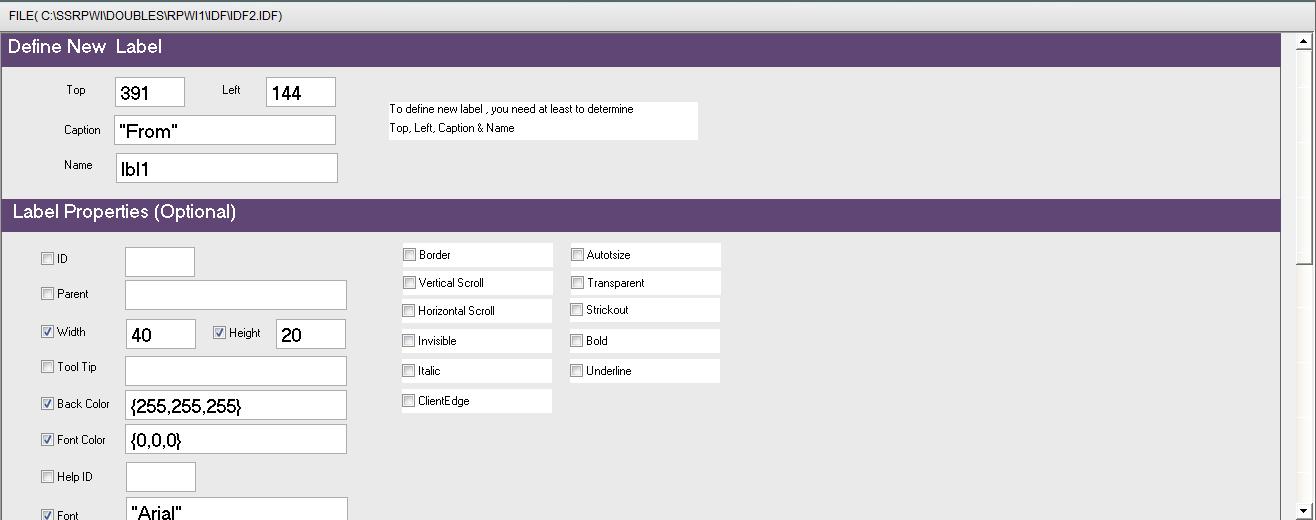
Fig. (78) Goal Desginer - Steps Tree Select the step (Date Range Controls) We will start now new interaction process to generate new steps to our steps tree. The slow way (Using Mouse): 1 - Click Interact to open the components browser 2 - Select the domain (Controls) 3 - Select the component (Label) The fast way (Using Keyboard shortcuts): 1 - Get the component using its name by typing (Label) Note : Stop typing when you see the required component is selected
Fig. (79) Component Browser – Select the component (Label) After selecting the component click Ok or press ENTER
Fig. (80) Interaction page - Set the properties and enter the required data as in the image above
Fig. (81) Goal Desginer - Steps Tree Select the step (Date Range Controls) We will start now new interaction process to generate new steps to our steps tree. The slow way (Using Mouse): 1 - Click Interact to open the components browser 2 - Select the domain (Controls) 3 - Select the component (Label) The fast way (Using Keyboard shortcuts): 1 - Get the component using its name by typing (Label) Note : Stop typing when you see the required component is selected
Fig. (82) Component Browser – Select the component (Label) After selecting the component click Ok or press ENTER
Fig. (83) Interaction page - Set the properties and enter the required data as in the image above
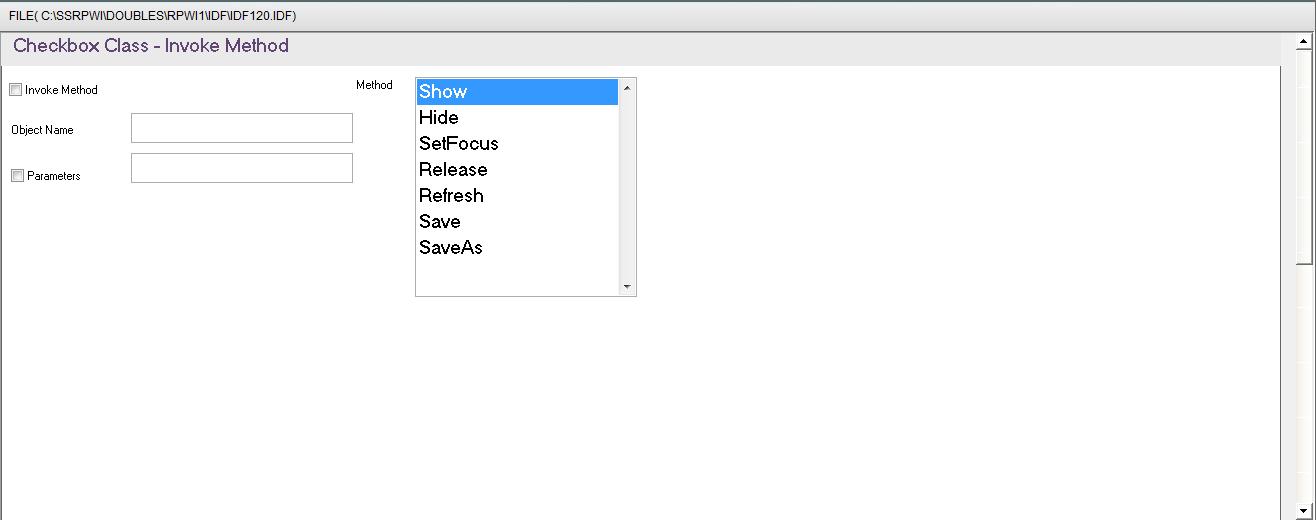
Fig. (84) Goal Desginer - Steps Tree Select the step (Date Range Controls) We will start now new interaction process to generate new steps to our steps tree. The slow way (Using Mouse): 1 - Click Interact to open the components browser 2 - Select the domain (Controls) 3 - Select the component (CheckBox) The fast way (Using Keyboard shortcuts): 1 - Get the component using its name by typing (CheckBox) Note : Stop typing when you see the required component is selected
Fig. (85) Component Browser – Select the component (CheckBox) After selecting the component click Ok or press ENTER
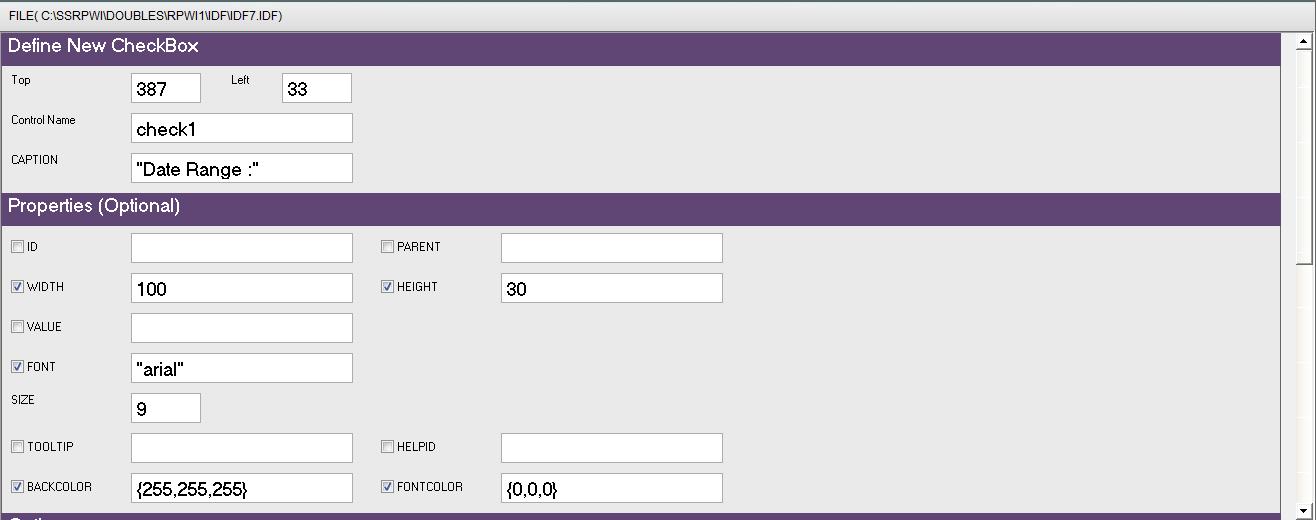
Fig. (86) Interaction page - Set the properties and enter the required data as in the image above
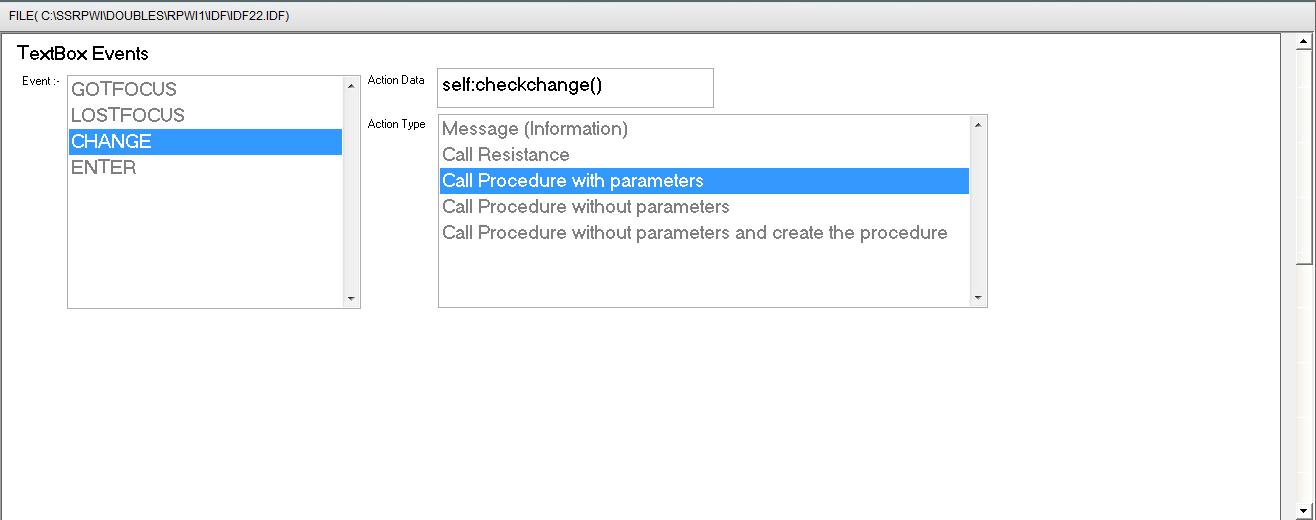
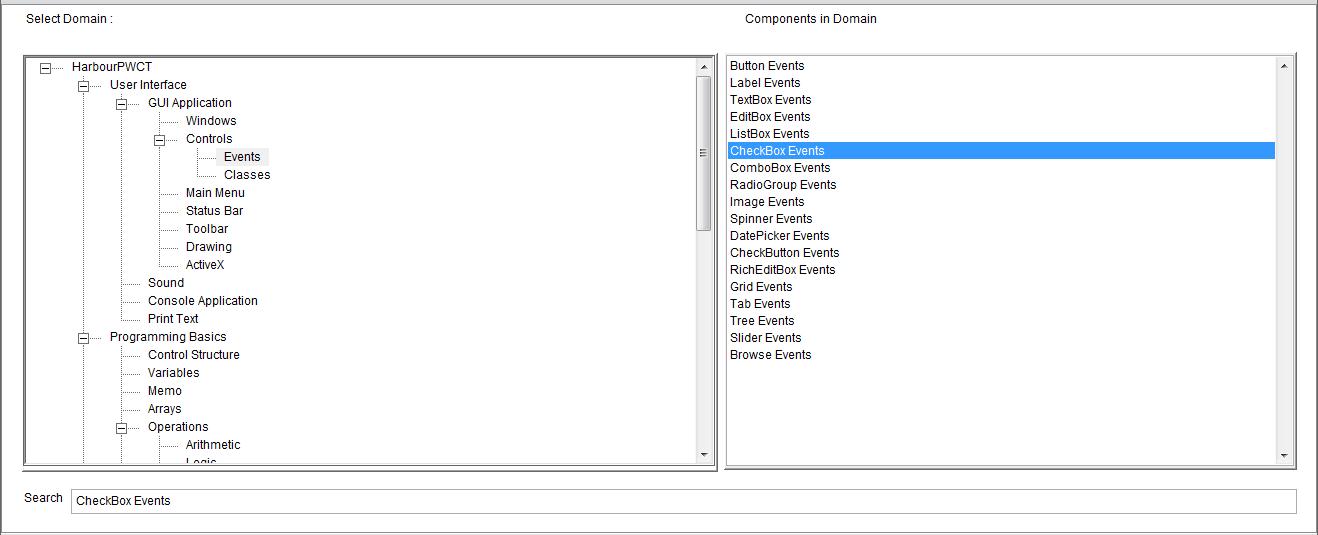
Fig. (87) Goal Desginer - Steps Tree Select the step (CheckBox Events) We will start now new interaction process to generate new steps to our steps tree. The slow way (Using Mouse): 1 - Click Interact to open the components browser 2 - Select the domain (Events) 3 - Select the component (CheckBox Events) The fast way (Using Keyboard shortcuts): 1 - Get the component using its name by typing (CheckBox Events) Note : Stop typing when you see the required component is selected
Fig. (88) Component Browser – Select the component (CheckBox Events) After selecting the component click Ok or press ENTER
Fig. (89) Interaction page - Set the properties and enter the required data as in the image above
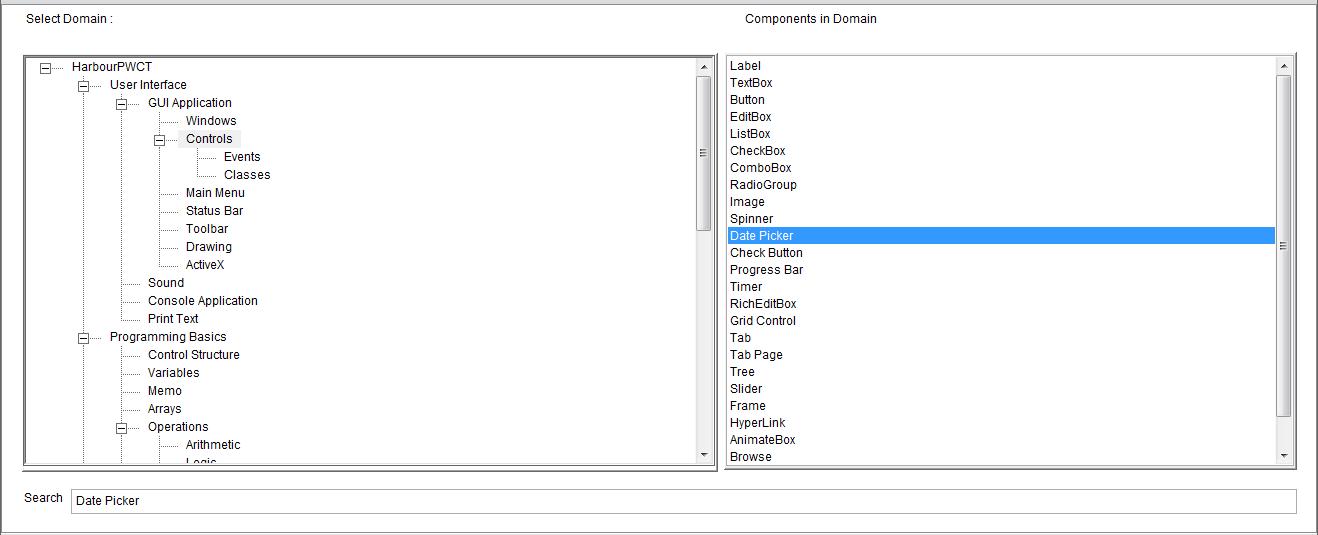
Fig. (90) Goal Desginer - Steps Tree Select the step (Date Range Controls) We will start now new interaction process to generate new steps to our steps tree. The slow way (Using Mouse): 1 - Click Interact to open the components browser 2 - Select the domain (Controls) 3 - Select the component (Date Picker) The fast way (Using Keyboard shortcuts): 1 - Get the component using its name by typing (Date Picker) Note : Stop typing when you see the required component is selected
Fig. (91) Component Browser – Select the component (Date Picker) After selecting the component click Ok or press ENTER
Fig. (92) Interaction page - Set the properties and enter the required data as in the image above
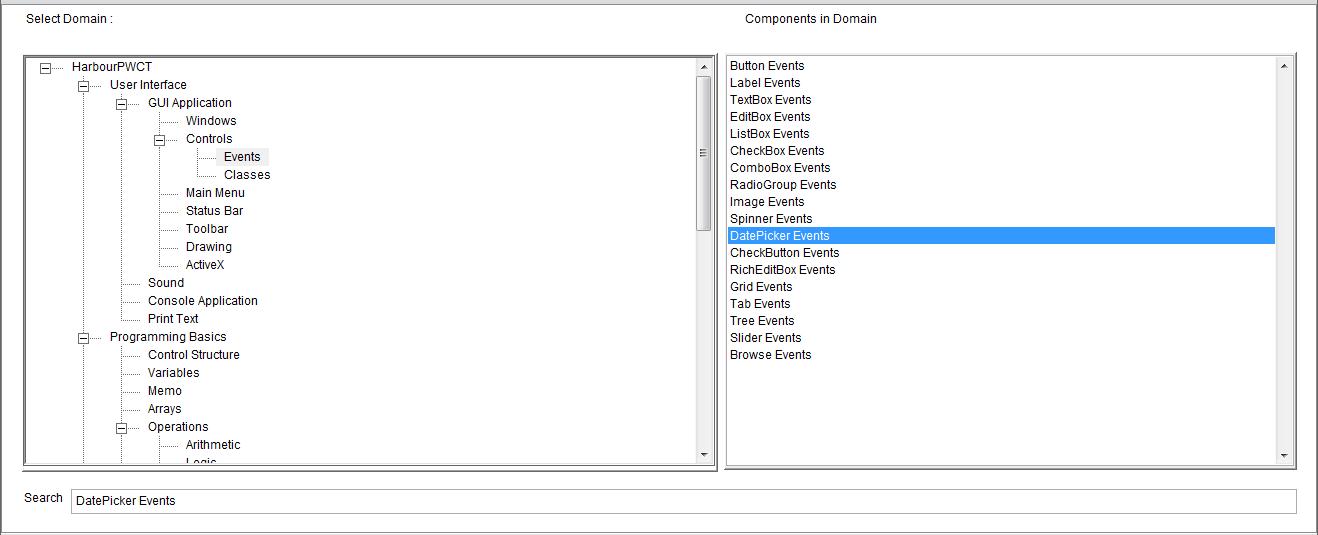
Fig. (93) Goal Desginer - Steps Tree Select the step (Events) We will start now new interaction process to generate new steps to our steps tree. The slow way (Using Mouse): 1 - Click Interact to open the components browser 2 - Select the domain (Events) 3 - Select the component (DatePicker Events) The fast way (Using Keyboard shortcuts): 1 - Get the component using its name by typing (DatePicker Events) Note : Stop typing when you see the required component is selected
Fig. (94) Component Browser – Select the component (DatePicker Events) After selecting the component click Ok or press ENTER
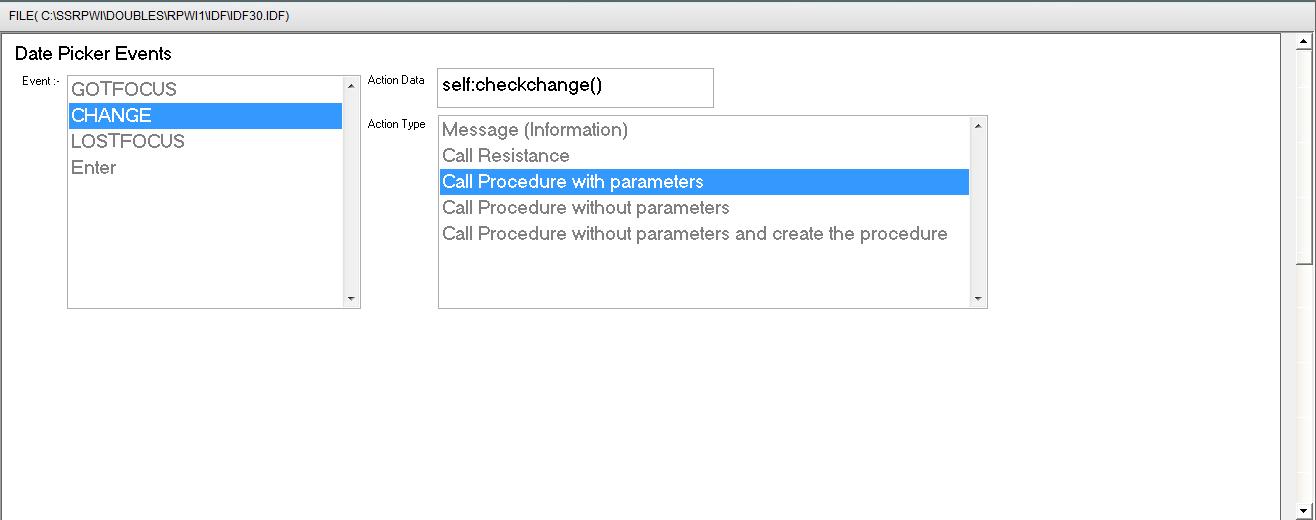
Fig. (95) Interaction page - Set the properties and enter the required data as in the image above
Fig. (96) Goal Desginer - Steps Tree Select the step (Date Range Controls) We will start now new interaction process to generate new steps to our steps tree. The slow way (Using Mouse): 1 - Click Interact to open the components browser 2 - Select the domain (Controls) 3 - Select the component (Date Picker) The fast way (Using Keyboard shortcuts): 1 - Get the component using its name by typing (Date Picker) Note : Stop typing when you see the required component is selected
Fig. (97) Component Browser – Select the component (Date Picker) After selecting the component click Ok or press ENTER
Fig. (98) Interaction page - Set the properties and enter the required data as in the image above
Fig. (99) Goal Desginer - Steps Tree Select the step (Events) We will start now new interaction process to generate new steps to our steps tree. The slow way (Using Mouse): 1 - Click Interact to open the components browser 2 - Select the domain (Events) 3 - Select the component (DatePicker Events) The fast way (Using Keyboard shortcuts): 1 - Get the component using its name by typing (DatePicker Events) Note : Stop typing when you see the required component is selected
Fig. (100) Component Browser – Select the component (DatePicker Events) After selecting the component click Ok or press ENTER
Fig. (101) Interaction page - Set the properties and enter the required data as in the image above
Fig. (102) Goal Desginer - Steps Tree Select the step (Order Number) We will start now new interaction process to generate new steps to our steps tree. The slow way (Using Mouse): 1 - Click Interact to open the components browser 2 - Select the domain (Controls) 3 - Select the component (TextBox) The fast way (Using Keyboard shortcuts): 1 - Get the component using its name by typing (TextBox) Note : Stop typing when you see the required component is selected
Fig. (103) Component Browser – Select the component (TextBox) After selecting the component click Ok or press ENTER
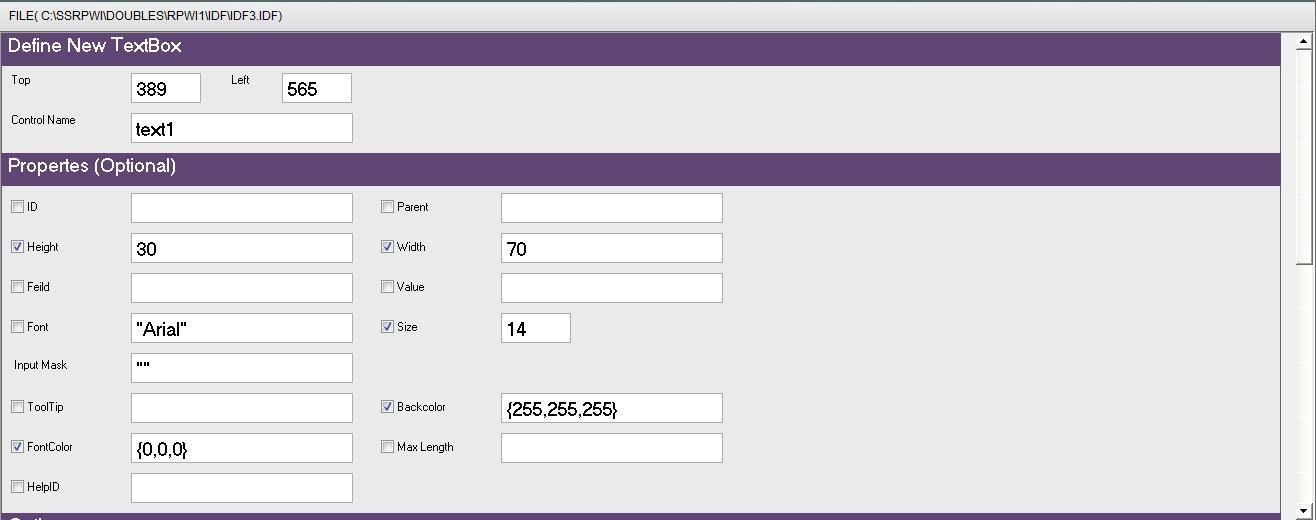
Fig. (104) Interaction page - Set the properties and enter the required data as in the image above
Fig. (105) Goal Desginer - Steps Tree Select the step (TextBox EVENTS) We will start now new interaction process to generate new steps to our steps tree. The slow way (Using Mouse): 1 - Click Interact to open the components browser 2 - Select the domain (Events) 3 - Select the component (TextBox Events) The fast way (Using Keyboard shortcuts): 1 - Get the component using its name by typing (TextBox Events) Note : Stop typing when you see the required component is selected
Fig. (106) Component Browser – Select the component (TextBox Events) After selecting the component click Ok or press ENTER
Fig. (107) Interaction page - Set the properties and enter the required data as in the image above
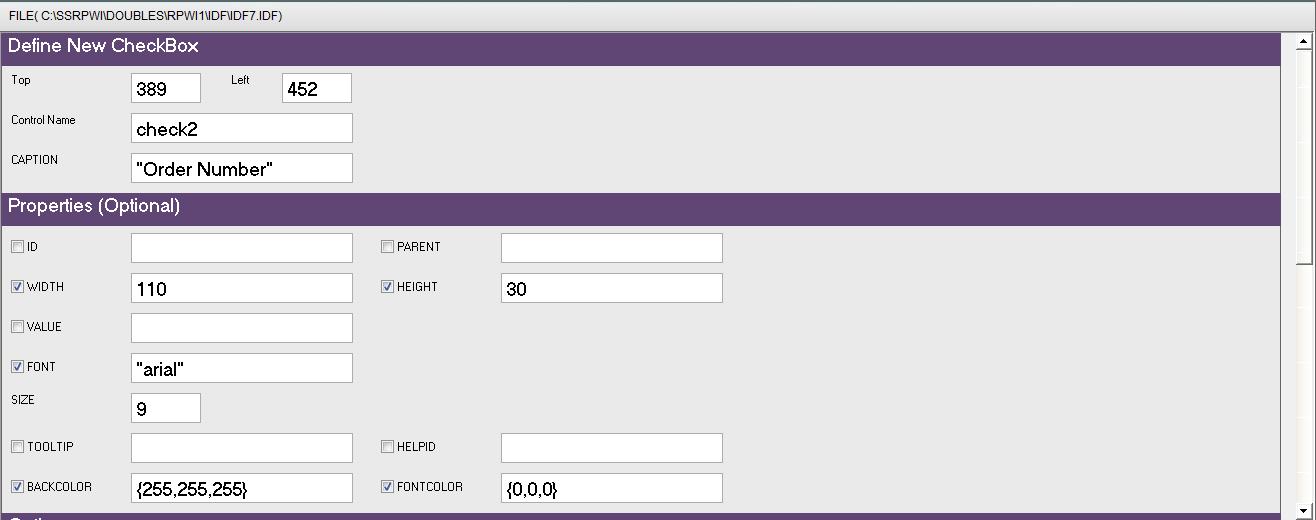
Fig. (108) Goal Desginer - Steps Tree Select the step (Order Number) We will start now new interaction process to generate new steps to our steps tree. The slow way (Using Mouse): 1 - Click Interact to open the components browser 2 - Select the domain (Controls) 3 - Select the component (CheckBox) The fast way (Using Keyboard shortcuts): 1 - Get the component using its name by typing (CheckBox) Note : Stop typing when you see the required component is selected
Fig. (109) Component Browser – Select the component (CheckBox) After selecting the component click Ok or press ENTER
Fig. (110) Interaction page - Set the properties and enter the required data as in the image above
Fig. (111) Goal Desginer - Steps Tree Select the step (CheckBox Events) We will start now new interaction process to generate new steps to our steps tree. The slow way (Using Mouse): 1 - Click Interact to open the components browser 2 - Select the domain (Events) 3 - Select the component (CheckBox Events) The fast way (Using Keyboard shortcuts): 1 - Get the component using its name by typing (CheckBox Events) Note : Stop typing when you see the required component is selected
Fig. (112) Component Browser – Select the component (CheckBox Events) After selecting the component click Ok or press ENTER
Fig. (113) Interaction page - Set the properties and enter the required data as in the image above
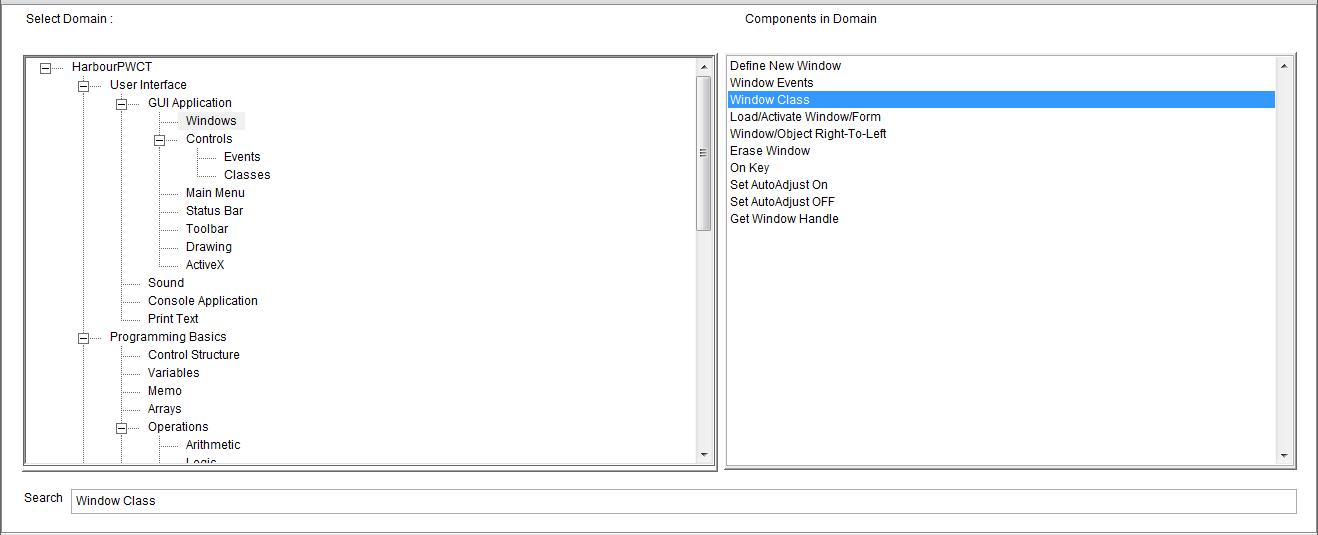
Fig. (114) Goal Desginer - Steps Tree Select the step (Define New Window ( MyWindowName ) , Title : "Report") We will start now new interaction process to generate new steps to our steps tree. The slow way (Using Mouse): 1 - Click Interact to open the components browser 2 - Select the domain (Windows) 3 - Select the component (Window Class) The fast way (Using Keyboard shortcuts): 1 - Get the component using its name by typing (Window Class) Note : Stop typing when you see the required component is selected
Fig. (115) Component Browser – Select the component (Window Class) After selecting the component click Ok or press ENTER
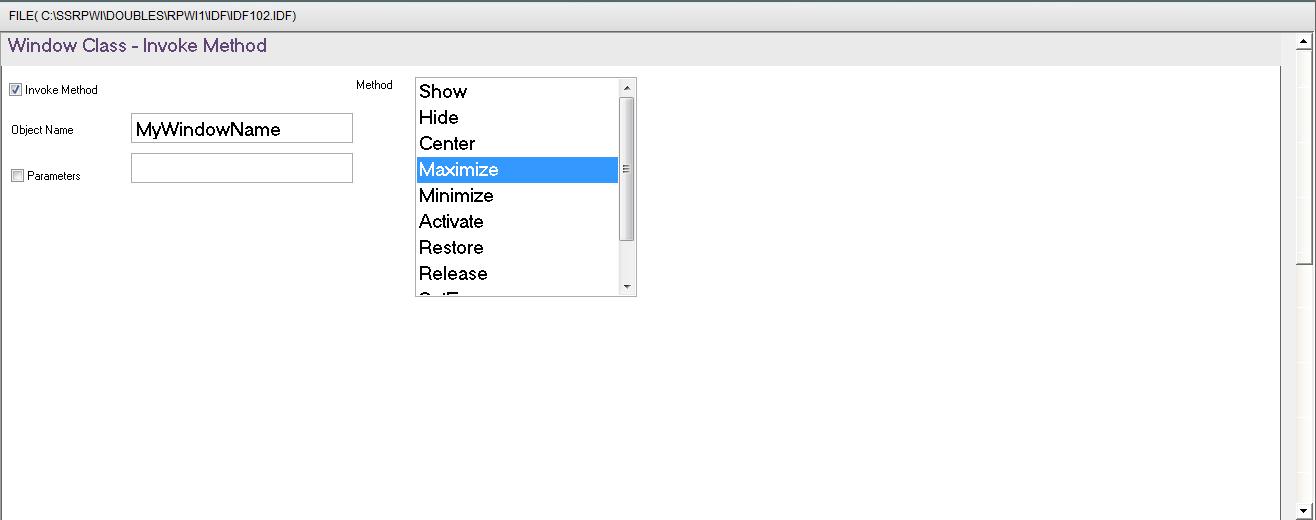
Fig. (116) Interaction page - Set the properties and enter the required data as in the image above
Fig. (117) Interaction page - Set the properties and enter the required data as in the image above
Fig. (118) Interaction page - Set the properties and enter the required data as in the image above
Fig. (119) Form Designer
Fig. (120) Goal Desginer - Steps Tree Select the step (Class Methods) We will start now new interaction process to generate new steps to our steps tree. The slow way (Using Mouse): 1 - Click Interact to open the components browser 2 - Select the domain (Object Oriented Programming (OOP)) 3 - Select the component (Define Class Method) The fast way (Using Keyboard shortcuts): 1 - Get the component using its name by typing (Define Class Method) Note : Stop typing when you see the required component is selected
Fig. (121) Component Browser – Select the component (Define Class Method) After selecting the component click Ok or press ENTER
Fig. (122) Interaction page - Set the properties and enter the required data as in the image above
Fig. (123) Goal Desginer - Steps Tree Select the step (Start Here) We will start now new interaction process to generate new steps to our steps tree. The slow way (Using Mouse): 1 - Click Interact to open the components browser 2 - Select the domain (Windows) 3 - Select the component (Window Class) The fast way (Using Keyboard shortcuts): 1 - Get the component using its name by typing (Window Class) Note : Stop typing when you see the required component is selected
Fig. (124) Component Browser – Select the component (Window Class) After selecting the component click Ok or press ENTER
Fig. (125) Interaction page - Set the properties and enter the required data as in the image above
Fig. (126) Interaction page - Set the properties and enter the required data as in the image above
Fig. (127) Interaction page - Set the properties and enter the required data as in the image above
Fig. (128) Goal Desginer - Steps Tree Select the step (Class Methods) We will start now new interaction process to generate new steps to our steps tree. The slow way (Using Mouse): 1 - Click Interact to open the components browser 2 - Select the domain (Object Oriented Programming (OOP)) 3 - Select the component (Define Class Method) The fast way (Using Keyboard shortcuts): 1 - Get the component using its name by typing (Define Class Method) Note : Stop typing when you see the required component is selected
Fig. (129) Component Browser – Select the component (Define Class Method) After selecting the component click Ok or press ENTER
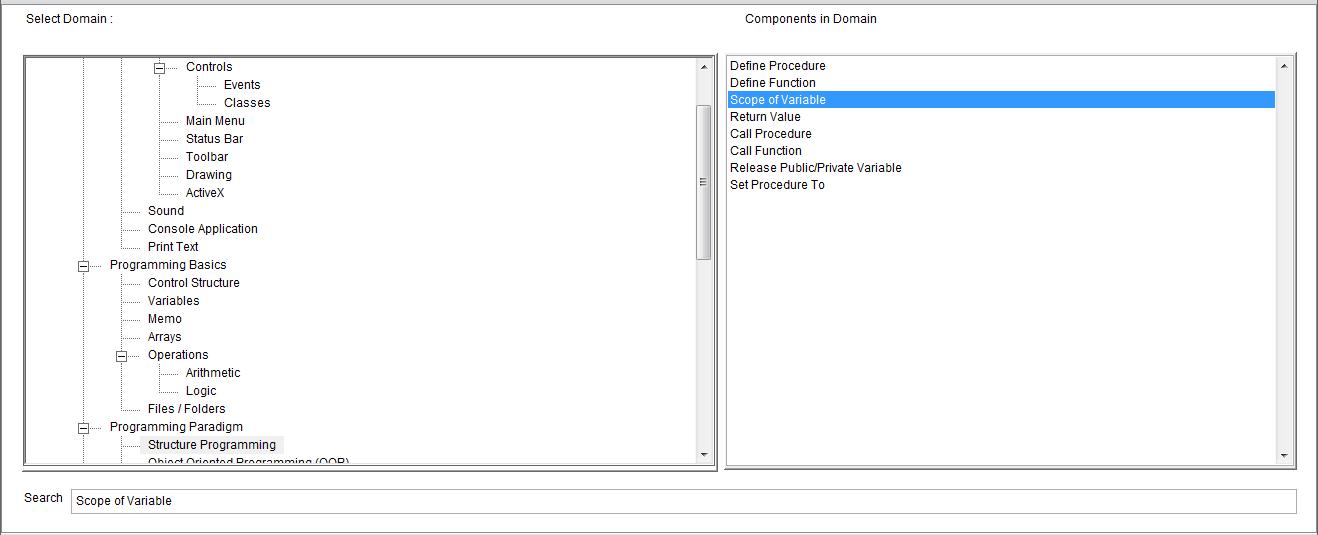
Fig. (130) Interaction page - Set the properties and enter the required data as in the image above
Fig. (131) Goal Desginer - Steps Tree Select the step (Start Here) We will start now new interaction process to generate new steps to our steps tree. The slow way (Using Mouse): 1 - Click Interact to open the components browser 2 - Select the domain (Structure Programming) 3 - Select the component (Scope of Variable) The fast way (Using Keyboard shortcuts): 1 - Get the component using its name by typing (Scope of Variable) Note : Stop typing when you see the required component is selected
Fig. (132) Component Browser – Select the component (Scope of Variable) After selecting the component click Ok or press ENTER
Fig. (133) Interaction page - Set the properties and enter the required data as in the image above
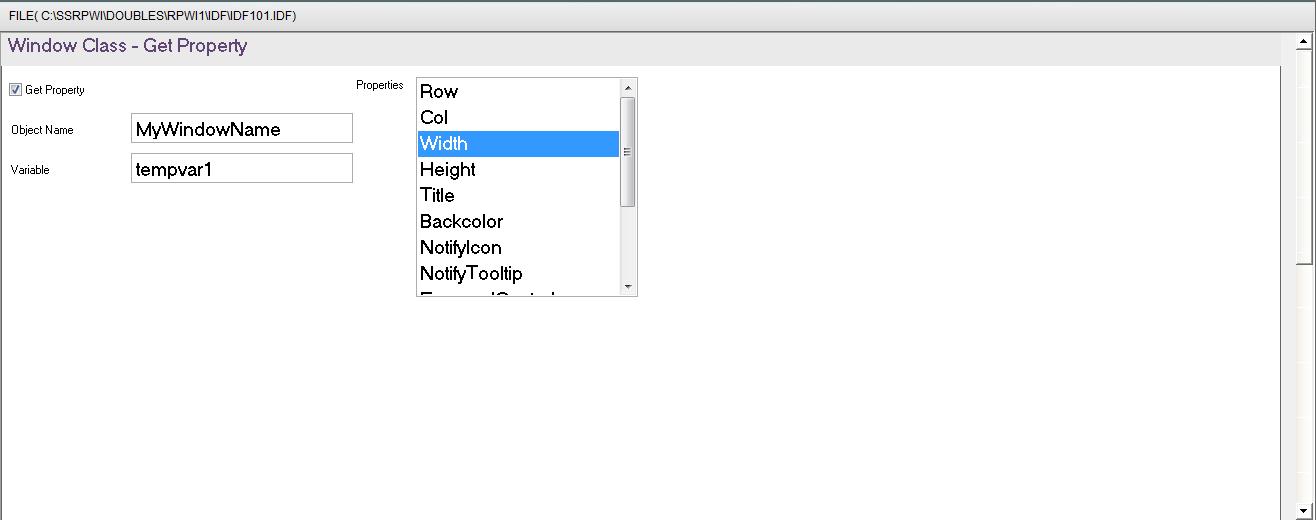
Fig. (134) Goal Desginer - Steps Tree Select the step (Start Here) We will start now new interaction process to generate new steps to our steps tree. The slow way (Using Mouse): 1 - Click Interact to open the components browser 2 - Select the domain (Windows) 3 - Select the component (Window Class) The fast way (Using Keyboard shortcuts): 1 - Get the component using its name by typing (Window Class) Note : Stop typing when you see the required component is selected
Fig. (135) Component Browser – Select the component (Window Class) After selecting the component click Ok or press ENTER
Fig. (136) Interaction page - Set the properties and enter the required data as in the image above
Fig. (137) Interaction page - Set the properties and enter the required data as in the image above
Fig. (138) Interaction page - Set the properties and enter the required data as in the image above
Fig. (139) Goal Desginer - Steps Tree Select the step (Start Here) We will start now new interaction process to generate new steps to our steps tree. The slow way (Using Mouse): 1 - Click Interact to open the components browser 2 - Select the domain (Windows) 3 - Select the component (Window Class) The fast way (Using Keyboard shortcuts): 1 - Get the component using its name by typing (Window Class) Note : Stop typing when you see the required component is selected
Fig. (140) Component Browser – Select the component (Window Class) After selecting the component click Ok or press ENTER
Fig. (141) Interaction page - Set the properties and enter the required data as in the image above
Fig. (142) Interaction page - Set the properties and enter the required data as in the image above
Fig. (143) Interaction page - Set the properties and enter the required data as in the image above
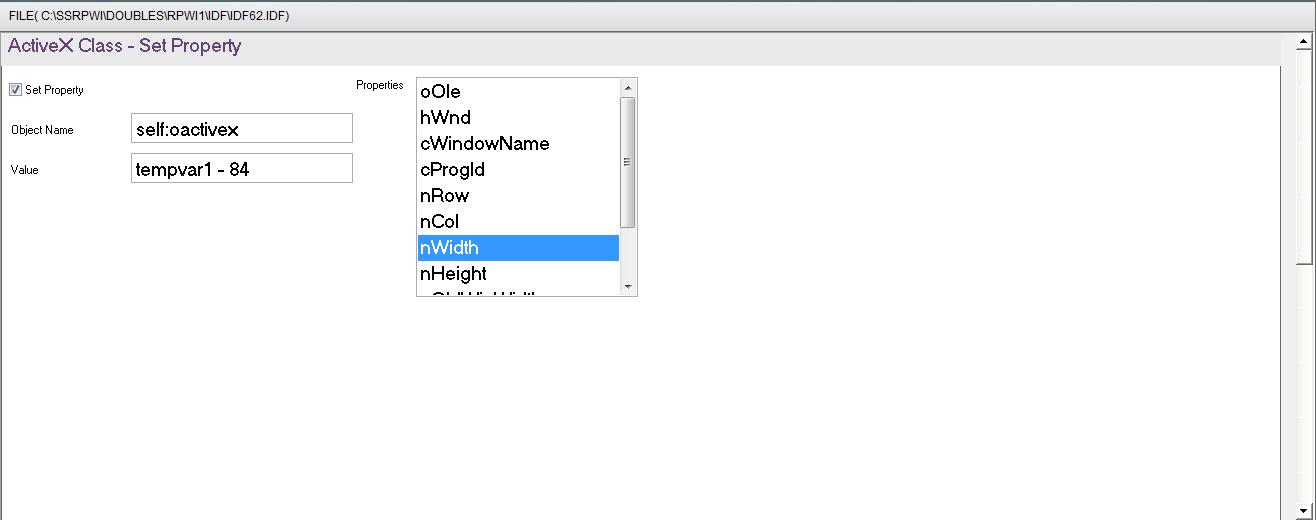
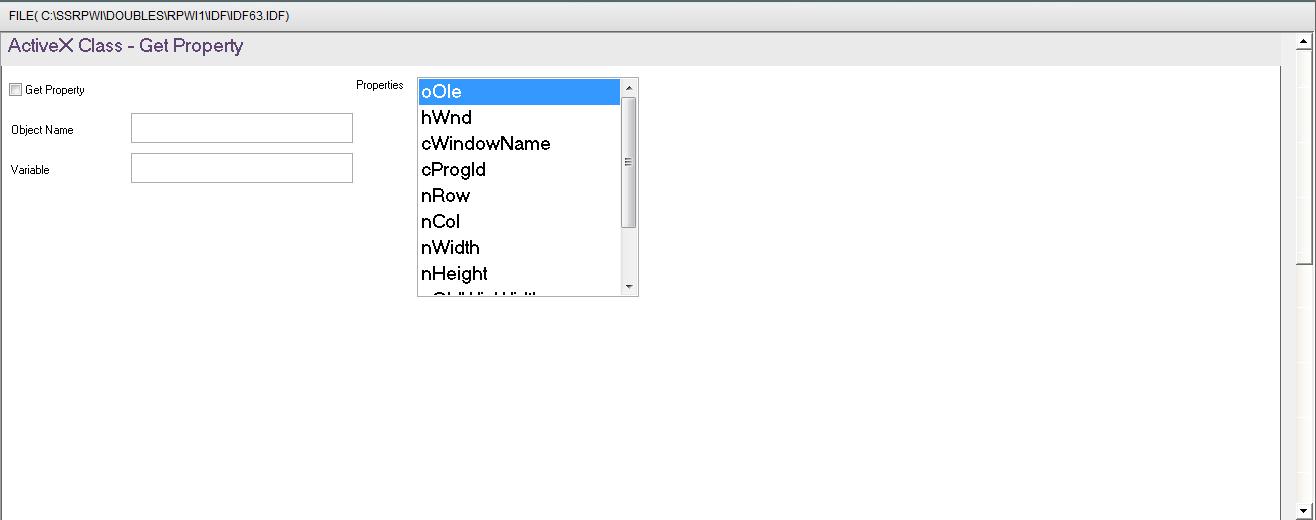
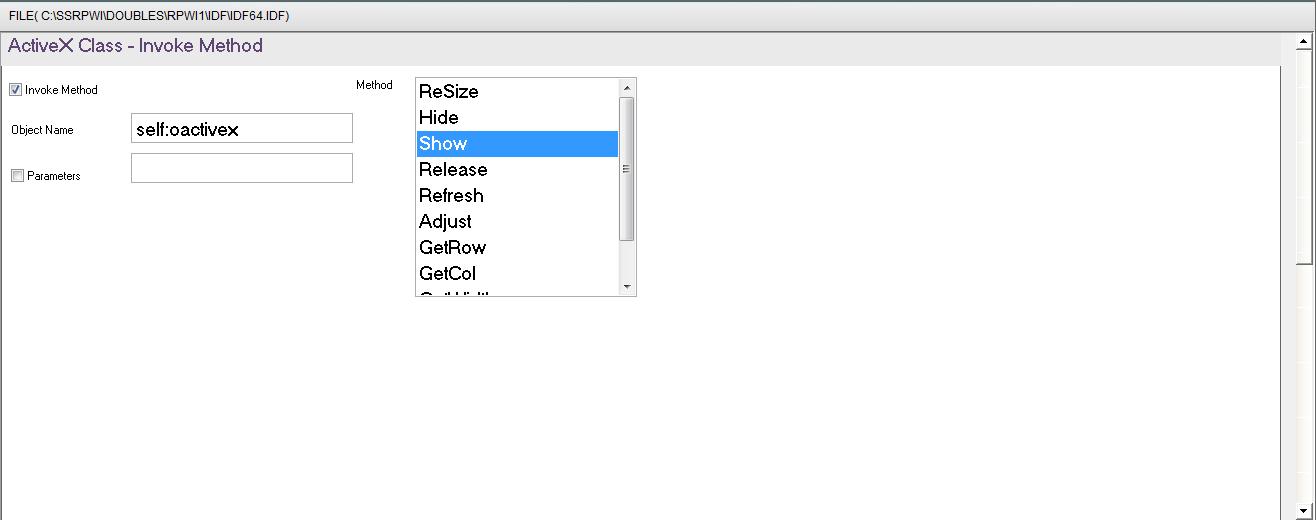
Fig. (144) Goal Desginer - Steps Tree Select the step (Start Here) We will start now new interaction process to generate new steps to our steps tree. The slow way (Using Mouse): 1 - Click Interact to open the components browser 2 - Select the domain (ActiveX) 3 - Select the component (ActiveX Class) The fast way (Using Keyboard shortcuts): 1 - Get the component using its name by typing (ActiveX Class) Note : Stop typing when you see the required component is selected
Fig. (145) Component Browser – Select the component (ActiveX Class) After selecting the component click Ok or press ENTER
Fig. (146) Interaction page - Set the properties and enter the required data as in the image above
Fig. (147) Interaction page - Set the properties and enter the required data as in the image above
Fig. (148) Interaction page - Set the properties and enter the required data as in the image above
Fig. (149) Goal Desginer - Steps Tree Select the step (Start Here) We will start now new interaction process to generate new steps to our steps tree. The slow way (Using Mouse): 1 - Click Interact to open the components browser 2 - Select the domain (ActiveX) 3 - Select the component (ActiveX Class) The fast way (Using Keyboard shortcuts): 1 - Get the component using its name by typing (ActiveX Class) Note : Stop typing when you see the required component is selected
Fig. (150) Component Browser – Select the component (ActiveX Class) After selecting the component click Ok or press ENTER
Fig. (151) Interaction page - Set the properties and enter the required data as in the image above
Fig. (152) Interaction page - Set the properties and enter the required data as in the image above
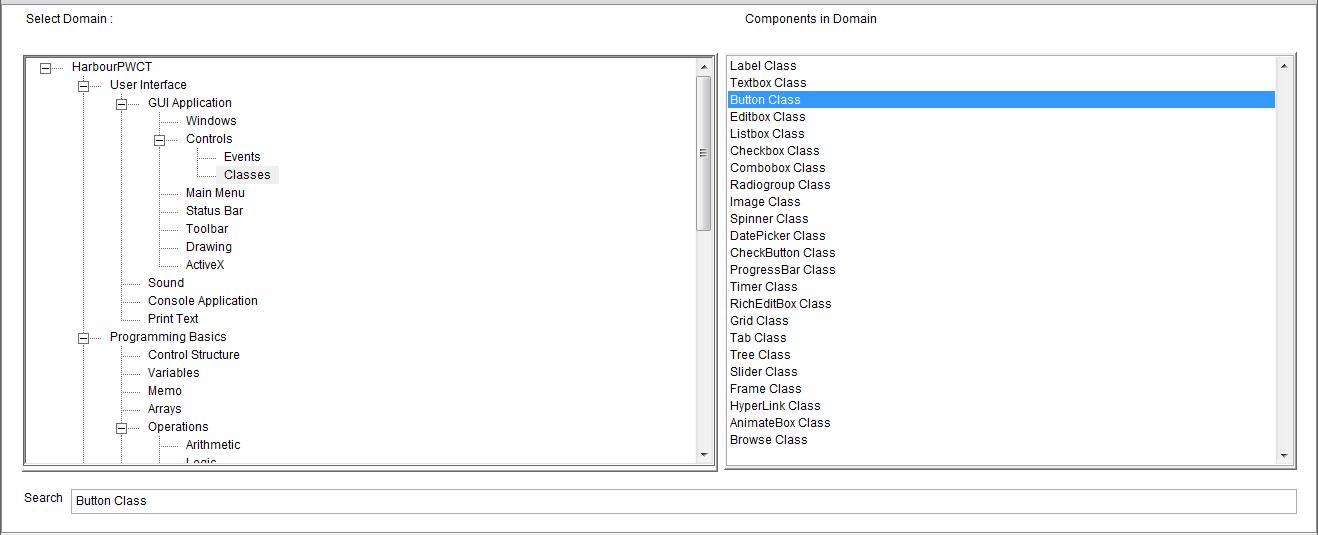
Fig. (153) Interaction page - Set the properties and enter the required data as in the image above
Fig. (154) Goal Desginer - Steps Tree Select the step (Start Here) We will start now new interaction process to generate new steps to our steps tree. The slow way (Using Mouse): 1 - Click Interact to open the components browser 2 - Select the domain (Classes) 3 - Select the component (Button Class) The fast way (Using Keyboard shortcuts): 1 - Get the component using its name by typing (Button Class) Note : Stop typing when you see the required component is selected
Fig. (155) Component Browser – Select the component (Button Class) After selecting the component click Ok or press ENTER
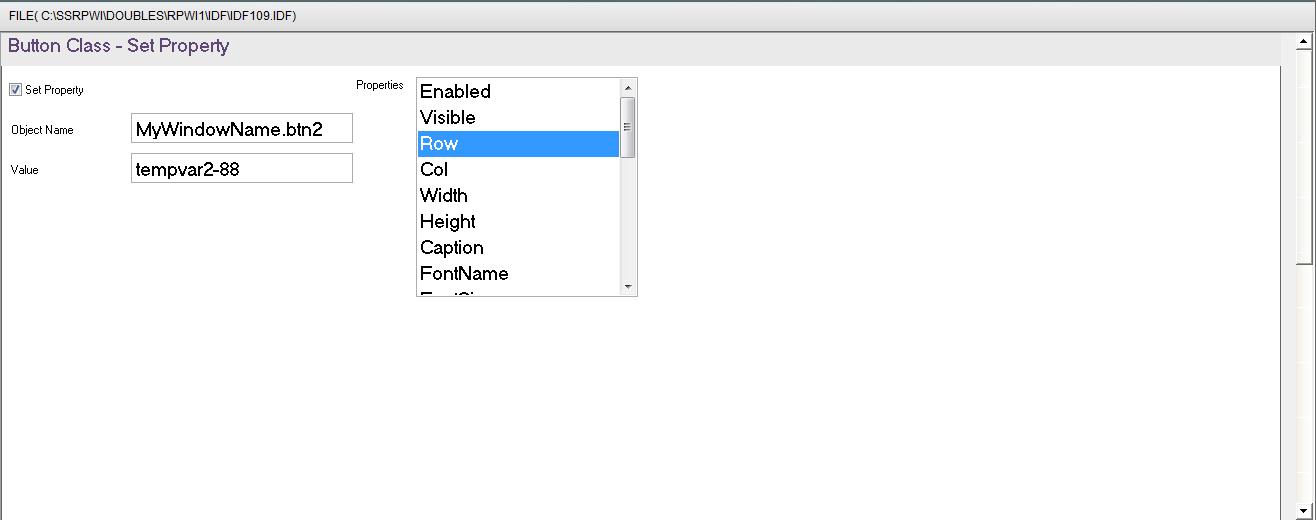
Fig. (156) Interaction page - Set the properties and enter the required data as in the image above
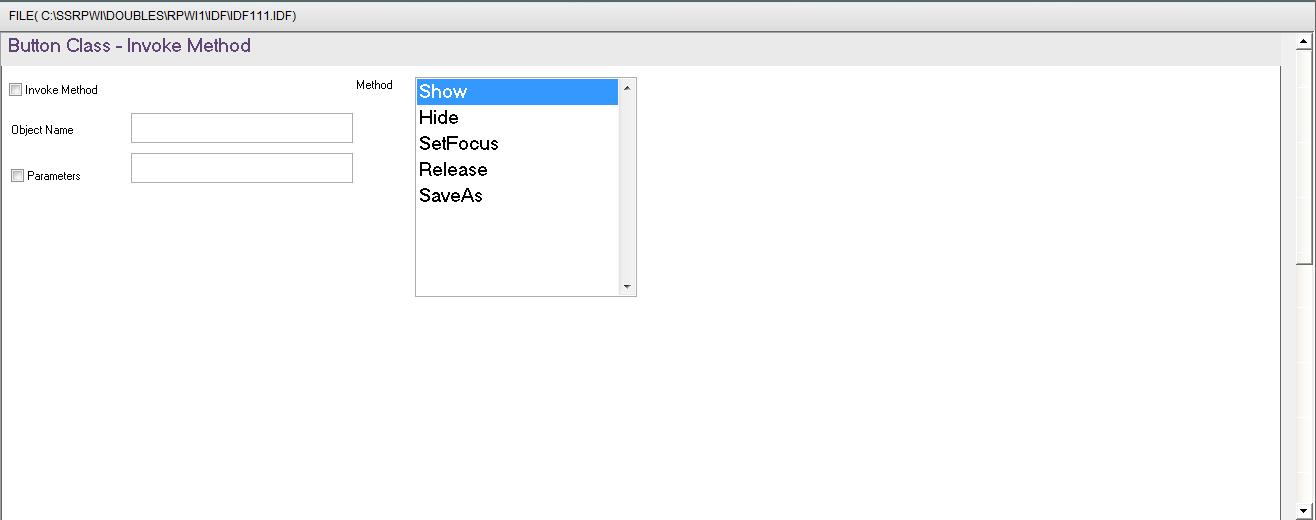
Fig. (157) Interaction page - Set the properties and enter the required data as in the image above
Fig. (158) Interaction page - Set the properties and enter the required data as in the image above
Fig. (159) Goal Desginer - Steps Tree Select the step (Start Here) We will start now new interaction process to generate new steps to our steps tree. The slow way (Using Mouse): 1 - Click Interact to open the components browser 2 - Select the domain (Classes) 3 - Select the component (Button Class) The fast way (Using Keyboard shortcuts): 1 - Get the component using its name by typing (Button Class) Note : Stop typing when you see the required component is selected
Fig. (160) Component Browser – Select the component (Button Class) After selecting the component click Ok or press ENTER
Fig. (161) Interaction page - Set the properties and enter the required data as in the image above
Fig. (162) Interaction page - Set the properties and enter the required data as in the image above
Fig. (163) Interaction page - Set the properties and enter the required data as in the image above
Fig. (164) Goal Desginer - Steps Tree Select the step (Start Here) We will start now new interaction process to generate new steps to our steps tree. The slow way (Using Mouse): 1 - Click Interact to open the components browser 2 - Select the domain (Classes) 3 - Select the component (Button Class) The fast way (Using Keyboard shortcuts): 1 - Get the component using its name by typing (Button Class) Note : Stop typing when you see the required component is selected
Fig. (165) Component Browser – Select the component (Button Class) After selecting the component click Ok or press ENTER
Fig. (166) Interaction page - Set the properties and enter the required data as in the image above
Fig. (167) Interaction page - Set the properties and enter the required data as in the image above
Fig. (168) Interaction page - Set the properties and enter the required data as in the image above
Fig. (169) Goal Desginer - Steps Tree Select the step (Start Here) We will start now new interaction process to generate new steps to our steps tree. The slow way (Using Mouse): 1 - Click Interact to open the components browser 2 - Select the domain (ActiveX) 3 - Select the component (ActiveX Class) The fast way (Using Keyboard shortcuts): 1 - Get the component using its name by typing (ActiveX Class) Note : Stop typing when you see the required component is selected
Fig. (170) Component Browser – Select the component (ActiveX Class) After selecting the component click Ok or press ENTER
Fig. (171) Interaction page - Set the properties and enter the required data as in the image above
Fig. (172) Interaction page - Set the properties and enter the required data as in the image above
Fig. (173) Interaction page - Set the properties and enter the required data as in the image above
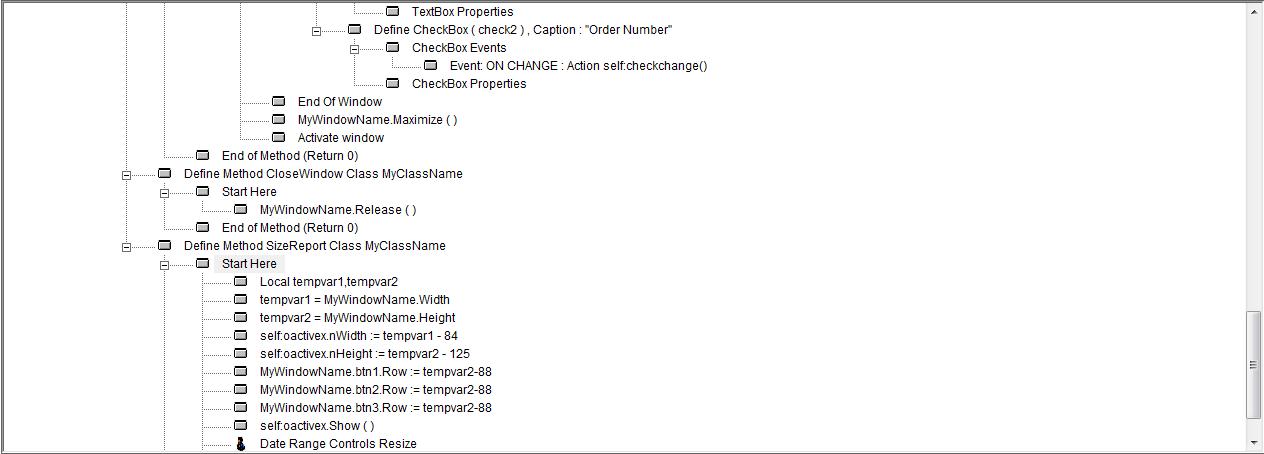
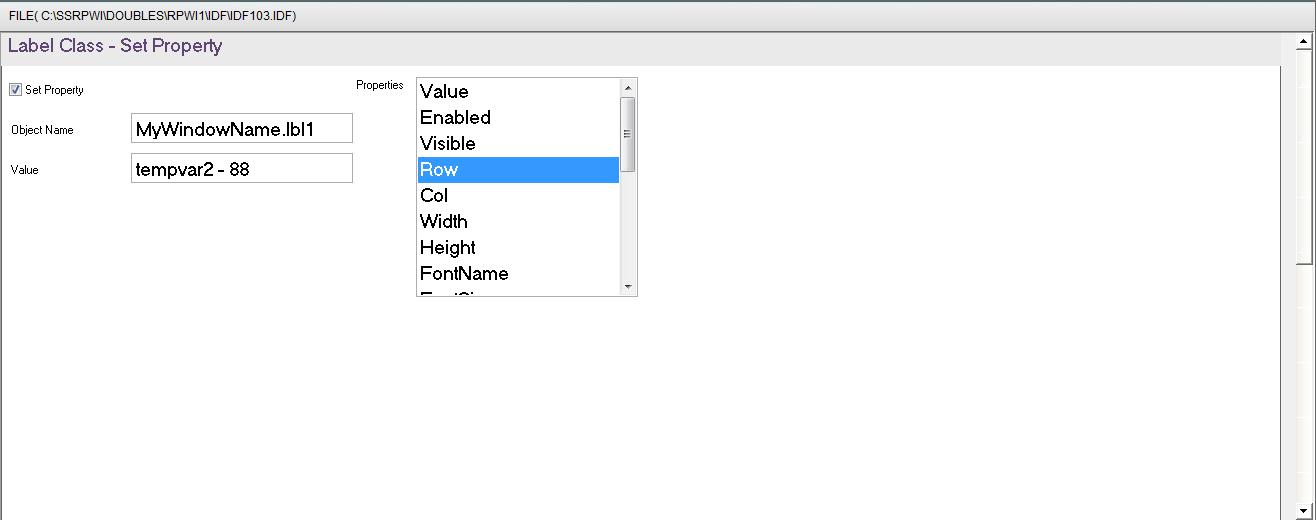
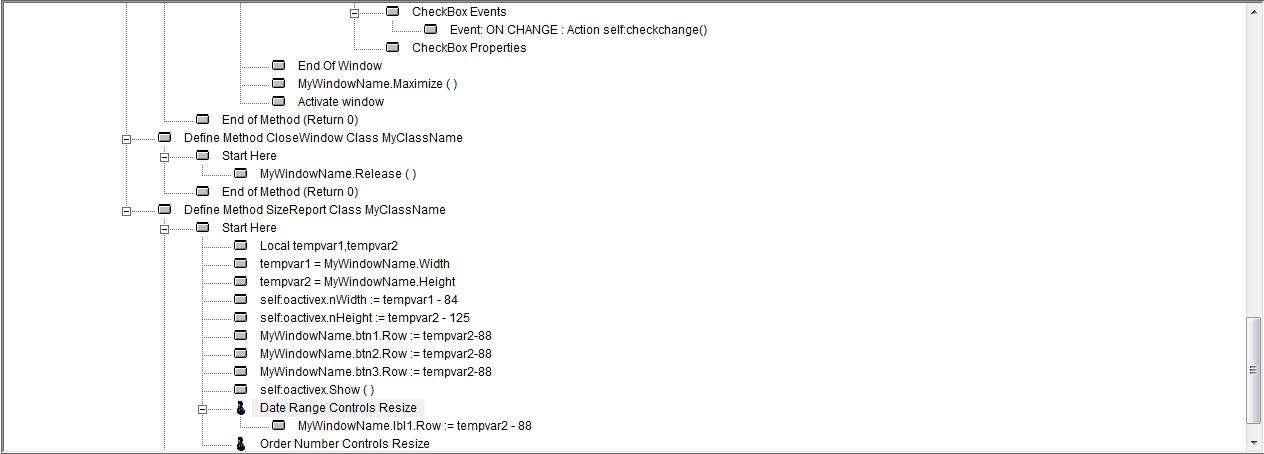
Fig. (174) Goal Desginer - Steps Tree Select the step (Date Range Controls Resize) We will start now new interaction process to generate new steps to our steps tree. The slow way (Using Mouse): 1 - Click Interact to open the components browser 2 - Select the domain (Classes) 3 - Select the component (Label Class) The fast way (Using Keyboard shortcuts): 1 - Get the component using its name by typing (Label Class) Note : Stop typing when you see the required component is selected
Fig. (175) Component Browser – Select the component (Label Class) After selecting the component click Ok or press ENTER
Fig. (176) Interaction page - Set the properties and enter the required data as in the image above
Fig. (177) Interaction page - Set the properties and enter the required data as in the image above
Fig. (178) Interaction page - Set the properties and enter the required data as in the image above
Fig. (179) Goal Desginer - Steps Tree Select the step (Date Range Controls Resize) We will start now new interaction process to generate new steps to our steps tree. The slow way (Using Mouse): 1 - Click Interact to open the components browser 2 - Select the domain (Classes) 3 - Select the component (Label Class) The fast way (Using Keyboard shortcuts): 1 - Get the component using its name by typing (Label Class) Note : Stop typing when you see the required component is selected
Fig. (180) Component Browser – Select the component (Label Class) After selecting the component click Ok or press ENTER
Fig. (181) Interaction page - Set the properties and enter the required data as in the image above
Fig. (182) Interaction page - Set the properties and enter the required data as in the image above
Fig. (183) Interaction page - Set the properties and enter the required data as in the image above
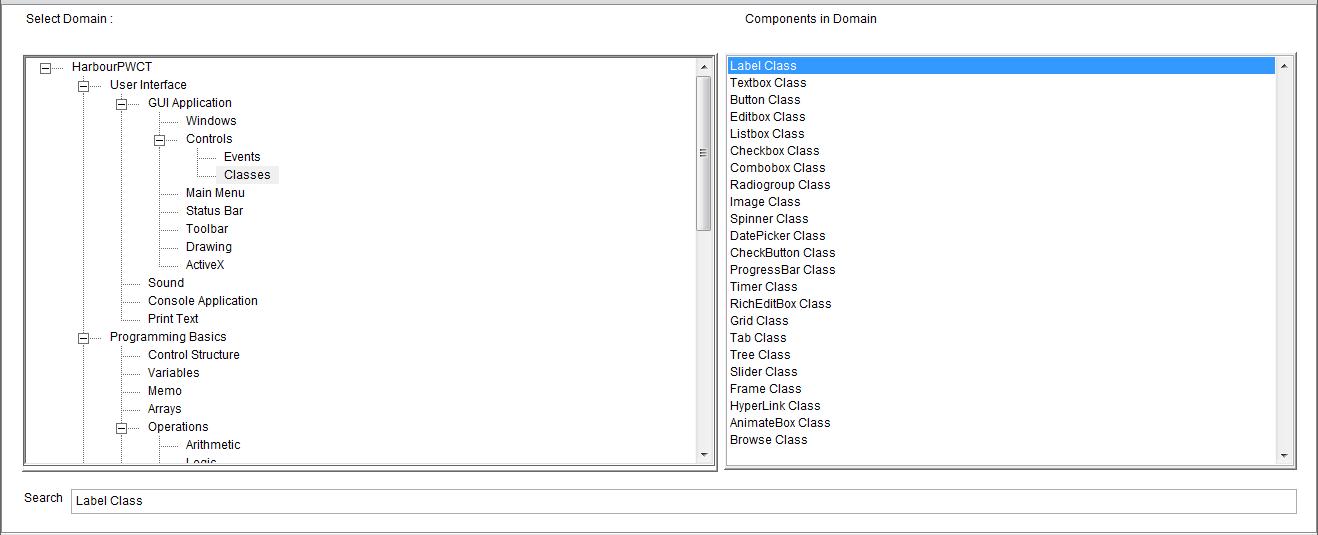
Fig. (184) Goal Desginer - Steps Tree Select the step (Date Range Controls Resize) We will start now new interaction process to generate new steps to our steps tree. The slow way (Using Mouse): 1 - Click Interact to open the components browser 2 - Select the domain (Classes) 3 - Select the component (Checkbox Class) The fast way (Using Keyboard shortcuts): 1 - Get the component using its name by typing (Checkbox Class) Note : Stop typing when you see the required component is selected
Fig. (185) Component Browser – Select the component (Checkbox Class) After selecting the component click Ok or press ENTER
Fig. (186) Interaction page - Set the properties and enter the required data as in the image above
Fig. (187) Interaction page - Set the properties and enter the required data as in the image above
Fig. (188) Interaction page - Set the properties and enter the required data as in the image above
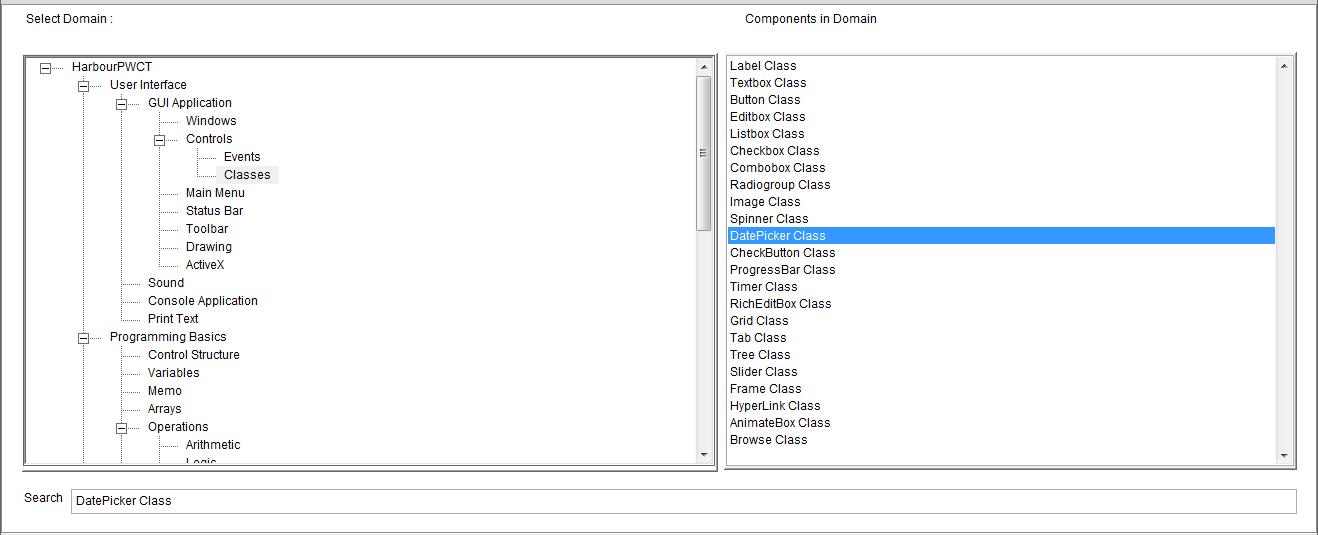
Fig. (189) Goal Desginer - Steps Tree Select the step (Date Range Controls Resize) We will start now new interaction process to generate new steps to our steps tree. The slow way (Using Mouse): 1 - Click Interact to open the components browser 2 - Select the domain (Classes) 3 - Select the component (DatePicker Class) The fast way (Using Keyboard shortcuts): 1 - Get the component using its name by typing (DatePicker Class) Note : Stop typing when you see the required component is selected
Fig. (190) Component Browser – Select the component (DatePicker Class) After selecting the component click Ok or press ENTER
Fig. (191) Interaction page - Set the properties and enter the required data as in the image above
Fig. (192) Interaction page - Set the properties and enter the required data as in the image above
Fig. (193) Interaction page - Set the properties and enter the required data as in the image above
Fig. (194) Goal Desginer - Steps Tree Select the step (Date Range Controls Resize) We will start now new interaction process to generate new steps to our steps tree. The slow way (Using Mouse): 1 - Click Interact to open the components browser 2 - Select the domain (Classes) 3 - Select the component (DatePicker Class) The fast way (Using Keyboard shortcuts): 1 - Get the component using its name by typing (DatePicker Class) Note : Stop typing when you see the required component is selected
Fig. (195) Component Browser – Select the component (DatePicker Class) After selecting the component click Ok or press ENTER
Fig. (196) Interaction page - Set the properties and enter the required data as in the image above
Fig. (197) Interaction page - Set the properties and enter the required data as in the image above
Fig. (198) Interaction page - Set the properties and enter the required data as in the image above
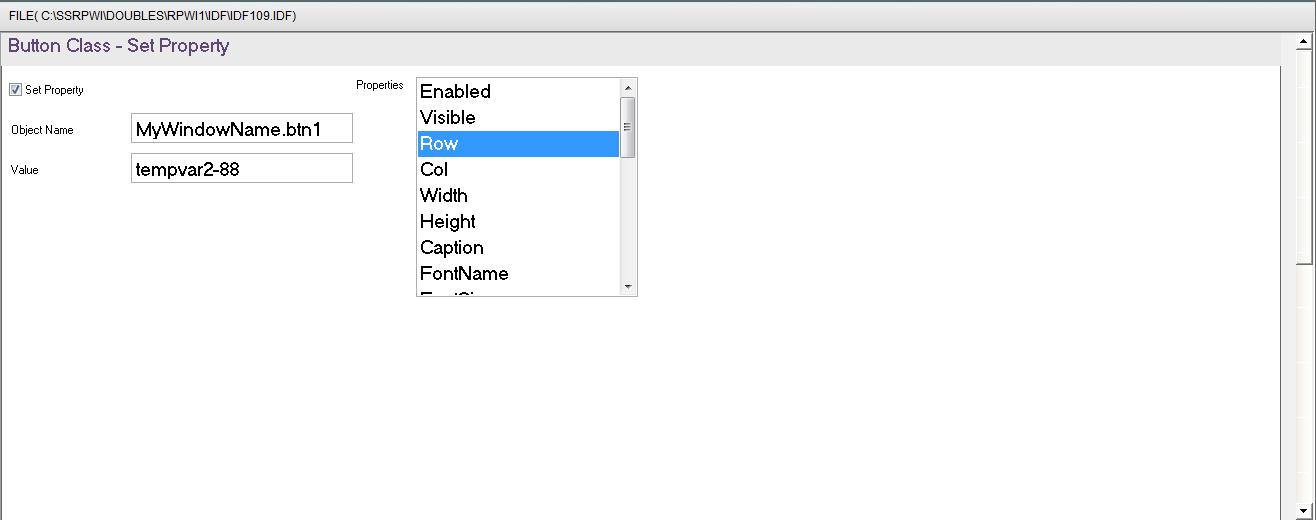
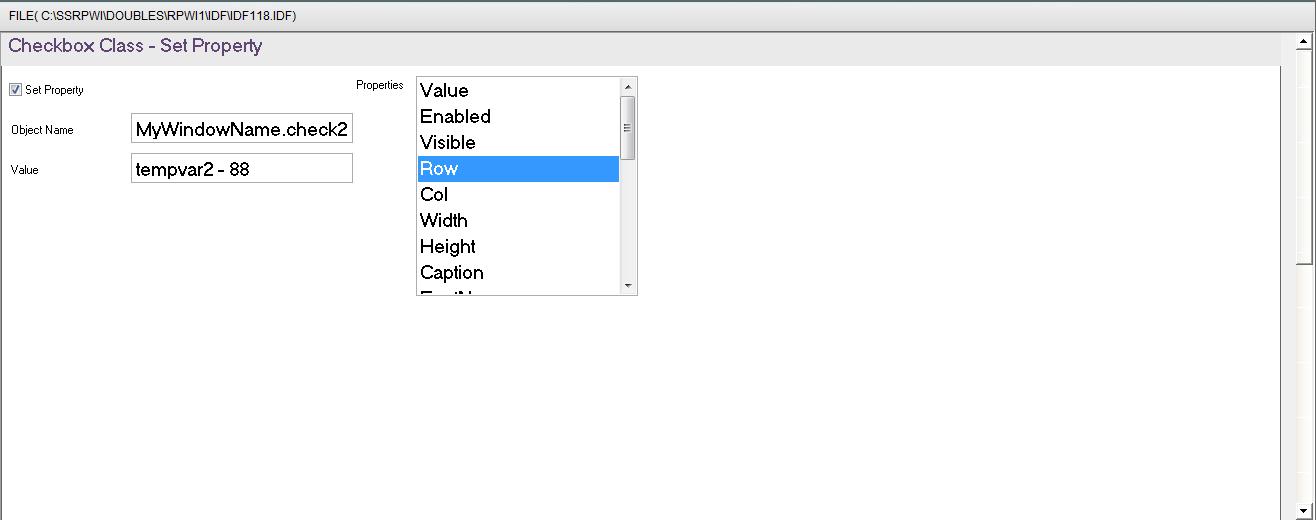
Fig. (199) Goal Desginer - Steps Tree Select the step (Order Number Controls Resize) We will start now new interaction process to generate new steps to our steps tree. The slow way (Using Mouse): 1 - Click Interact to open the components browser 2 - Select the domain (Classes) 3 - Select the component (Checkbox Class) The fast way (Using Keyboard shortcuts): 1 - Get the component using its name by typing (Checkbox Class) Note : Stop typing when you see the required component is selected
Fig. (200) Component Browser – Select the component (Checkbox Class) After selecting the component click Ok or press ENTER
Fig. (201) Interaction page - Set the properties and enter the required data as in the image above
Fig. (202) Interaction page - Set the properties and enter the required data as in the image above
Fig. (203) Interaction page - Set the properties and enter the required data as in the image above
Fig. (204) Goal Desginer - Steps Tree Select the step (Order Number Controls Resize) We will start now new interaction process to generate new steps to our steps tree. The slow way (Using Mouse): 1 - Click Interact to open the components browser 2 - Select the domain (Classes) 3 - Select the component (Textbox Class) The fast way (Using Keyboard shortcuts): 1 - Get the component using its name by typing (Textbox Class) Note : Stop typing when you see the required component is selected
Fig. (205) Component Browser – Select the component (Textbox Class) After selecting the component click Ok or press ENTER
Fig. (206) Interaction page - Set the properties and enter the required data as in the image above
Fig. (207) Interaction page - Set the properties and enter the required data as in the image above
Fig. (208) Interaction page - Set the properties and enter the required data as in the image above
Fig. (209) Goal Desginer - Steps Tree Select the step (Class Methods) We will start now new interaction process to generate new steps to our steps tree. The slow way (Using Mouse): 1 - Click Interact to open the components browser 2 - Select the domain (Object Oriented Programming (OOP)) 3 - Select the component (Define Class Method) The fast way (Using Keyboard shortcuts): 1 - Get the component using its name by typing (Define Class Method) Note : Stop typing when you see the required component is selected
Fig. (210) Component Browser – Select the component (Define Class Method) After selecting the component click Ok or press ENTER
Fig. (211) Interaction page - Set the properties and enter the required data as in the image above
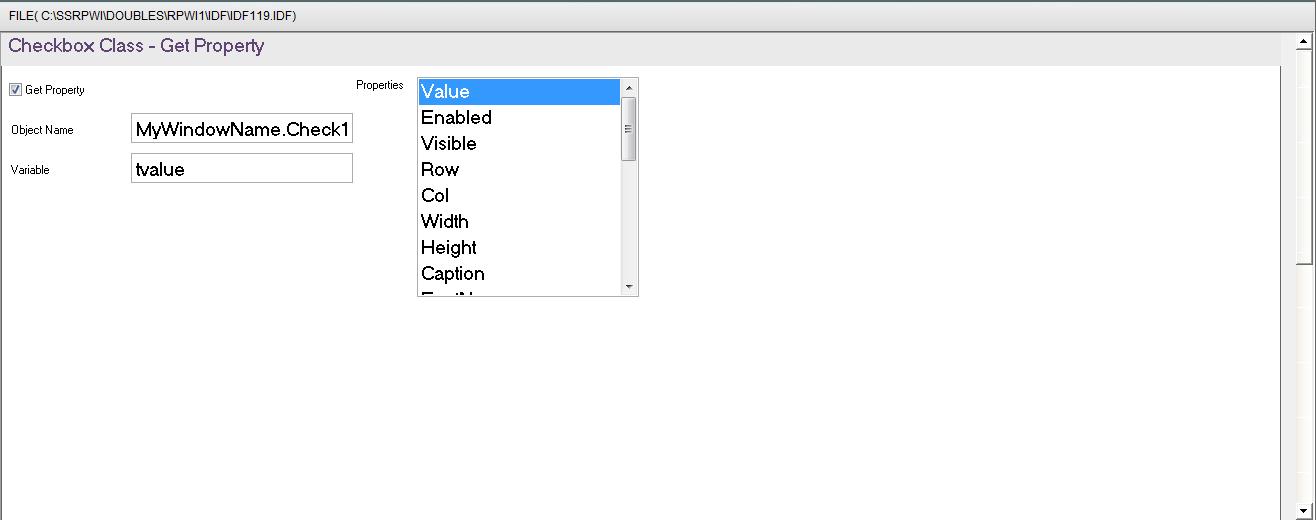
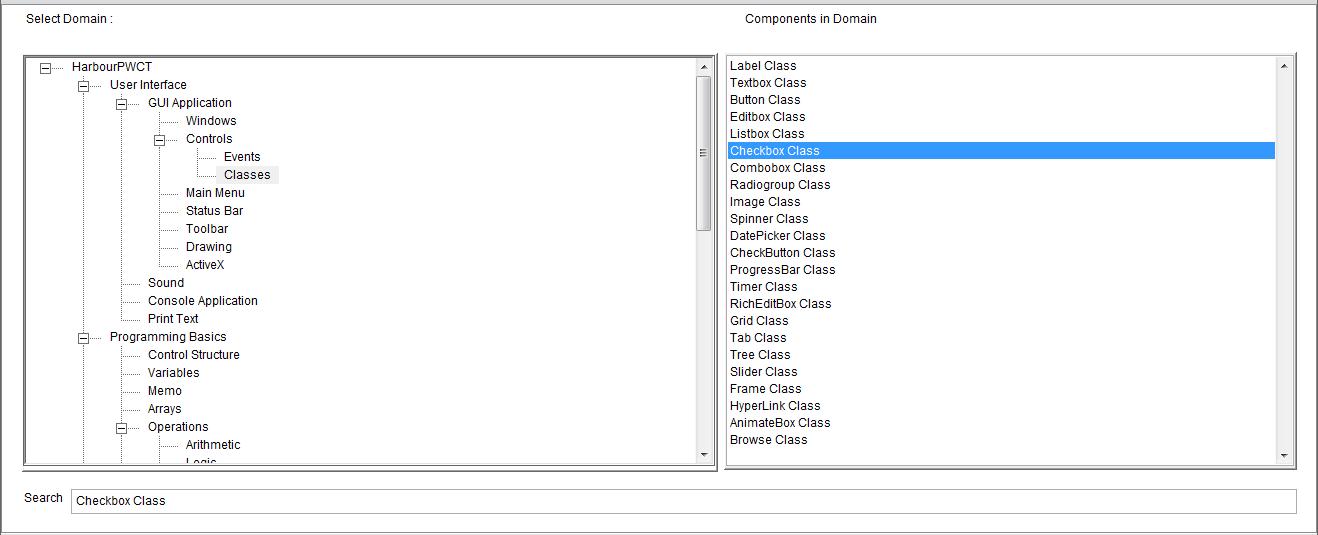
Fig. (212) Goal Desginer - Steps Tree Select the step (Check Filter) We will start now new interaction process to generate new steps to our steps tree. The slow way (Using Mouse): 1 - Click Interact to open the components browser 2 - Select the domain (Classes) 3 - Select the component (Checkbox Class) The fast way (Using Keyboard shortcuts): 1 - Get the component using its name by typing (Checkbox Class) Note : Stop typing when you see the required component is selected
Fig. (213) Component Browser – Select the component (Checkbox Class) After selecting the component click Ok or press ENTER
Fig. (214) Interaction page - Set the properties and enter the required data as in the image above
Fig. (215) Interaction page - Set the properties and enter the required data as in the image above
Fig. (216) Interaction page - Set the properties and enter the required data as in the image above
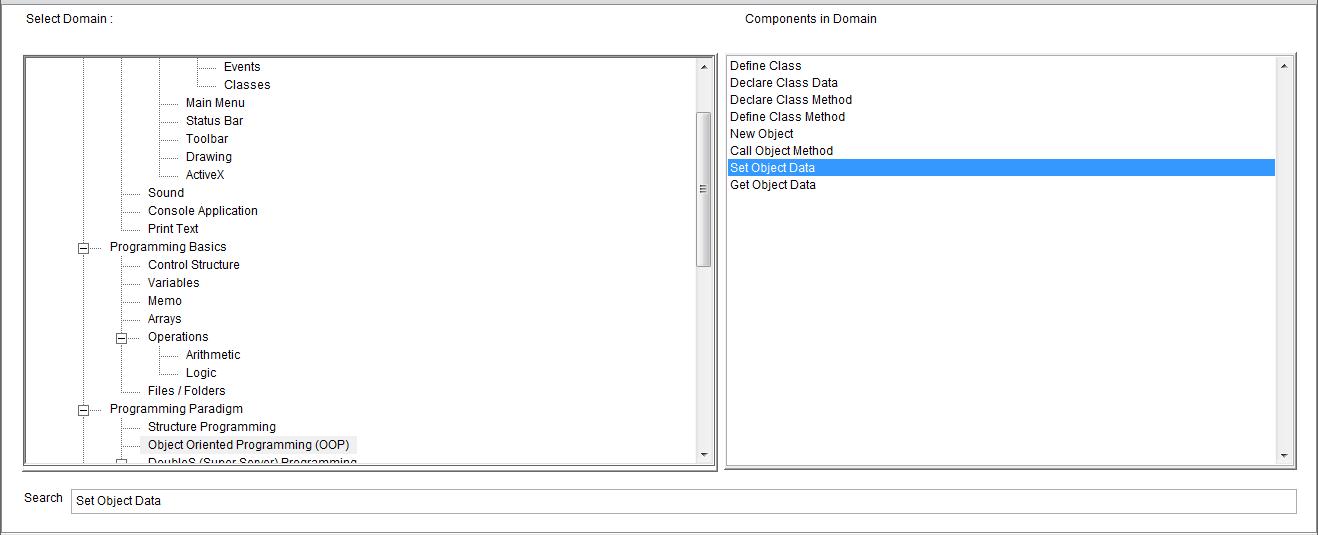
Fig. (217) Goal Desginer - Steps Tree Select the step (Check Filter) We will start now new interaction process to generate new steps to our steps tree. The slow way (Using Mouse): 1 - Click Interact to open the components browser 2 - Select the domain (Object Oriented Programming (OOP)) 3 - Select the component (Set Object Data) The fast way (Using Keyboard shortcuts): 1 - Get the component using its name by typing (Set Object Data) Note : Stop typing when you see the required component is selected
Fig. (218) Component Browser – Select the component (Set Object Data) After selecting the component click Ok or press ENTER
Fig. (219) Interaction page - Set the properties and enter the required data as in the image above
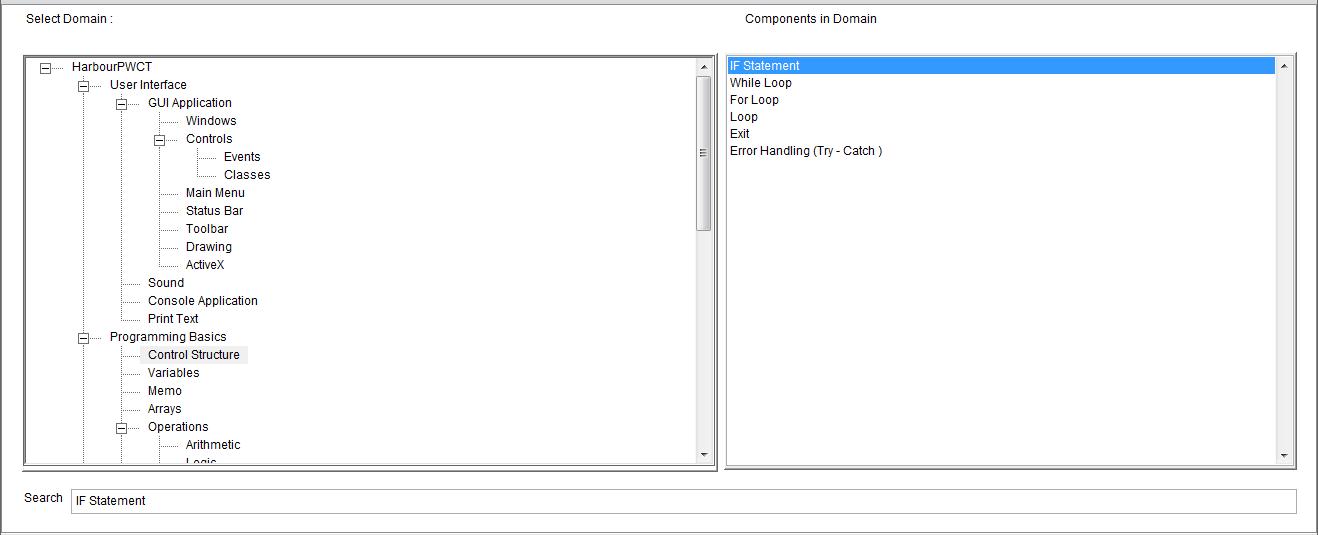
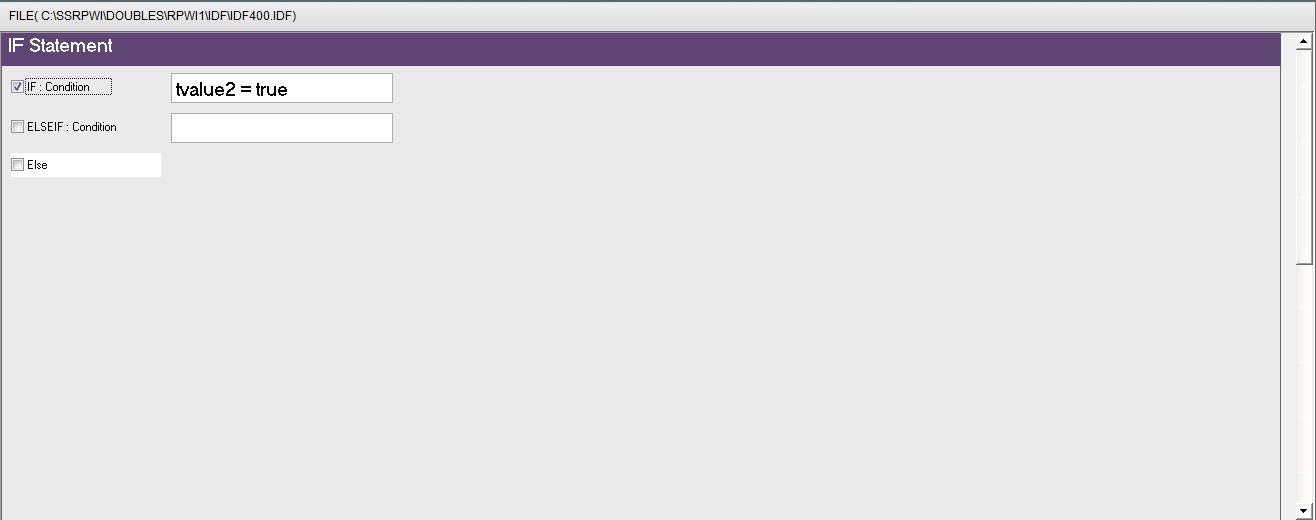
Fig. (220) Goal Desginer - Steps Tree Select the step (Check Filter) We will start now new interaction process to generate new steps to our steps tree. The slow way (Using Mouse): 1 - Click Interact to open the components browser 2 - Select the domain (Control Structure) 3 - Select the component (IF Statement) The fast way (Using Keyboard shortcuts): 1 - Get the component using its name by typing (IF Statement) Note : Stop typing when you see the required component is selected
Fig. (221) Component Browser – Select the component (IF Statement) After selecting the component click Ok or press ENTER
Fig. (222) Interaction page - Set the properties and enter the required data as in the image above
Fig. (223) Goal Desginer - Steps Tree Select the step (Start Here) We will start now new interaction process to generate new steps to our steps tree. The slow way (Using Mouse): 1 - Click Interact to open the components browser 2 - Select the domain (Classes) 3 - Select the component (DatePicker Class) The fast way (Using Keyboard shortcuts): 1 - Get the component using its name by typing (DatePicker Class) Note : Stop typing when you see the required component is selected
Fig. (224) Component Browser – Select the component (DatePicker Class) After selecting the component click Ok or press ENTER
Fig. (225) Interaction page - Set the properties and enter the required data as in the image above
Fig. (226) Interaction page - Set the properties and enter the required data as in the image above
Fig. (227) Interaction page - Set the properties and enter the required data as in the image above
Fig. (228) Goal Desginer - Steps Tree Select the step (Start Here) We will start now new interaction process to generate new steps to our steps tree. The slow way (Using Mouse): 1 - Click Interact to open the components browser 2 - Select the domain (Classes) 3 - Select the component (DatePicker Class) The fast way (Using Keyboard shortcuts): 1 - Get the component using its name by typing (DatePicker Class) Note : Stop typing when you see the required component is selected
Fig. (229) Component Browser – Select the component (DatePicker Class) After selecting the component click Ok or press ENTER
Fig. (230) Interaction page - Set the properties and enter the required data as in the image above
Fig. (231) Interaction page - Set the properties and enter the required data as in the image above
Fig. (232) Interaction page - Set the properties and enter the required data as in the image above
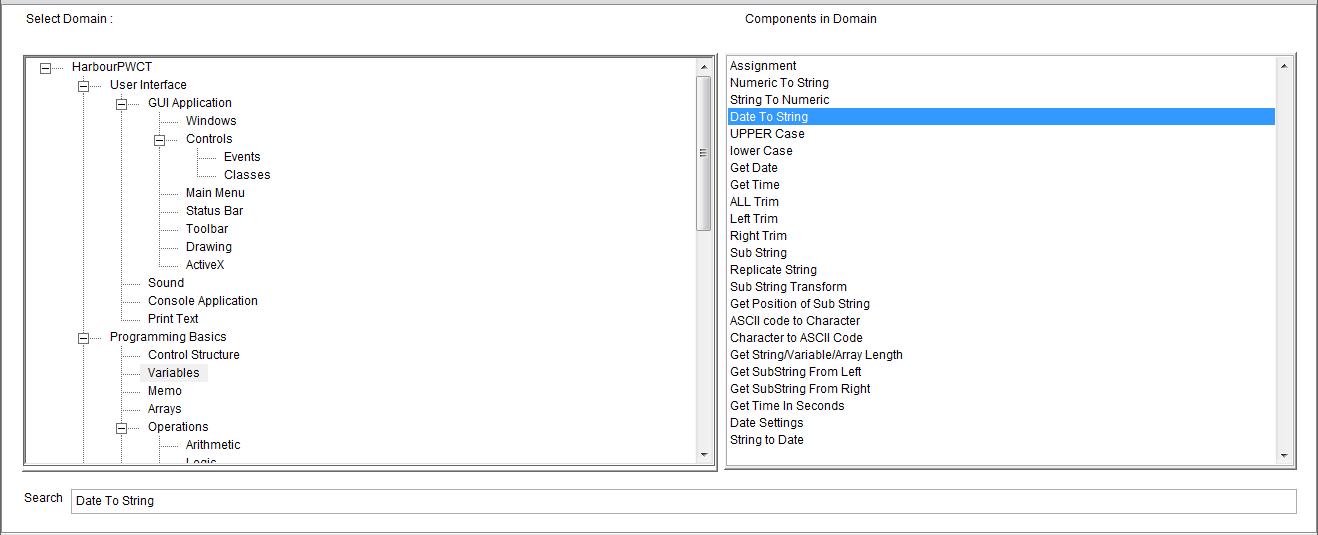
Fig. (233) Goal Desginer - Steps Tree Select the step (Start Here) We will start now new interaction process to generate new steps to our steps tree. The slow way (Using Mouse): 1 - Click Interact to open the components browser 2 - Select the domain (Variables) 3 - Select the component (Date To String) The fast way (Using Keyboard shortcuts): 1 - Get the component using its name by typing (Date To String) Note : Stop typing when you see the required component is selected
Fig. (234) Component Browser – Select the component (Date To String) After selecting the component click Ok or press ENTER
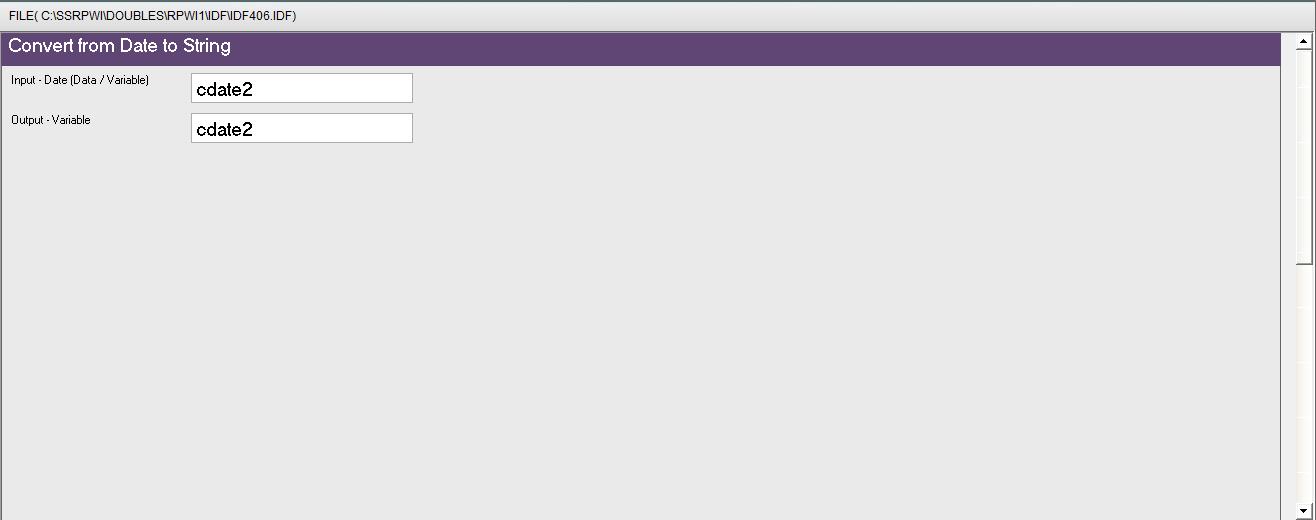
Fig. (235) Interaction page - Set the properties and enter the required data as in the image above
Fig. (236) Goal Desginer - Steps Tree Select the step (Start Here) We will start now new interaction process to generate new steps to our steps tree. The slow way (Using Mouse): 1 - Click Interact to open the components browser 2 - Select the domain (Variables) 3 - Select the component (Date To String) The fast way (Using Keyboard shortcuts): 1 - Get the component using its name by typing (Date To String) Note : Stop typing when you see the required component is selected
Fig. (237) Component Browser – Select the component (Date To String) After selecting the component click Ok or press ENTER
Fig. (238) Interaction page - Set the properties and enter the required data as in the image above
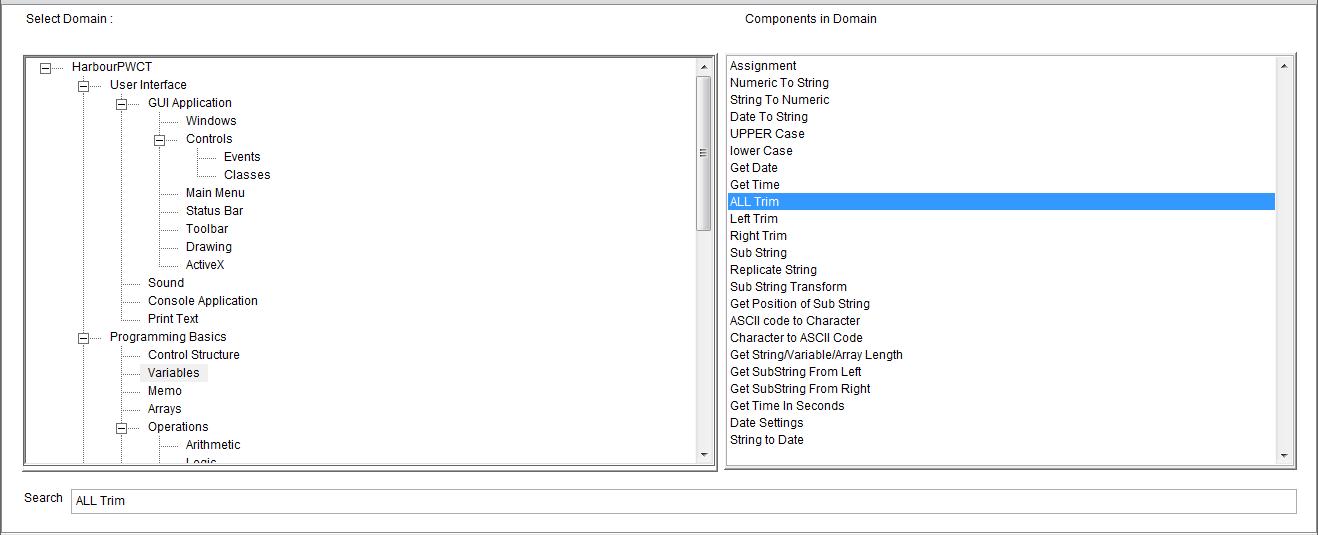
Fig. (239) Goal Desginer - Steps Tree Select the step (Start Here) We will start now new interaction process to generate new steps to our steps tree. The slow way (Using Mouse): 1 - Click Interact to open the components browser 2 - Select the domain (Variables) 3 - Select the component (ALL Trim) The fast way (Using Keyboard shortcuts): 1 - Get the component using its name by typing (ALL Trim) Note : Stop typing when you see the required component is selected
Fig. (240) Component Browser – Select the component (ALL Trim) After selecting the component click Ok or press ENTER
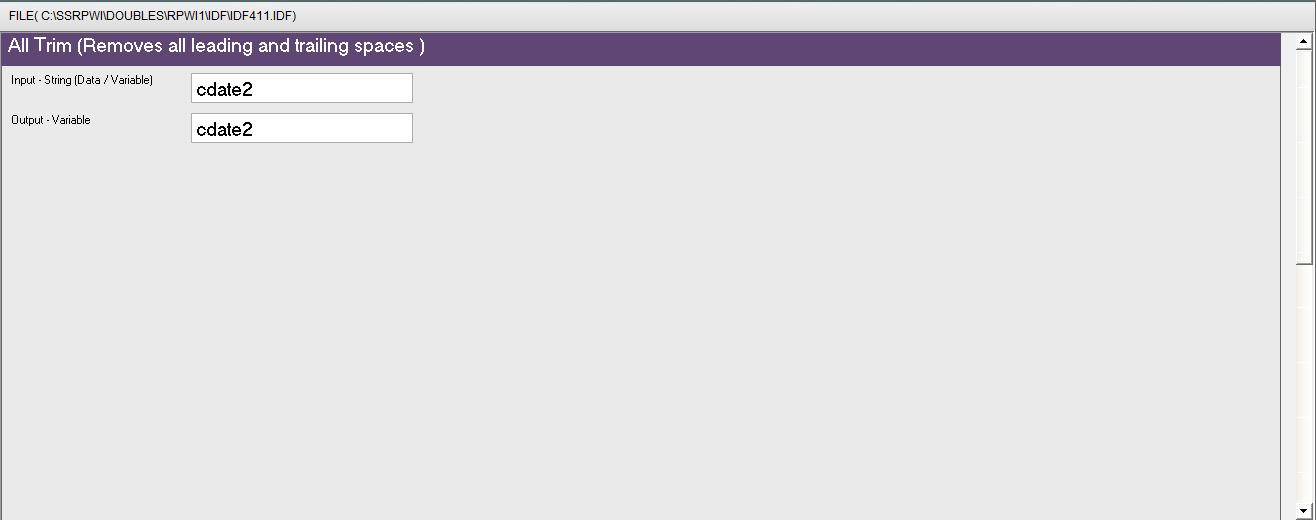
Fig. (241) Interaction page - Set the properties and enter the required data as in the image above
Fig. (242) Goal Desginer - Steps Tree Select the step (Start Here) We will start now new interaction process to generate new steps to our steps tree. The slow way (Using Mouse): 1 - Click Interact to open the components browser 2 - Select the domain (Variables) 3 - Select the component (ALL Trim) The fast way (Using Keyboard shortcuts): 1 - Get the component using its name by typing (ALL Trim) Note : Stop typing when you see the required component is selected
Fig. (243) Component Browser – Select the component (ALL Trim) After selecting the component click Ok or press ENTER
Fig. (244) Interaction page - Set the properties and enter the required data as in the image above
Fig. (245) Goal Desginer - Steps Tree Select the step (Start Here) We will start now new interaction process to generate new steps to our steps tree. The slow way (Using Mouse): 1 - Click Interact to open the components browser 2 - Select the domain (Object Oriented Programming (OOP)) 3 - Select the component (Set Object Data) The fast way (Using Keyboard shortcuts): 1 - Get the component using its name by typing (Set Object Data) Note : Stop typing when you see the required component is selected
Fig. (246) Component Browser – Select the component (Set Object Data) After selecting the component click Ok or press ENTER
Fig. (247) Interaction page - Set the properties and enter the required data as in the image above
Fig. (248) Goal Desginer - Steps Tree Select the step (Start Here) We will start now new interaction process to generate new steps to our steps tree. The slow way (Using Mouse): 1 - Click Interact to open the components browser 2 - Select the domain (Object Oriented Programming (OOP)) 3 - Select the component (Set Object Data) The fast way (Using Keyboard shortcuts): 1 - Get the component using its name by typing (Set Object Data) Note : Stop typing when you see the required component is selected
Fig. (249) Component Browser – Select the component (Set Object Data) After selecting the component click Ok or press ENTER
Fig. (250) Interaction page - Set the properties and enter the required data as in the image above
Fig. (251) Goal Desginer - Steps Tree Select the step (Check Filter) We will start now new interaction process to generate new steps to our steps tree. The slow way (Using Mouse): 1 - Click Interact to open the components browser 2 - Select the domain (Classes) 3 - Select the component (Checkbox Class) The fast way (Using Keyboard shortcuts): 1 - Get the component using its name by typing (Checkbox Class) Note : Stop typing when you see the required component is selected
Fig. (252) Component Browser – Select the component (Checkbox Class) After selecting the component click Ok or press ENTER
Fig. (454) Interaction page - Set the properties and enter the required data as in the image above
Fig. (254) Interaction page - Set the properties and enter the required data as in the image above
Fig. (255) Interaction page - Set the properties and enter the required data as in the image above
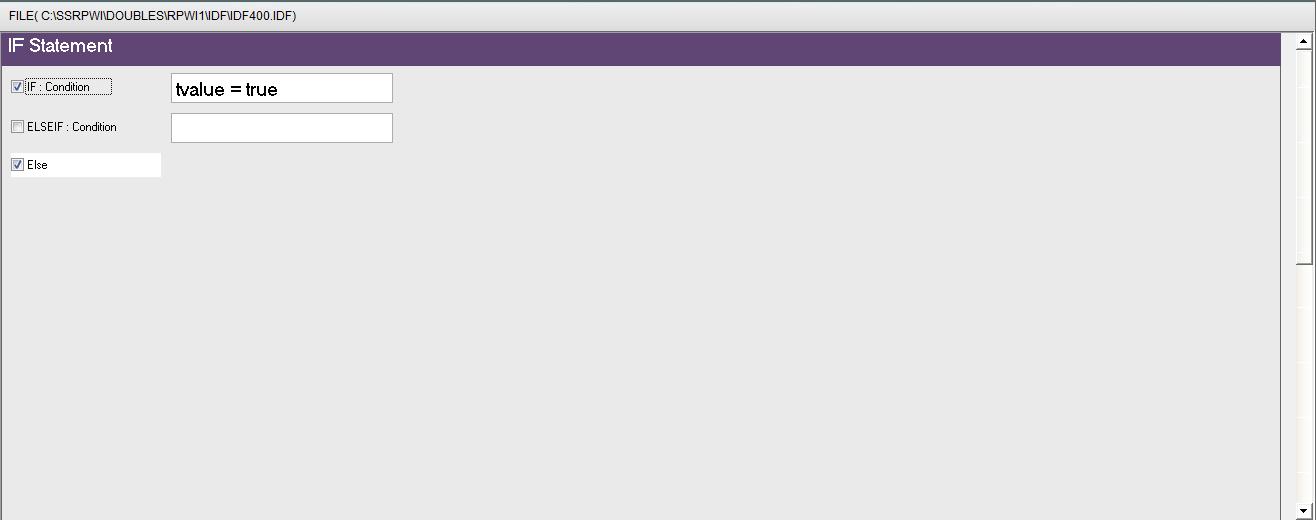
Fig. (256) Goal Desginer - Steps Tree Select the step (Check Filter) We will start now new interaction process to generate new steps to our steps tree. The slow way (Using Mouse): 1 - Click Interact to open the components browser 2 - Select the domain (Control Structure) 3 - Select the component (IF Statement) The fast way (Using Keyboard shortcuts): 1 - Get the component using its name by typing (IF Statement) Note : Stop typing when you see the required component is selected
Fig. (257) Component Browser – Select the component (IF Statement) After selecting the component click Ok or press ENTER
Fig. (258) Interaction page - Set the properties and enter the required data as in the image above
Fig. (259) Goal Desginer - Steps Tree Select the step (Start Here) We will start now new interaction process to generate new steps to our steps tree. The slow way (Using Mouse): 1 - Click Interact to open the components browser 2 - Select the domain (Control Structure) 3 - Select the component (IF Statement) The fast way (Using Keyboard shortcuts): 1 - Get the component using its name by typing (IF Statement) Note : Stop typing when you see the required component is selected
Fig. (260) Component Browser – Select the component (IF Statement) After selecting the component click Ok or press ENTER
Fig. (261) Interaction page - Set the properties and enter the required data as in the image above
Fig. (262) Goal Desginer - Steps Tree Select the step (Start Here) We will start now new interaction process to generate new steps to our steps tree. The slow way (Using Mouse): 1 - Click Interact to open the components browser 2 - Select the domain (Object Oriented Programming (OOP)) 3 - Select the component (Set Object Data) The fast way (Using Keyboard shortcuts): 1 - Get the component using its name by typing (Set Object Data) Note : Stop typing when you see the required component is selected
Fig. (263) Component Browser – Select the component (Set Object Data) After selecting the component click Ok or press ENTER
Fig. (264) Interaction page - Set the properties and enter the required data as in the image above
Fig. (265) Goal Desginer - Steps Tree Select the step (Start Here) We will start now new interaction process to generate new steps to our steps tree. The slow way (Using Mouse): 1 - Click Interact to open the components browser 2 - Select the domain (Object Oriented Programming (OOP)) 3 - Select the component (Set Object Data) The fast way (Using Keyboard shortcuts): 1 - Get the component using its name by typing (Set Object Data) Note : Stop typing when you see the required component is selected
Fig. (266) Component Browser – Select the component (Set Object Data) After selecting the component click Ok or press ENTER
Fig. (267) Interaction page - Set the properties and enter the required data as in the image above
Fig. (268) Goal Desginer - Steps Tree Select the step (Start Here) We will start now new interaction process to generate new steps to our steps tree. The slow way (Using Mouse): 1 - Click Interact to open the components browser 2 - Select the domain (Classes) 3 - Select the component (Textbox Class) The fast way (Using Keyboard shortcuts): 1 - Get the component using its name by typing (Textbox Class) Note : Stop typing when you see the required component is selected
Fig. (269) Component Browser – Select the component (Textbox Class) After selecting the component click Ok or press ENTER
Fig. (270) Interaction page - Set the properties and enter the required data as in the image above
Fig. (271) Interaction page - Set the properties and enter the required data as in the image above
Fig. (272) Interaction page - Set the properties and enter the required data as in the image above
Fig. (273) Goal Desginer - Steps Tree Select the step (Start Here) We will start now new interaction process to generate new steps to our steps tree. The slow way (Using Mouse): 1 - Click Interact to open the components browser 2 - Select the domain (Variables) 3 - Select the component (ALL Trim) The fast way (Using Keyboard shortcuts): 1 - Get the component using its name by typing (ALL Trim) Note : Stop typing when you see the required component is selected
Fig. (274) Component Browser – Select the component (ALL Trim) After selecting the component click Ok or press ENTER
Fig. (275) Interaction page - Set the properties and enter the required data as in the image above
Fig. (276) Goal Desginer - Steps Tree Select the step (Start Here) We will start now new interaction process to generate new steps to our steps tree. The slow way (Using Mouse): 1 - Click Interact to open the components browser 2 - Select the domain (Object Oriented Programming (OOP)) 3 - Select the component (Set Object Data) The fast way (Using Keyboard shortcuts): 1 - Get the component using its name by typing (Set Object Data) Note : Stop typing when you see the required component is selected
Fig. (277) Component Browser – Select the component (Set Object Data) After selecting the component click Ok or press ENTER
Fig. (278) Interaction page - Set the properties and enter the required data as in the image above
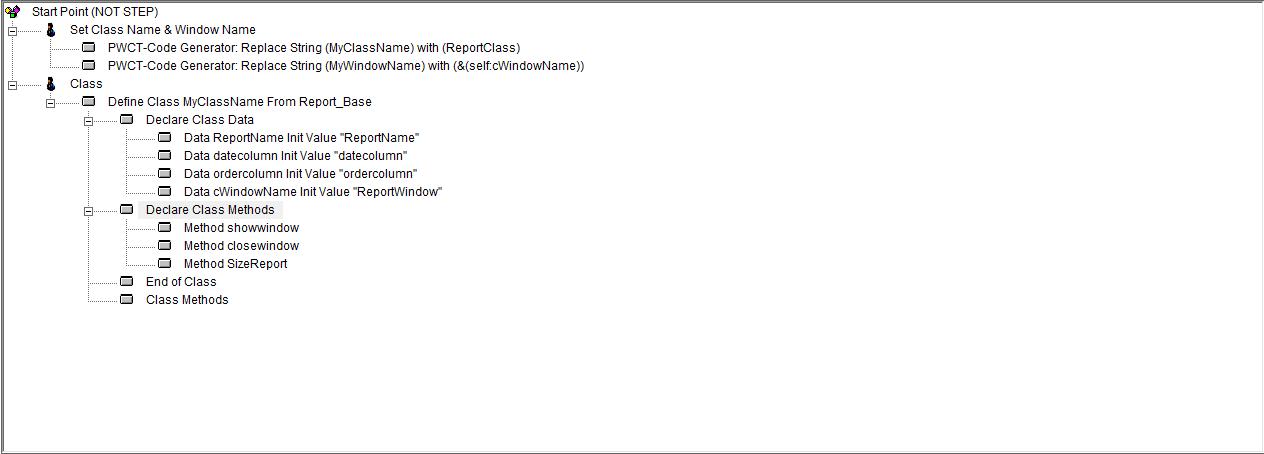
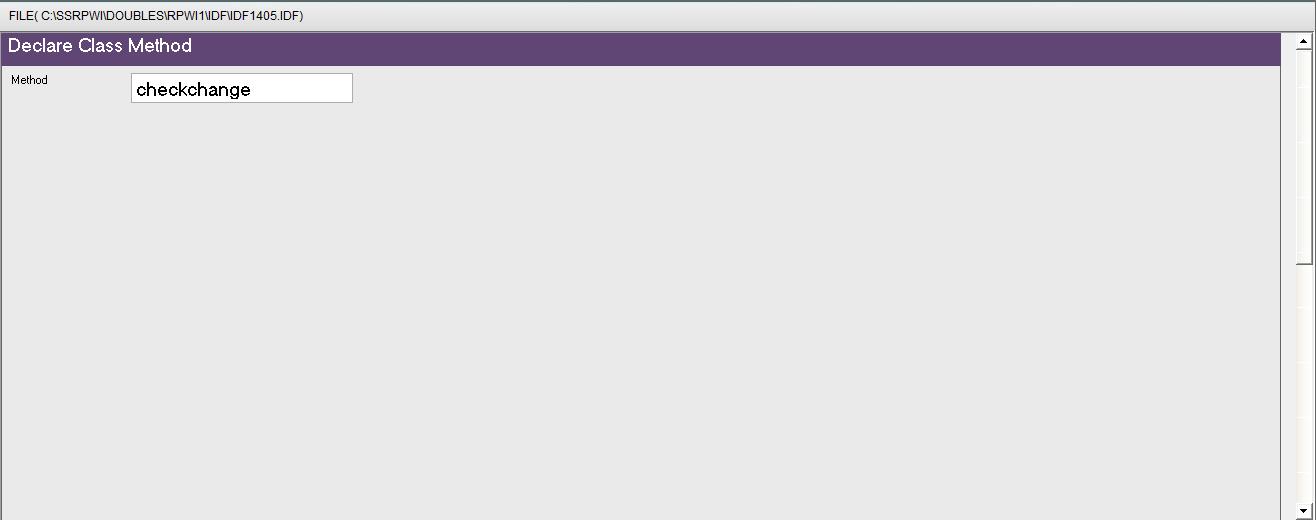
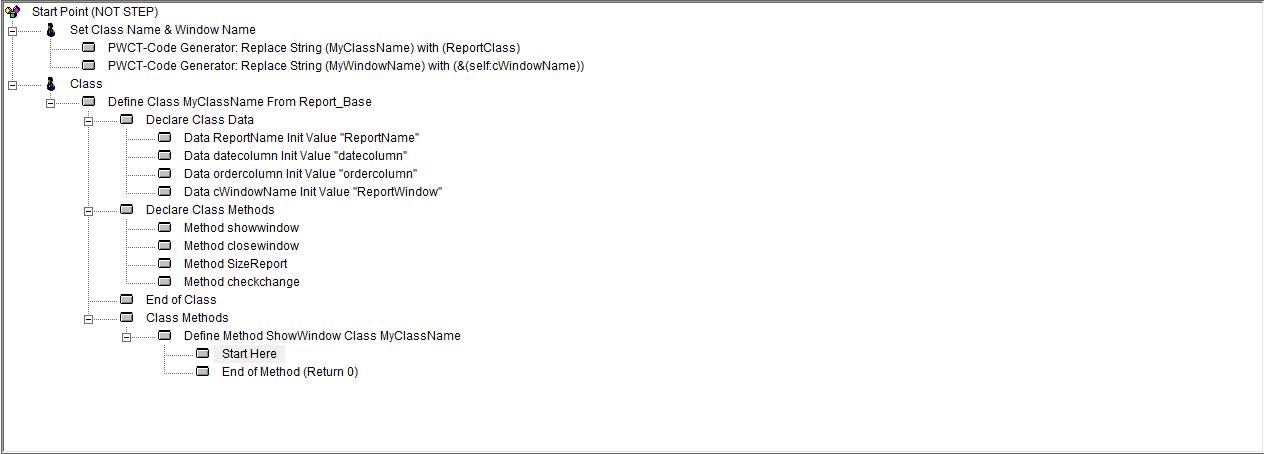
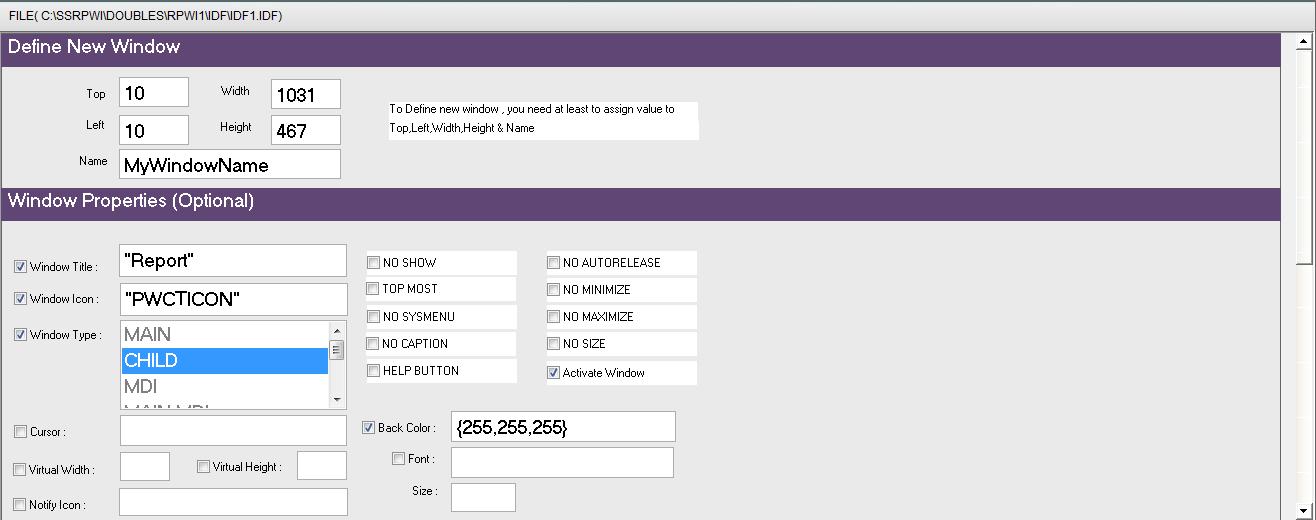
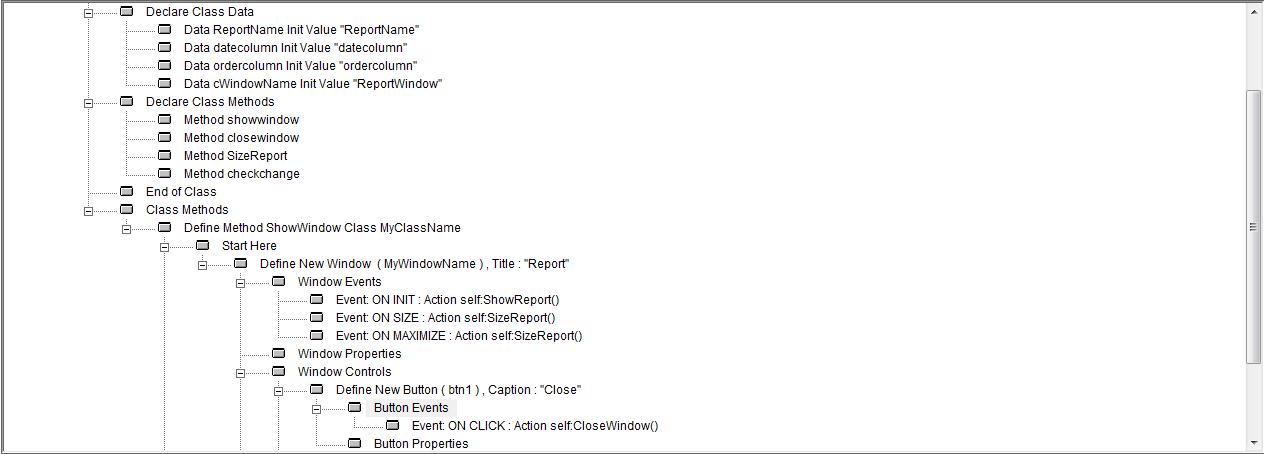
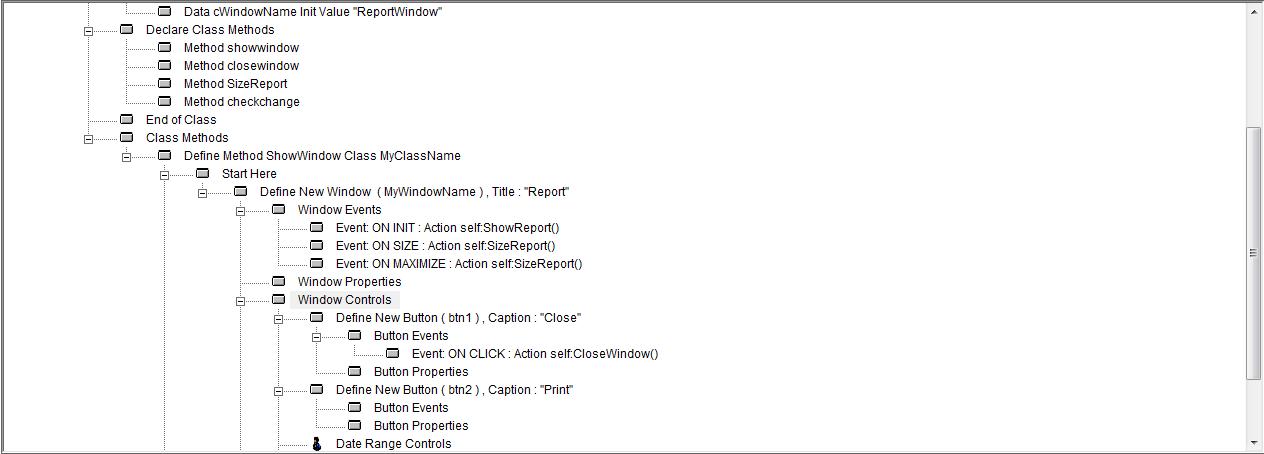
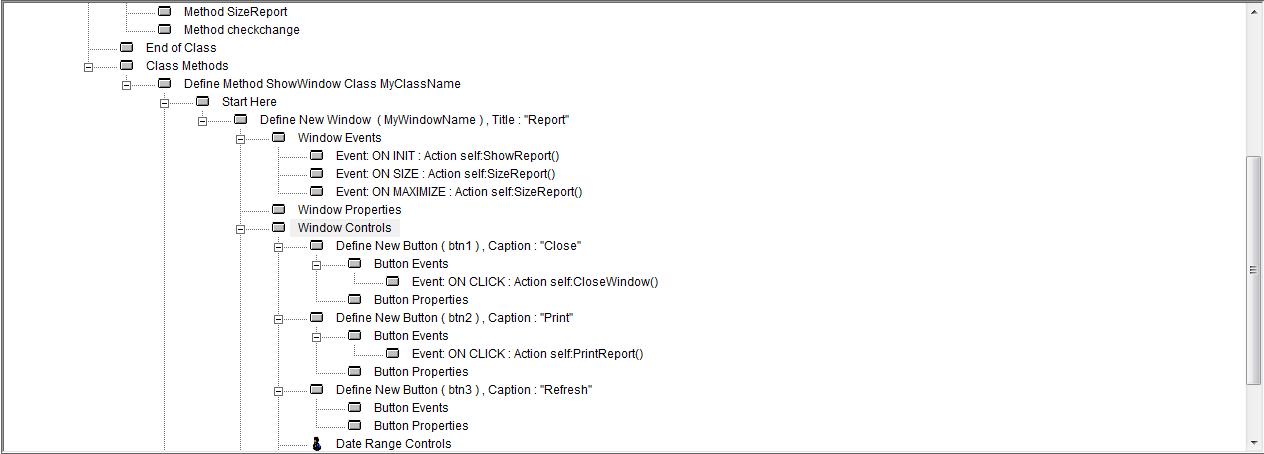
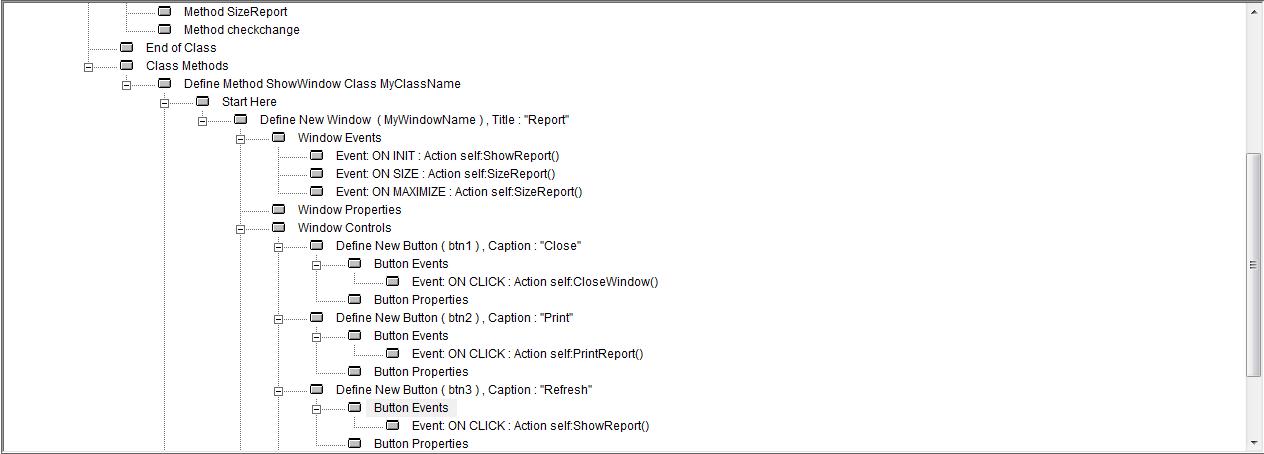
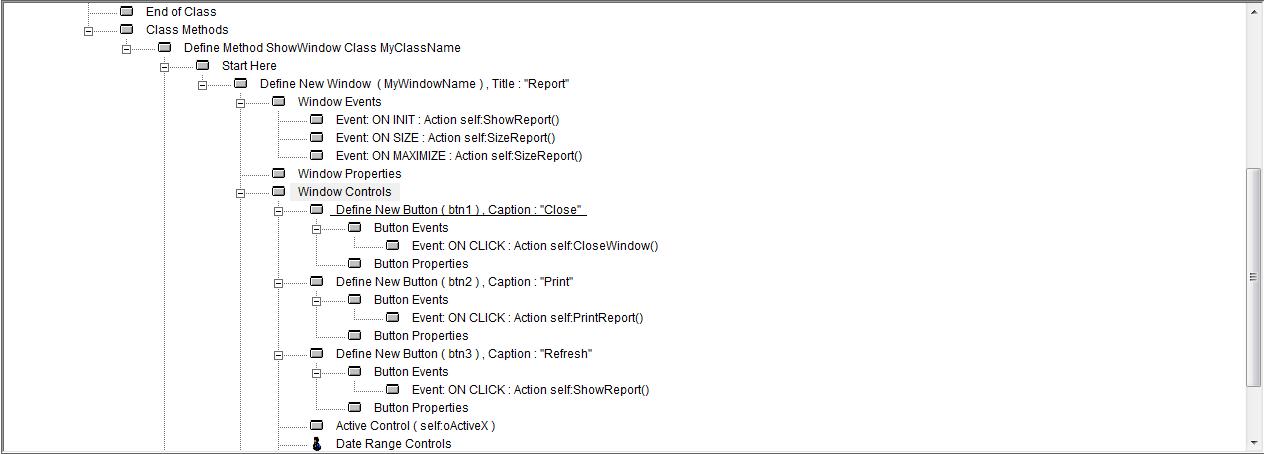
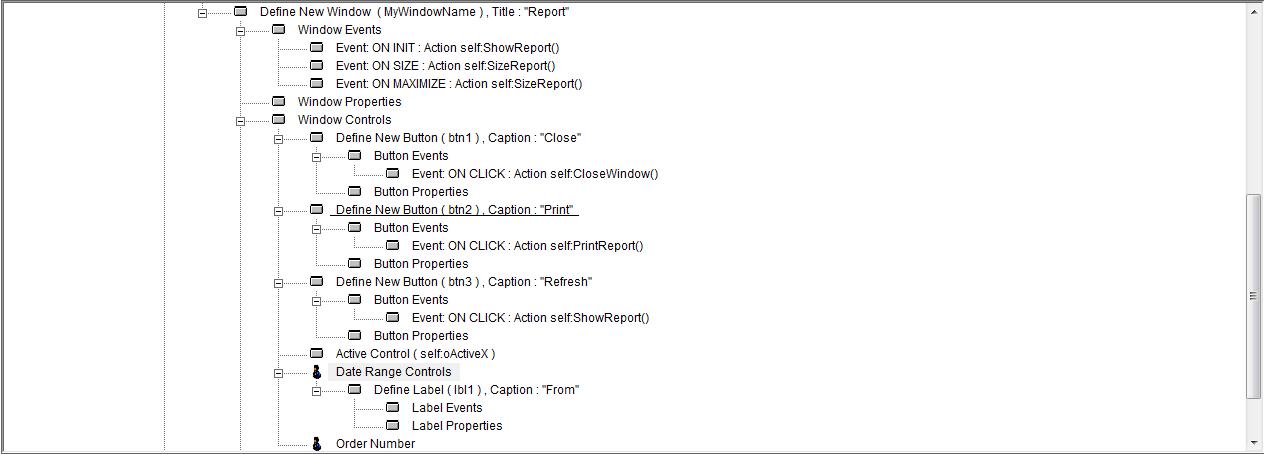
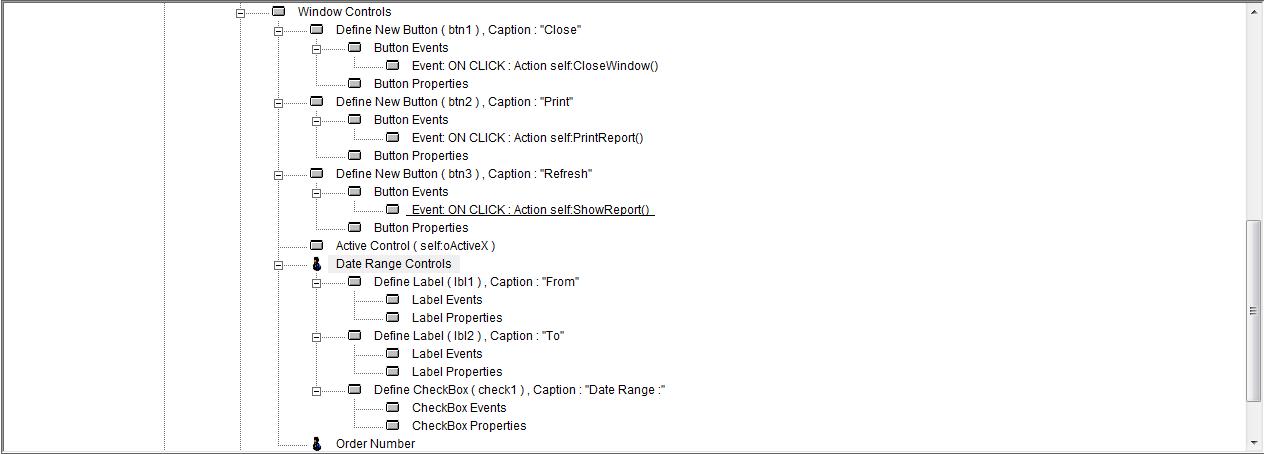
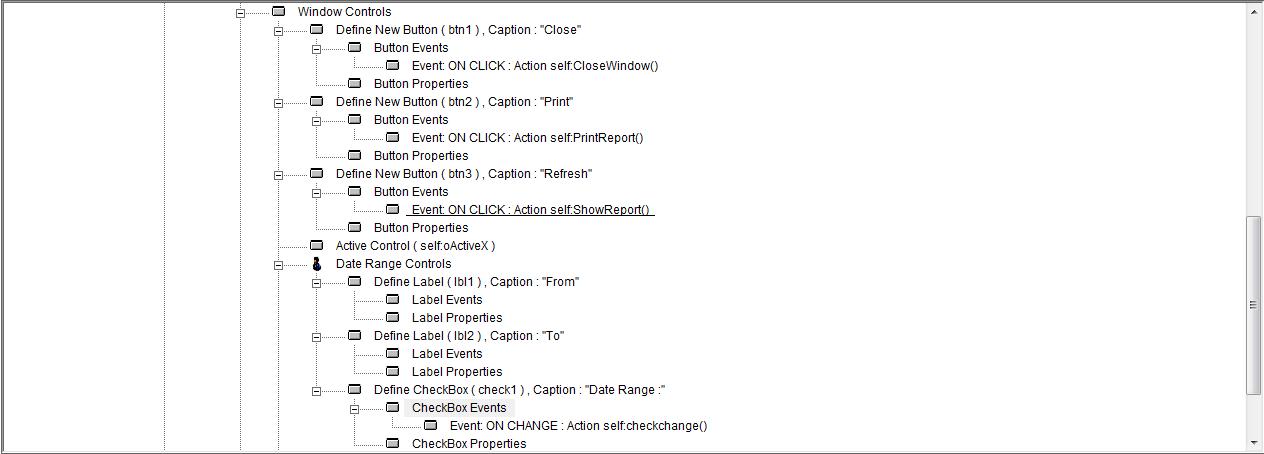
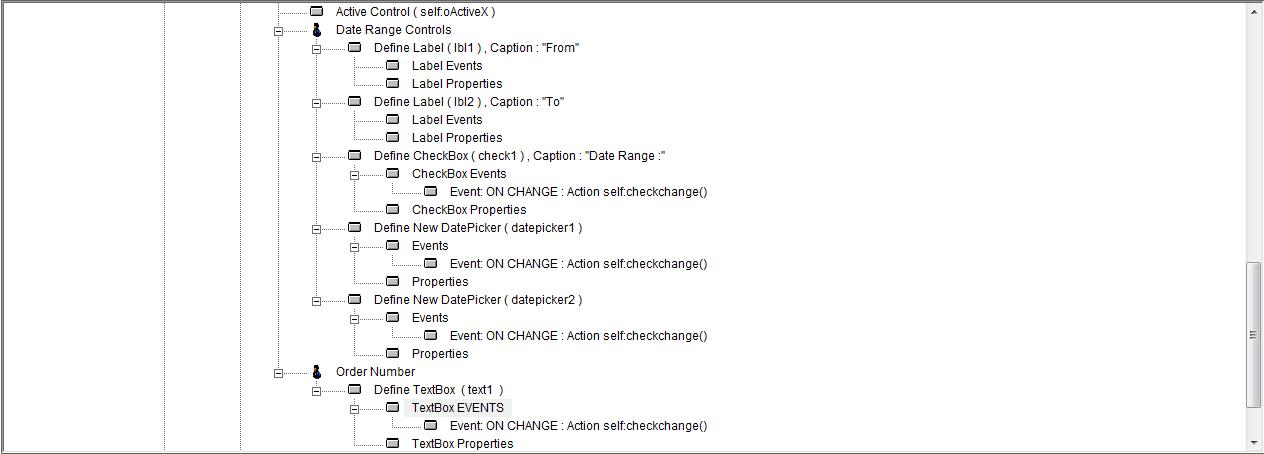
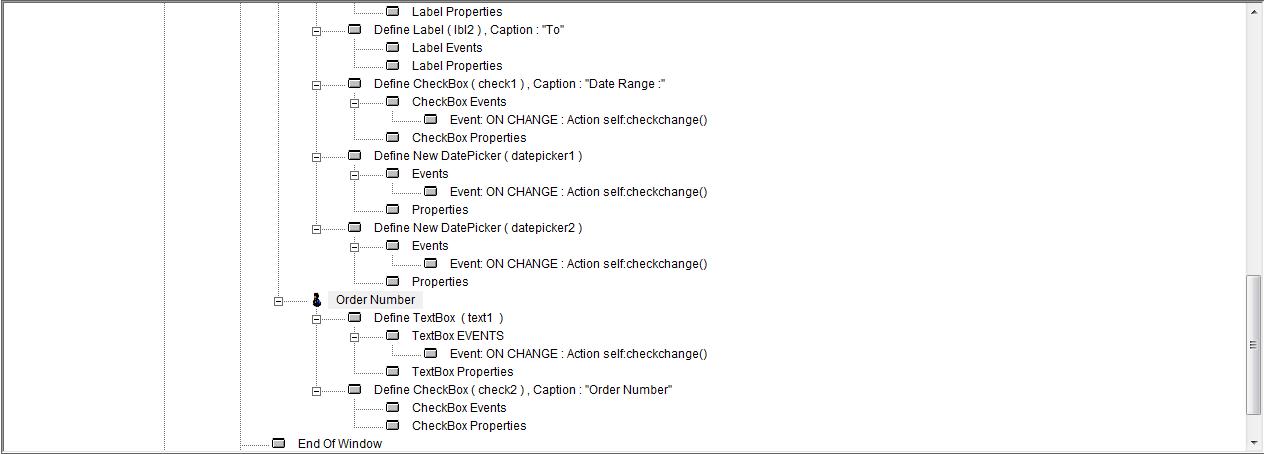
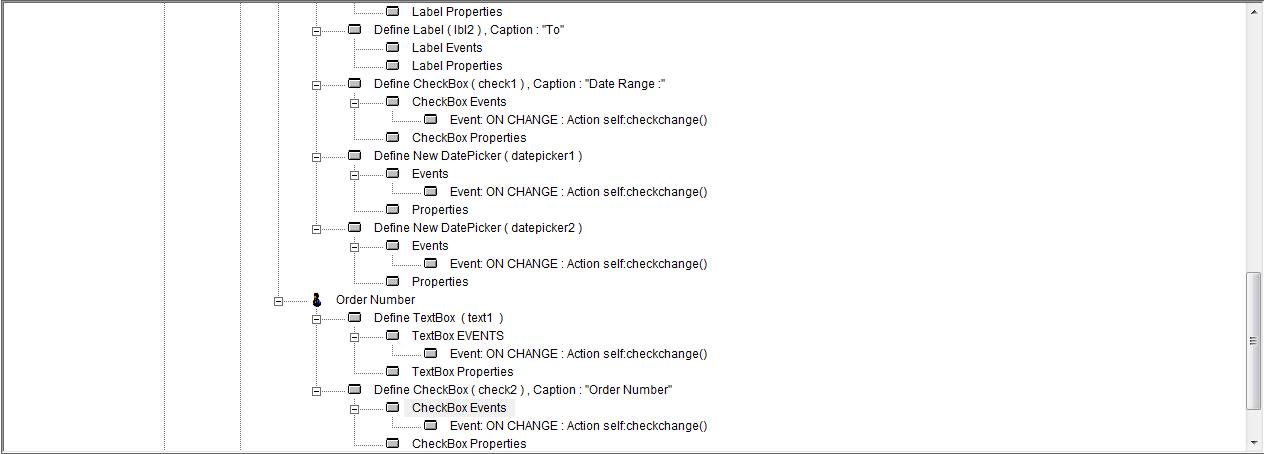
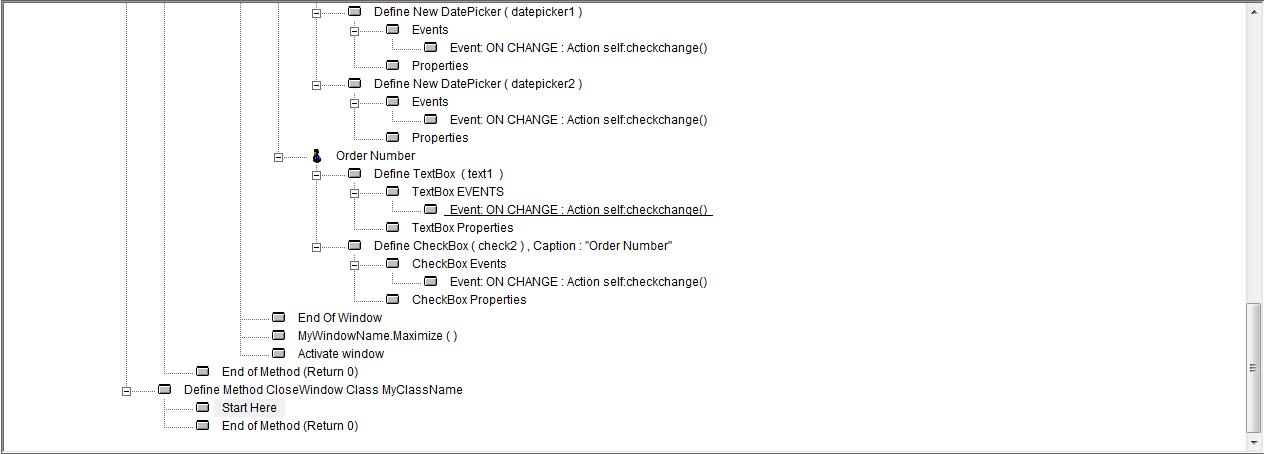
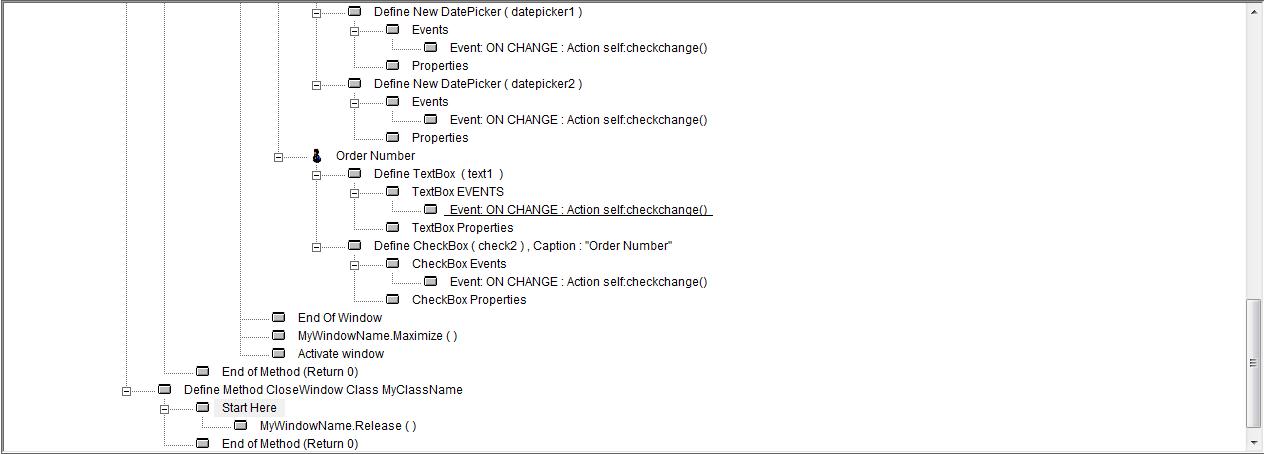
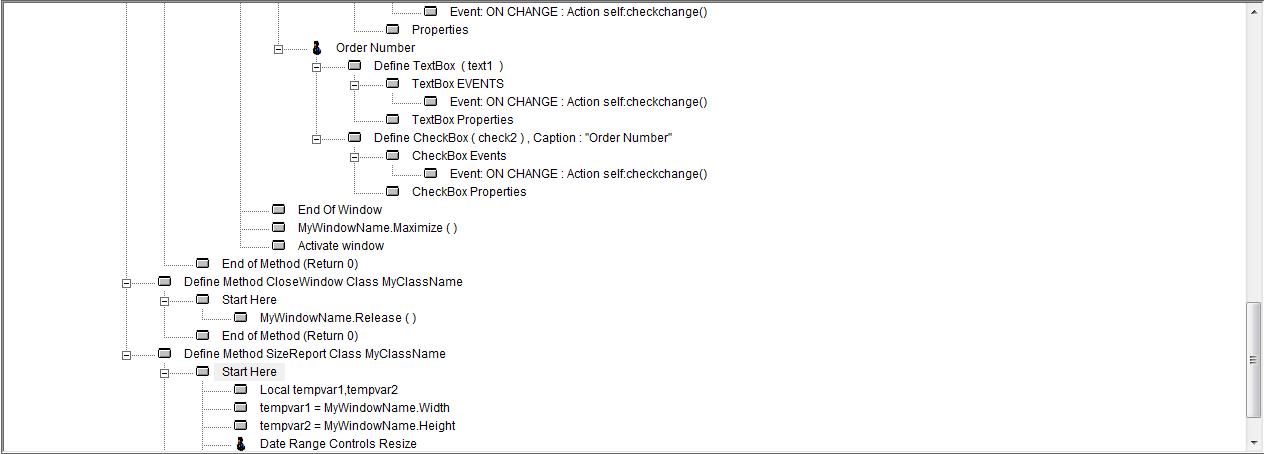
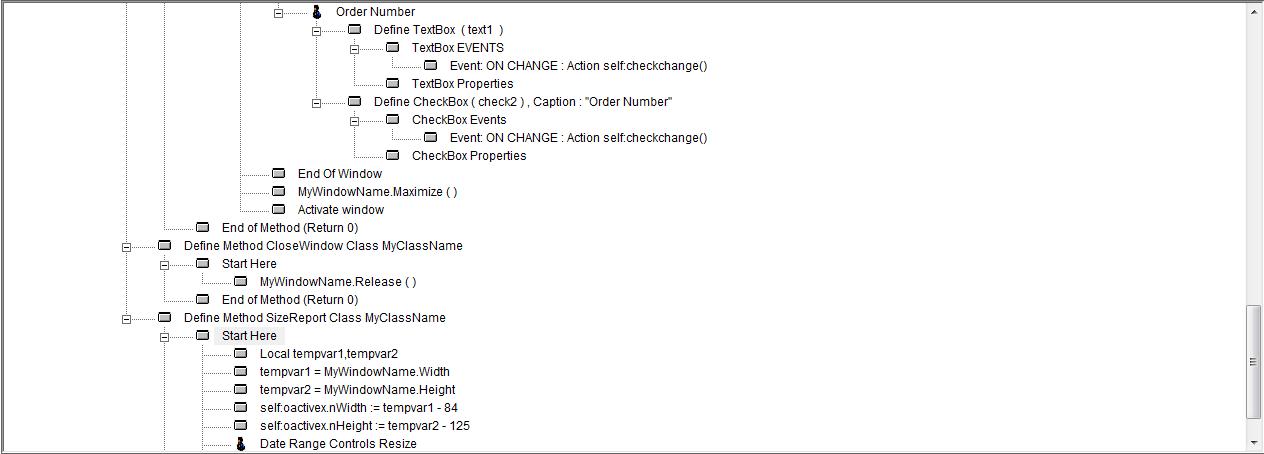
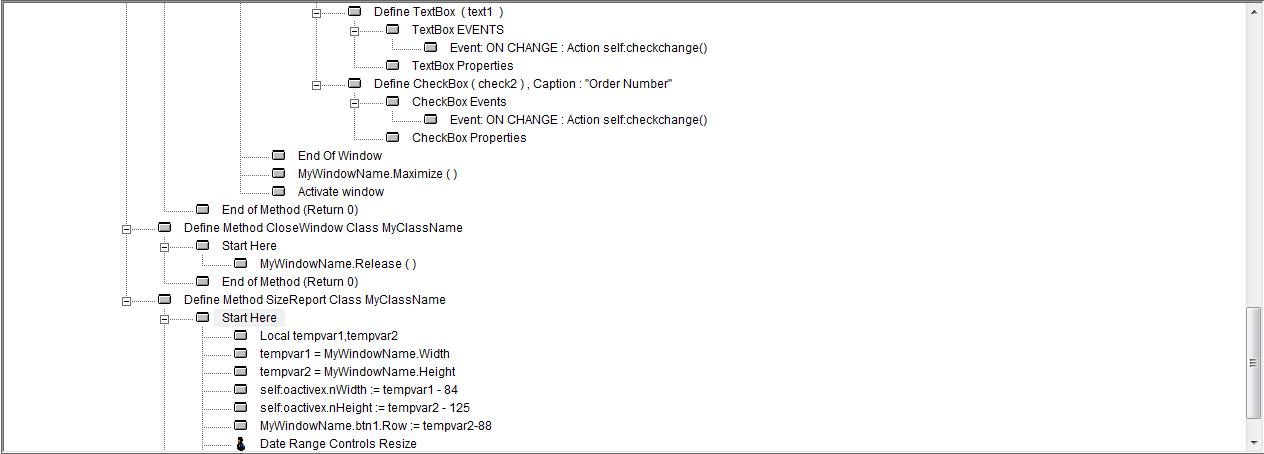
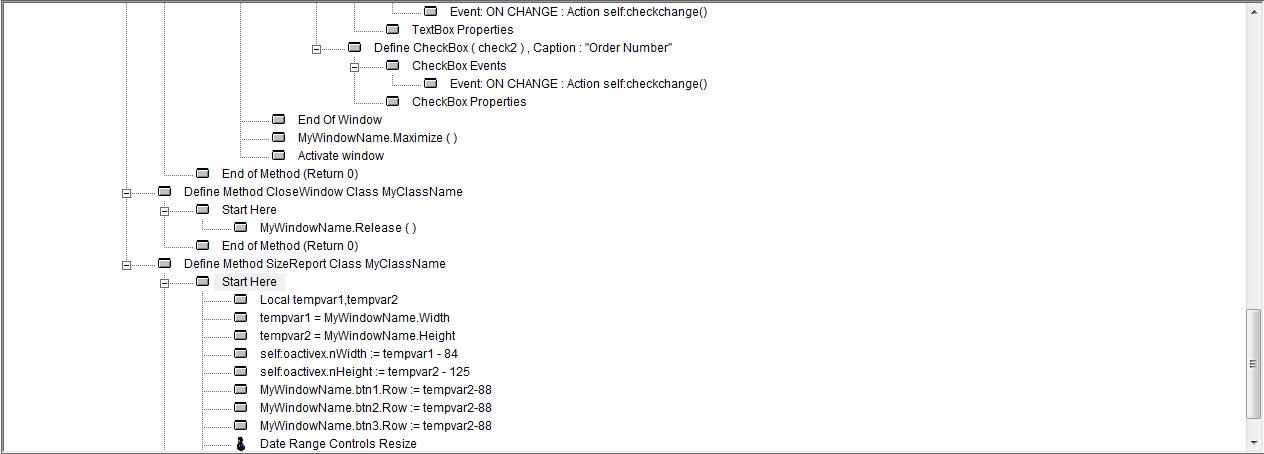
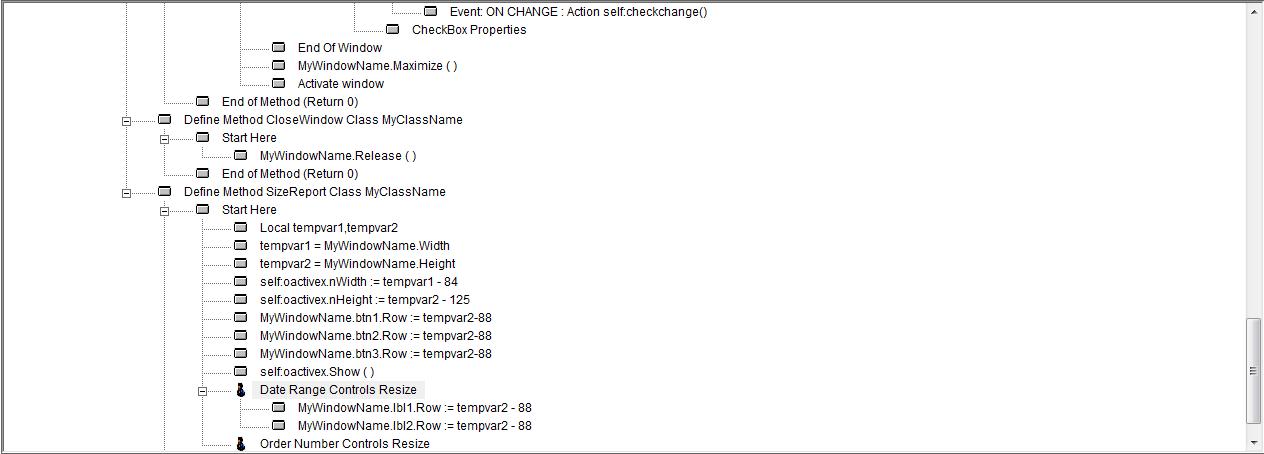
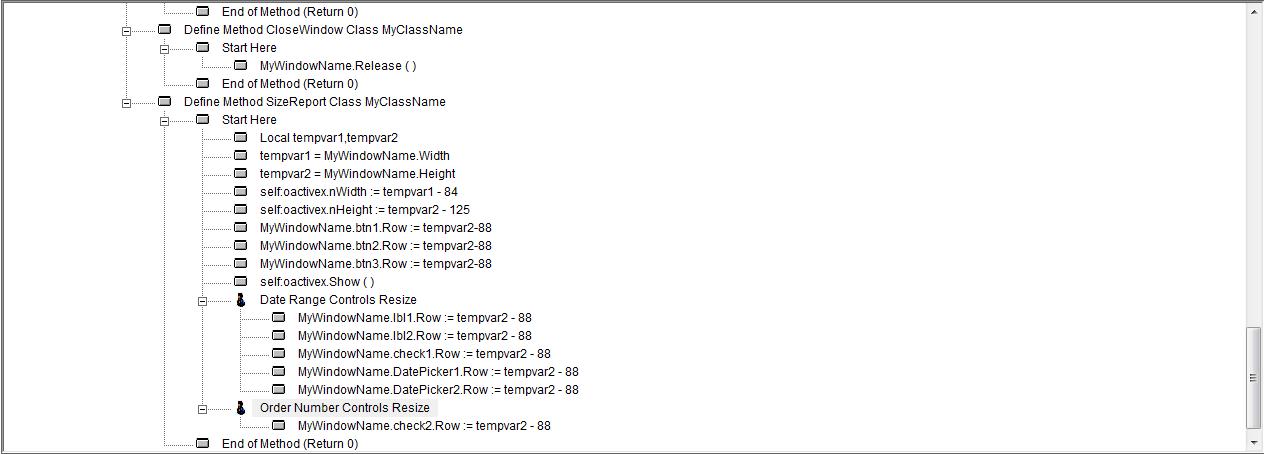
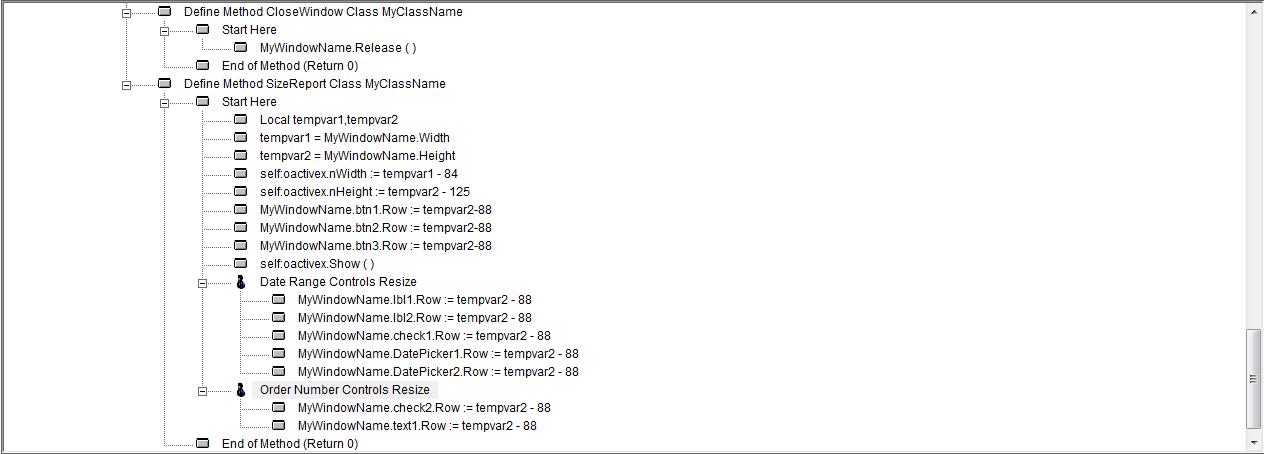
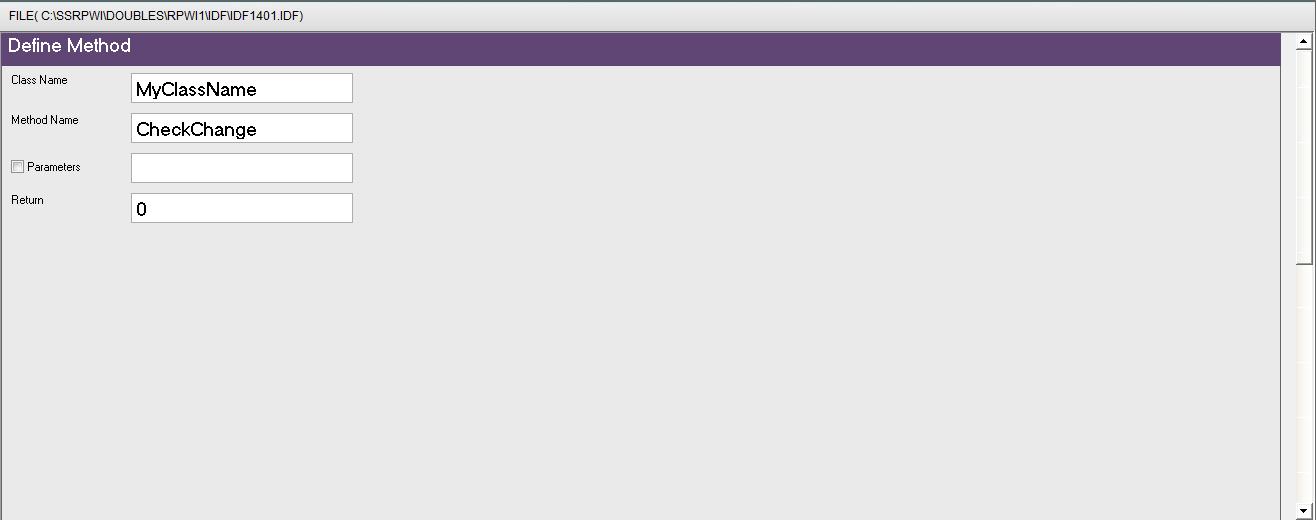
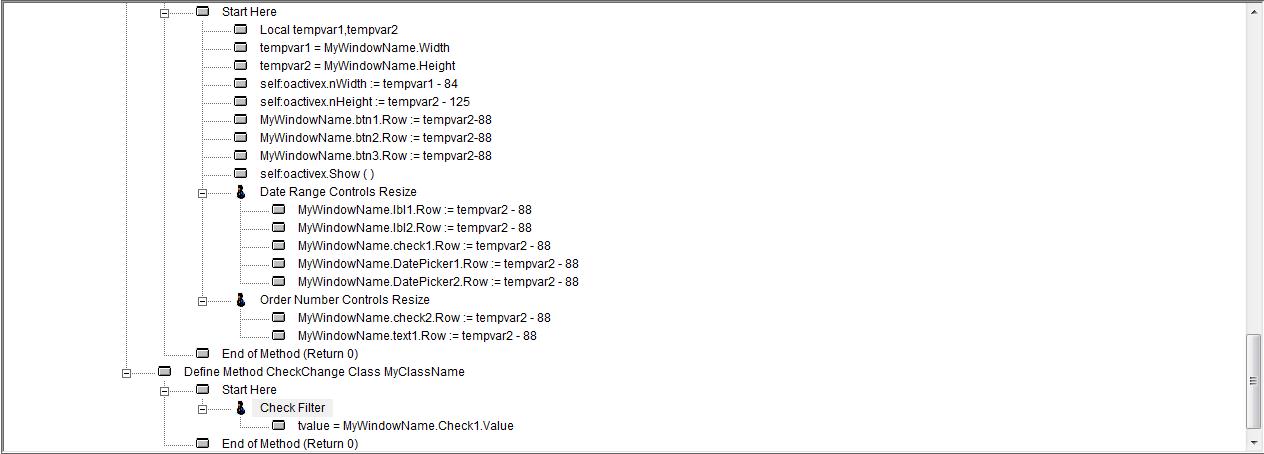
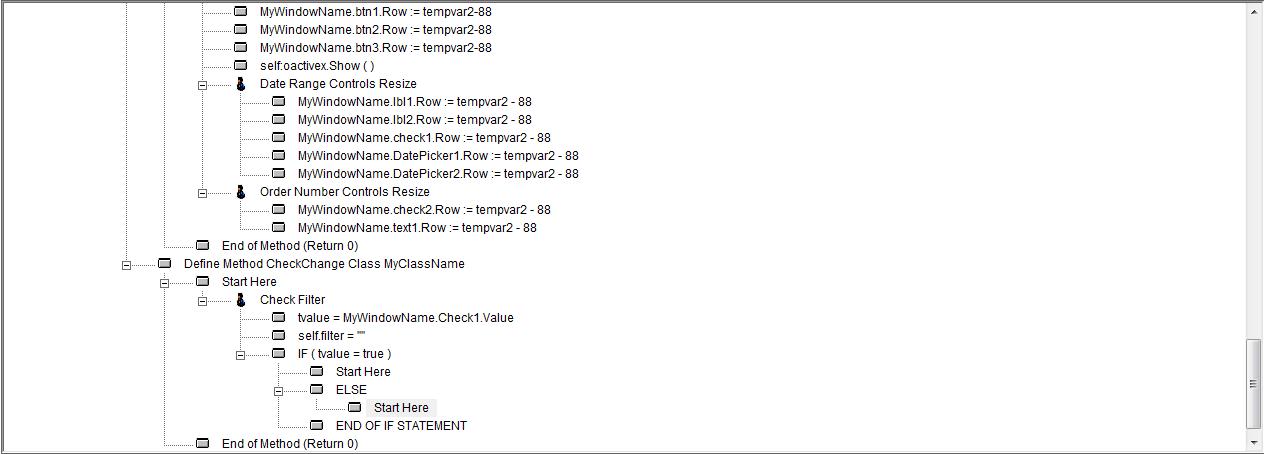
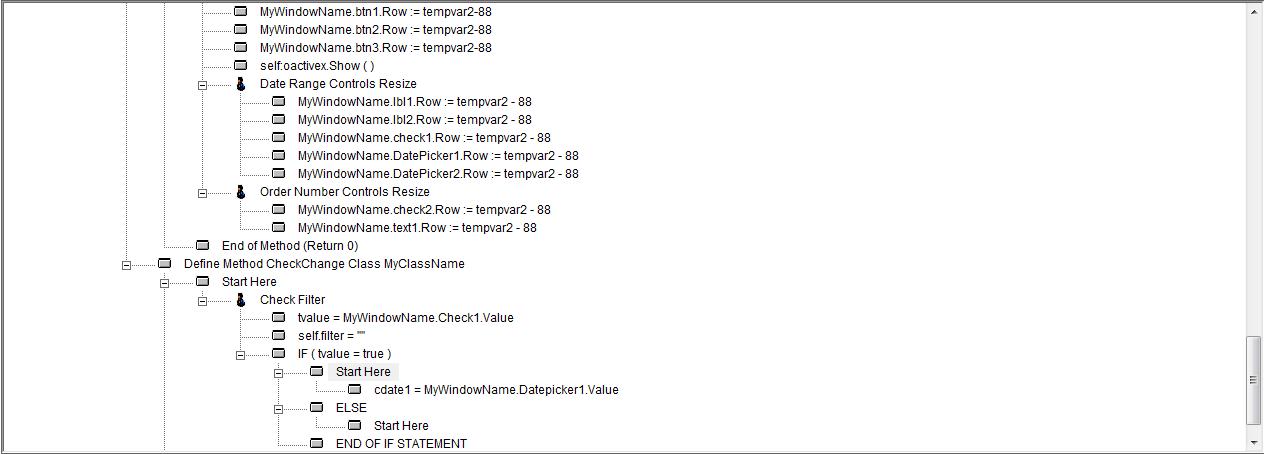
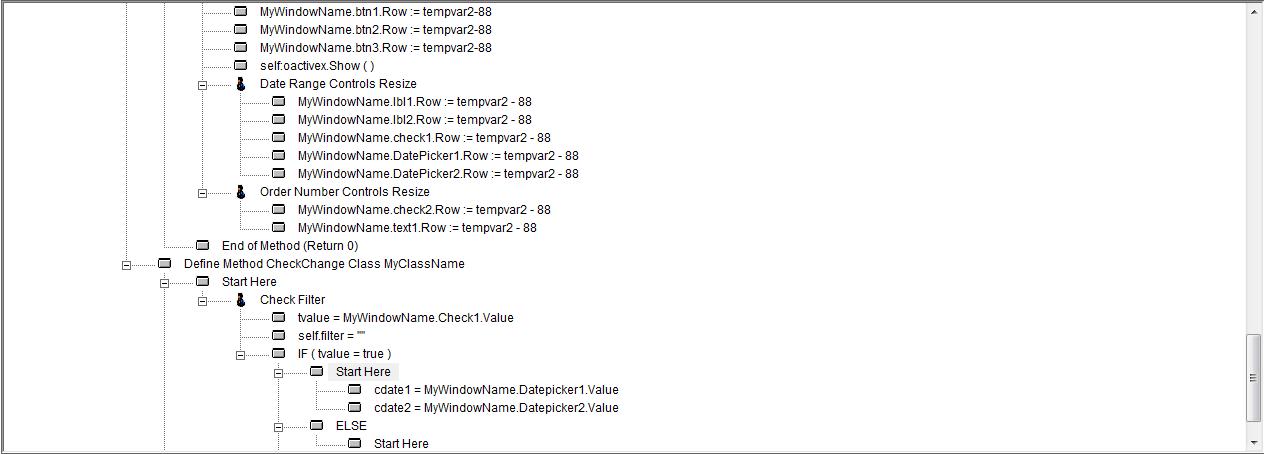
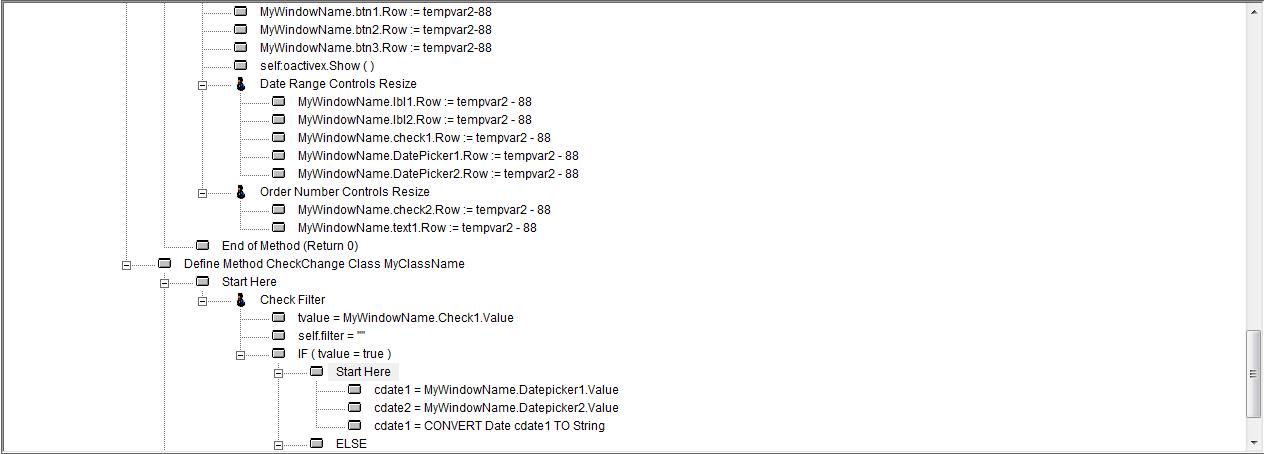
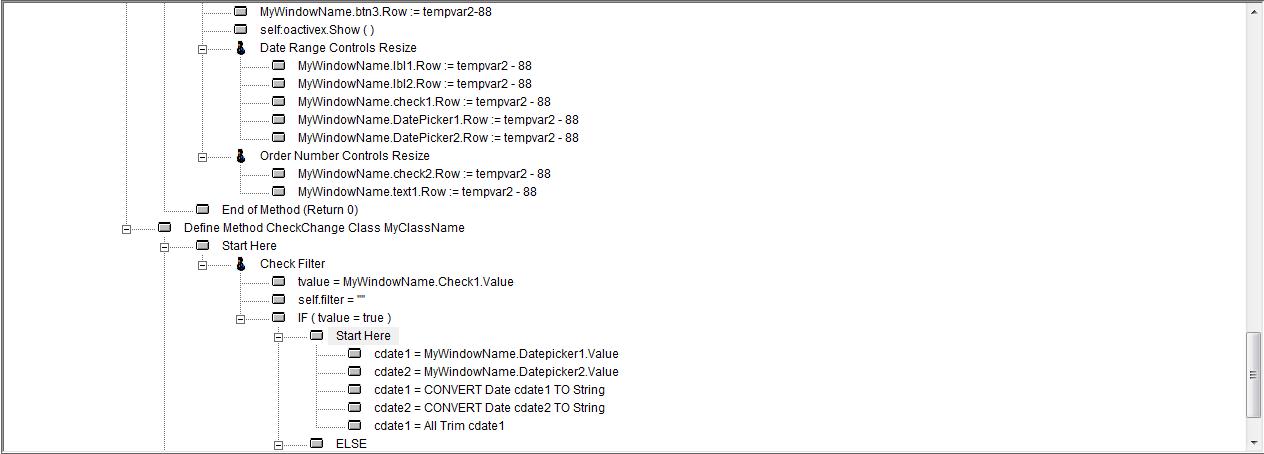
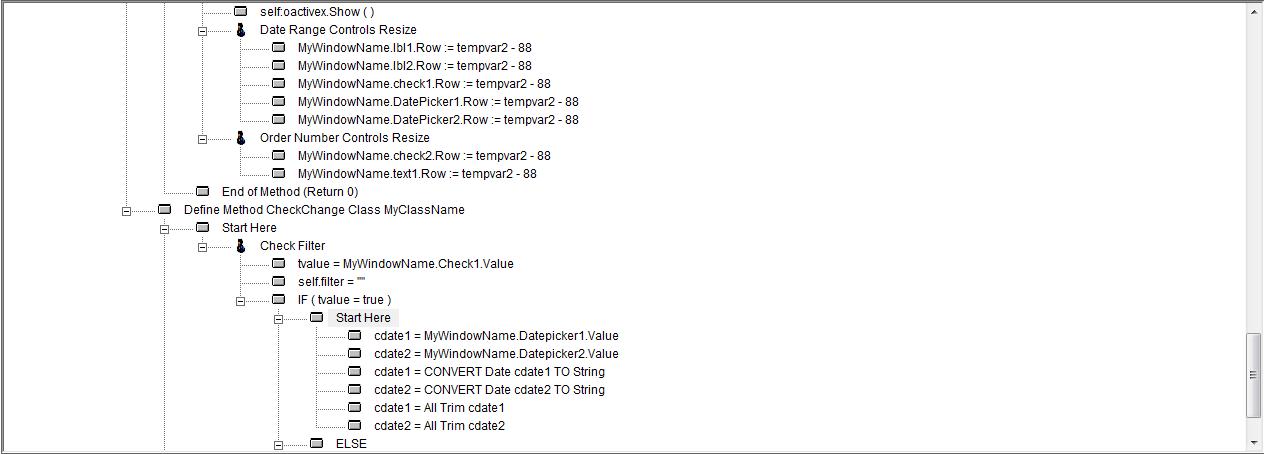
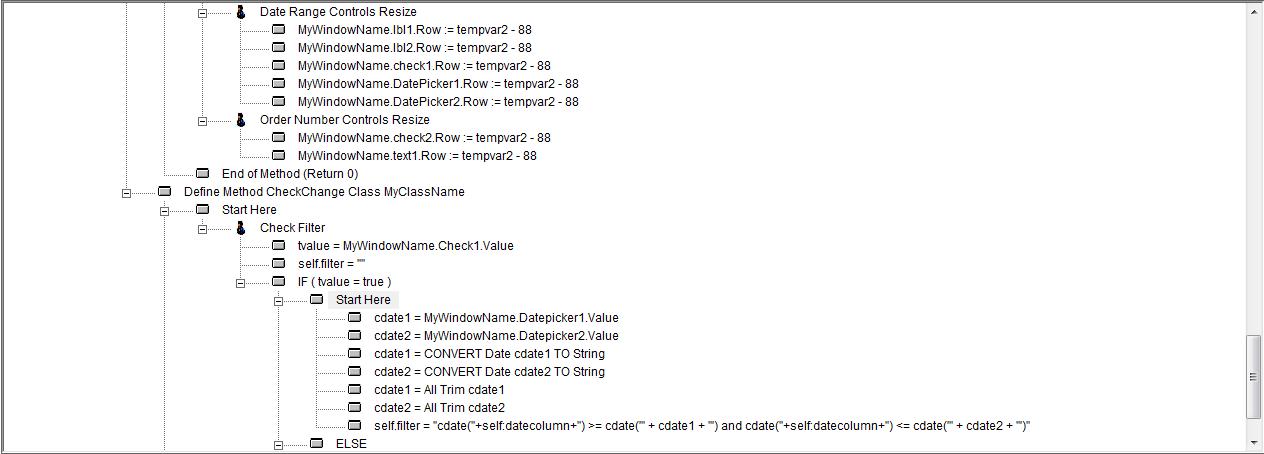
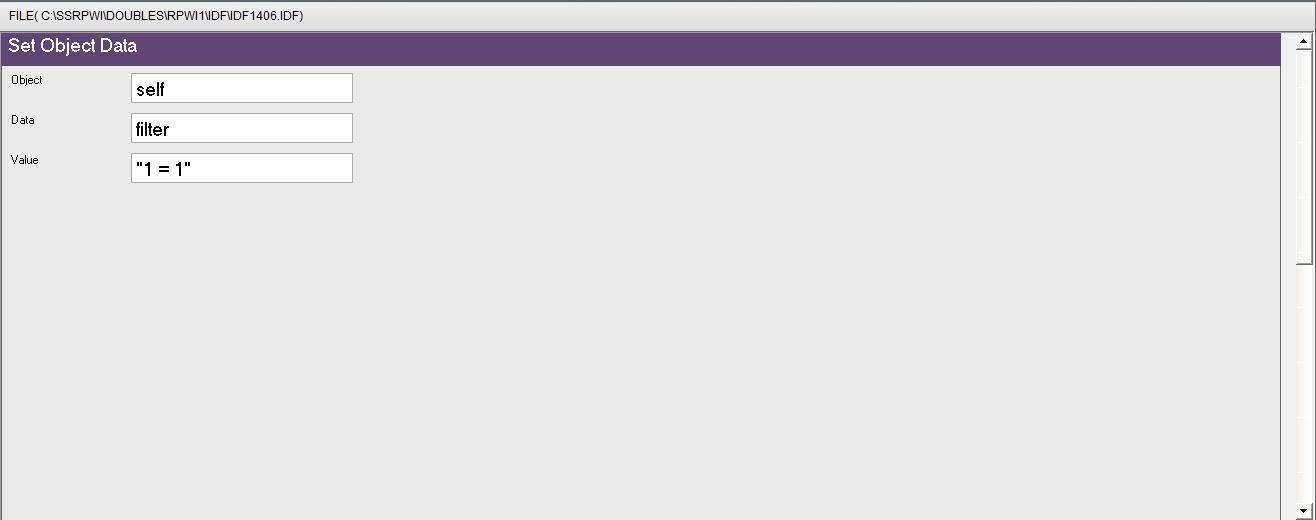
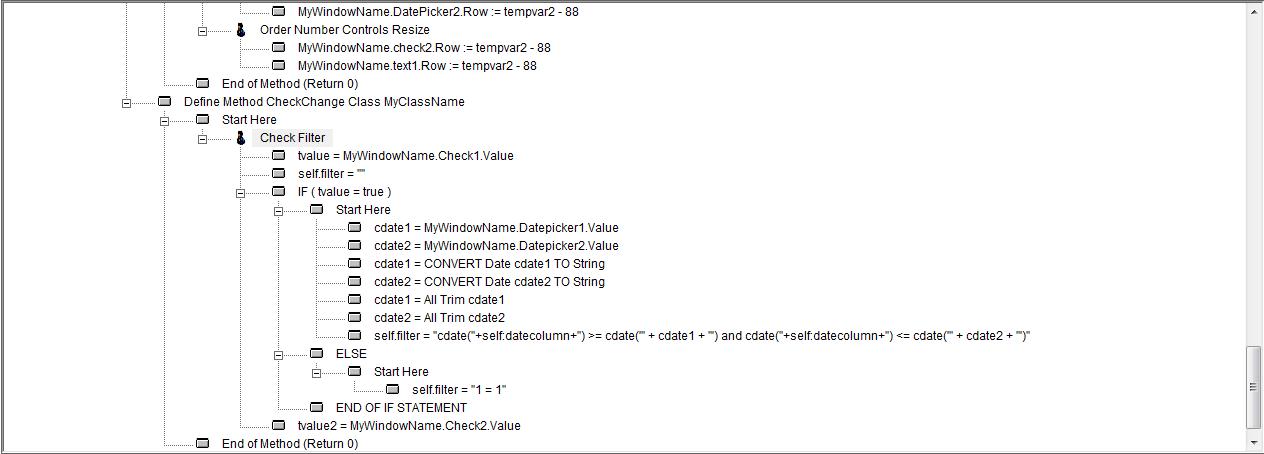
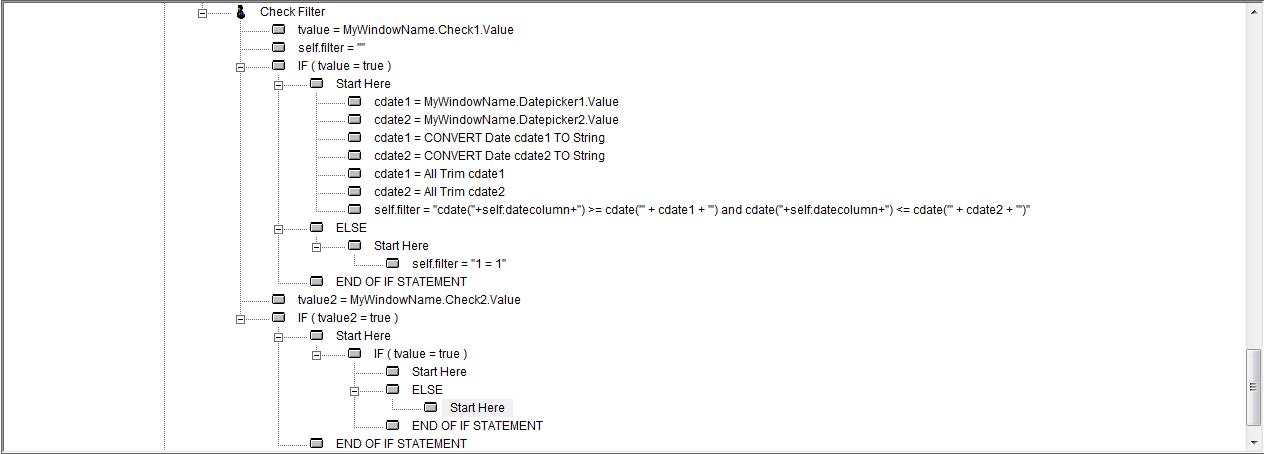
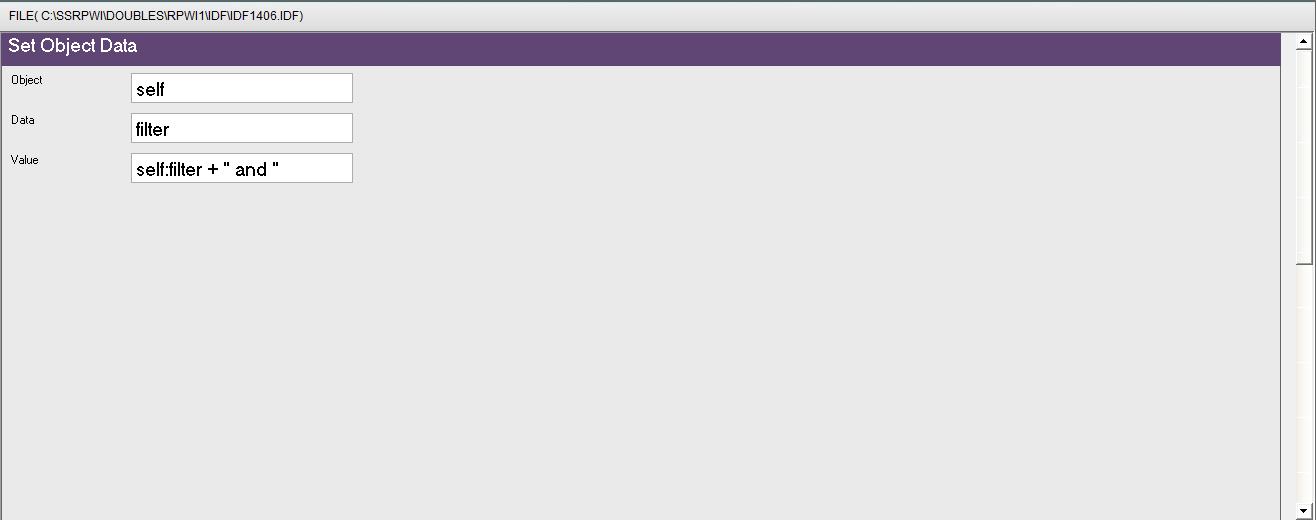
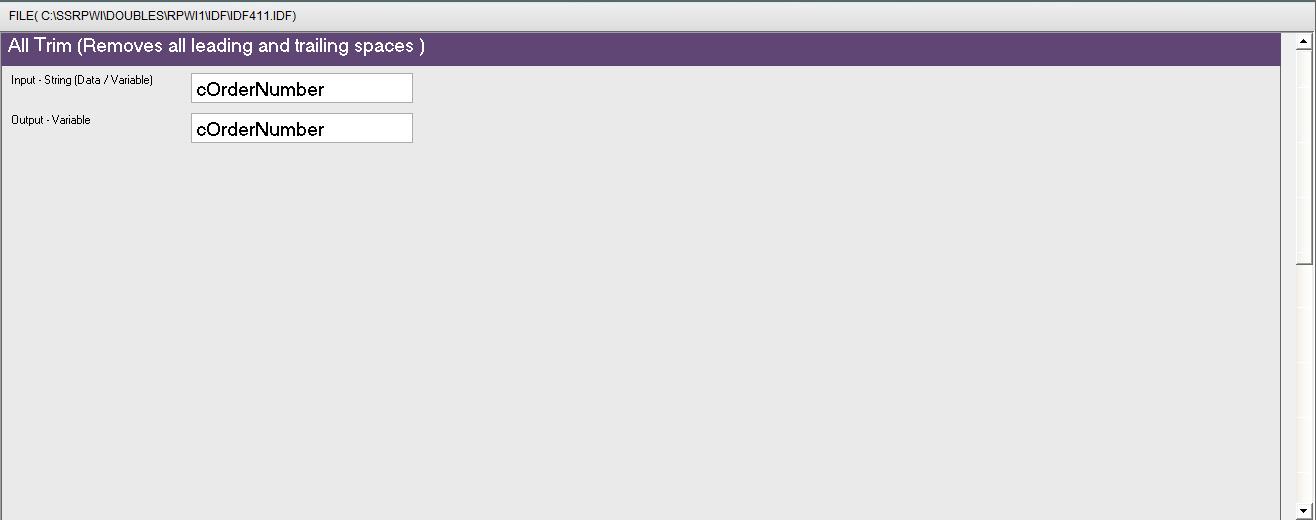
Fig. (279) Goal Desginer - Final Steps Tree 3 - Final Steps Tree Set Class Name & Window Name PWCT-Code Generator: Replace String (MyClassName) with (ReportClass) PWCT-Code Generator: Replace String (MyWindowName) with (&(self:cWindowName)) Class Define Class MyClassName From Report_Base Declare Class Data Data ReportName Init Value "ReportName" Data datecolumn Init Value "datecolumn" Data ordercolumn Init Value "ordercolumn" Data cWindowName Init Value "ReportWindow" Declare Class Methods Method showwindow Method closewindow Method SizeReport Method checkchange End of Class Class Methods Define Method ShowWindow Class MyClassName Start Here Define New Window ( MyWindowName ) , Title : "Report" Window Events Event: ON INIT : Action self:ShowReport() Event: ON SIZE : Action self:SizeReport() Event: ON MAXIMIZE : Action self:SizeReport() Window Properties Window Controls Define New Button ( btn1 ) , Caption : "Close" Button Events Event: ON CLICK : Action self:CloseWindow() Button Properties Define New Button ( btn2 ) , Caption : "Print" Button Events Event: ON CLICK : Action self:PrintReport() Button Properties Define New Button ( btn3 ) , Caption : "Refresh" Button Events Event: ON CLICK : Action self:ShowReport() Button Properties Active Control ( self:oActiveX ) Date Range Controls Define Label ( lbl1 ) , Caption : "From" Label Events Label Properties Define Label ( lbl2 ) , Caption : "To" Label Events Label Properties Define CheckBox ( check1 ) , Caption : "Date Range :" CheckBox Events Event: ON CHANGE : Action self:checkchange() CheckBox Properties Define New DatePicker ( datepicker1 ) Events Event: ON CHANGE : Action self:checkchange() Properties Define New DatePicker ( datepicker2 ) Events Event: ON CHANGE : Action self:checkchange() Properties Order Number Define TextBox ( text1 ) TextBox EVENTS Event: ON CHANGE : Action self:checkchange() TextBox Properties Define CheckBox ( check2 ) , Caption : "Order Number" CheckBox Events Event: ON CHANGE : Action self:checkchange() CheckBox Properties End Of Window MyWindowName.Maximize ( ) Activate window End of Method (Return 0) Define Method CloseWindow Class MyClassName Start Here MyWindowName.Release ( ) End of Method (Return 0) Define Method SizeReport Class MyClassName Start Here Local tempvar1,tempvar2 tempvar1 = MyWindowName.Width tempvar2 = MyWindowName.Height self:oactivex.nWidth := tempvar1 - 84 self:oactivex.nHeight := tempvar2 - 125 MyWindowName.btn1.Row := tempvar2-88 MyWindowName.btn2.Row := tempvar2-88 MyWindowName.btn3.Row := tempvar2-88 self:oactivex.Show ( ) Date Range Controls Resize MyWindowName.lbl1.Row := tempvar2 - 88 MyWindowName.lbl2.Row := tempvar2 - 88 MyWindowName.check1.Row := tempvar2 - 88 MyWindowName.DatePicker1.Row := tempvar2 - 88 MyWindowName.DatePicker2.Row := tempvar2 - 88 Order Number Controls Resize MyWindowName.check2.Row := tempvar2 - 88 MyWindowName.text1.Row := tempvar2 - 88 End of Method (Return 0) Define Method CheckChange Class MyClassName Start Here Check Filter tvalue = MyWindowName.Check1.Value self.filter = "" IF ( tvalue = true ) Start Here cdate1 = MyWindowName.Datepicker1.Value cdate2 = MyWindowName.Datepicker2.Value cdate1 = CONVERT Date cdate1 TO String cdate2 = CONVERT Date cdate2 TO String cdate1 = All Trim cdate1 cdate2 = All Trim cdate2 self.filter = "cdate("+self:datecolumn+") >= cdate('" + cdate1 + "') and cdate("+self:datecolumn+") <= cdate('" + cdate2 + "')" ELSE Start Here self.filter = "1 = 1" END OF IF STATEMENT tvalue2 = MyWindowName.Check2.Value IF ( tvalue2 = true ) Start Here IF ( tvalue = true ) Start Here self.filter = self:filter + " and " ELSE Start Here self.filter = "" END OF IF STATEMENT cOrderNumber = MyWindowName.text1.Value cOrderNumber = All Trim cOrderNumber self.filter = self:filter + self:ordercolumn+"= " + cordernumber END OF IF STATEMENT End of Method (Return 0)
|