PWCT Features – Practical Editor
A powerful visual editor with keyboard shortcuts, customization, and error prevention for building large-scale applications.
PWCT is not only a tool for Education and creating applications quickly by Novice programmers, PWCT is also a visual programming language (VPL) for expert programmers.
PWCT is a “General Purpose Visual Programming Language for developing Large Scale Systems and Applications.”
Developing a VPL for expert programmers requires advanced features to increase the productivity and flexibility without adding limitations about what the programmer can do and how.
This means that the programmer is free to select any programming problem in any domain and is free to determine the algorithm that will solve the problem. PWCT helps the expert programmer to reach his goal by using visual programming instead of typing the text based source code.
The visual source inside PWCT is designed using the Goal Designer where the programmer can generate the steps tree through the interaction with the VPL components. The Goal Designer is a practical editor for creating large programs quickly with optional features that increase the productivity and prevent errors.
Inside the Goal Designer, you can use the “Mouse” or the “Keyboard” to use the available visual components and generate new steps in the steps tree. Using the Mouse you can explore the environment to see what are the components that are ready for use and using the Keyboard by typing the component name you can quickly get any component and start using it.
| Window | Keys | Description |
|---|---|---|
| Goal Designer | Ctrl+N | Create new step as comment or for organization |
| Ctrl+T | Open the components browser to start new Interaction process. During the interaction process we select a component from the components browser then we enter data to this component using the “Interaction using Transporter” window and after that new steps will be generated for us in the steps tree. | |
| Ctrl+Y | Modify the generated steps; this will open the Interaction using Transporter window to modify the data which is entered during the interaction process. | |
| Del | Delete the selected step | |
| A–Z | Open the components browser to start new Interaction process then send the pressed key to the search line in the components browser | |
| Ctrl+R | Save, Build & Run the program | |
| Ctrl+F | Open the form designer | |
| Ctrl+C | Copy the selected step in the steps tree | |
| Ctrl+X | Cut the selected step in the steps tree | |
| Ctrl+V | Paste steps in the steps tree | |
| Components Browser | Enter | Use the selected component |
| ↑ | Move to the previous component | |
| ↓ | Move to the next component | |
| Ctrl+W | Use the selected component | |
| Esc | Close the components browser and return to the Goal Designer | |
| Interaction Using Transporter | Ctrl+W | Save, close the interaction using transporter window then return to the Goal Designer |
| Ctrl+A | Save, start new interaction process using the same component and continue (like clicking the “Again” button) | |
| Ctrl+O | Open (Select Object) window | |
| Alt+→ | Move to the next page | |
| Alt+← | Move to the previous page | |
| Esc | Close the Interaction using transporter window and return to the Goal Designer | |
| Form Designer | → | Move the selected controls to the right |
| ← | Move the selected controls to the left | |
| ↑ | Move the selected controls up | |
| ↓ | Move the selected controls down | |
| Ctrl+A | Select all controls | |
| Shift+→ | Increase the width of the selected controls | |
| Shift+← | Decrease the width of the selected controls | |
| Shift+↓ | Increase the height of the selected controls | |
| Shift+↑ | Decrease the height of the selected controls | |
| Ctrl+F | Open the font dialog | |
| Ctrl+↑/↓ | Increase/Decrease the spacing between the selected controls | |
| Ctrl+W | Save and Close |
Table (1) Keyboard shortcuts

Figure (1) The Components Browser
Inside the components browser we can see at the left side the domain tree where each domain may contain one or more components.
We can use the Mouse to see the available components or just type a letter in the search line to try to find the component using the component name.
In Figure (1) we see the letter “f” in the search line and the component “For Loop” is selected after typing this letter.
From the Goal Designer the programmer can open the Components Browser by pressing Ctrl+T or by clicking on the “Interact” button. But the programmer doesn’t need to open the Components Browser first to start the search operation — from the Goal Designer window, once the programmer types any letter the Components Browser window will be opened and this letter will be sent to the search line.
When you write the source code in text based programming languages, you are using a syntax determined by the programming language designer and what you write is what you read. Inside PWCT where you develop your programs using Visual Programming the case is different where you write something then read something else. This separation between Writability and Readability gives us the chance to get the Maximum Readability and the Maximum Writability at the same time without conflicts.
Adding Customization to this concept where the programmer can change the component name and can change the generated steps names — the programmer can feel that he/she is living in his programming world where he can easily and quickly change what he is using to create and read the program source.
This is done without adding problems to other programmers working on the same project because if every programmer changed the components names and the generated steps names, other programmers can open the same project using their copy of PWCT then do a quick refresh operation to see the visual source in their environment based on their customizations.
For example if programmer (A) changed the generated steps text from English to Arabic then programmer (B) opened the program and discovered that the visual source is changed to Arabic, he can change it again to English by one click. Just imagine many programmers are working on the same visual source and each programmer is seeing the visual source text in his/her human language!
Since components control the generated source code in the background, customization could be changing the generated source code from one language to another language. Yes, we can develop one visual programming language and get the generated source code in many languages just by changing the generated code in the components.
1 – How to change the component name?
2 – How to change the generated steps names in the component design?
3 – How to regenerate the steps based on the components design?
For the first question, you can change the component name by using the “Reinstall Component” window. You can open it from the “Domain Tree” popup in the menubar.
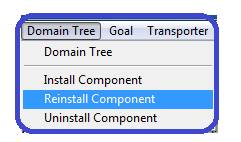
Figure (2) Opening the “Reinstall Component” window
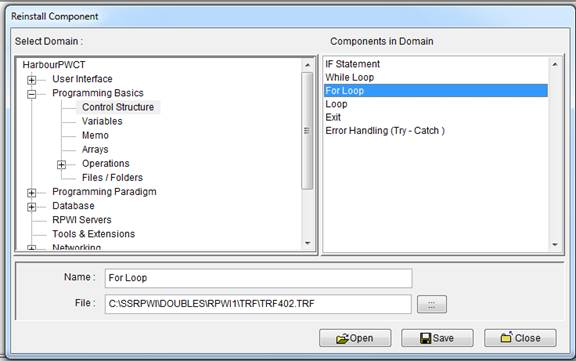
Figure (3) Change the component name or open the component file
To change the component name, type the new name then click “Save.”
For the second question, to change the generated steps names, you need first to open the component file and you can do this quickly from the “Reinstall Component” window by selecting the component then clicking on the “Open” button.

Figure (4) Change the generated steps names from the code mask
The component (Transporter) file can be opened using the Transporter Designer. By moving to the (Code Mask) tab, you can see the script which controls the steps and code generation process. The command <RPWI:NEWSTEP> is used to create a new step inside the steps tree. You can change the step name by changing this script then saving and closing the file.
For the third question, to refresh the visual source file based on the latest components updates, inside the Goal Designer window click on the “Time Machine” button then select “Refresh steps based on current components updates.”

Figure (5) Refresh steps
Inside the Goal Designer, we have features like Cut, Copy & Paste to do things quickly. Also we have the Search option to find steps using part of its name. We can do a replace operation on the results (Names, Data/Generated Code) of the search operation.
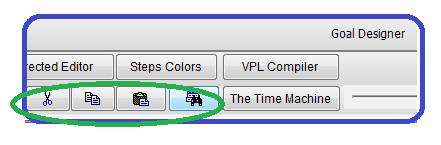
Figure (6) Cut, Copy, Paste & Search buttons inside the Goal Designer
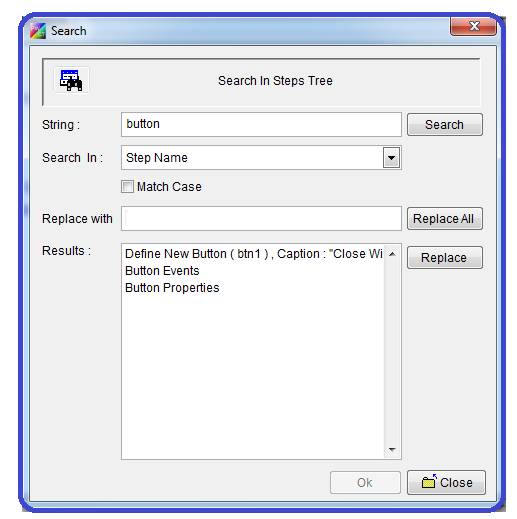
Figure (7) Search & Replace window
Inside PWCT, when the programmer uses the Syntax Directed Editor (SDE) he will be restricted by doing only the actions that leave the visual source of the program (Steps Tree) in a correct state (Prevent Errors). For example when we use the IF Statement component we can’t ignore or delete the step (End of IF Statement) because deleting it will lead to (Unclosed control structure) error. Another example when we create a new window using the step (Window Controls) to add new controls, the Syntax Directed Editor will prevent us from adding any other types of components.
A clear advantage of using the Syntax Directed Editor: when you open the Components Browser you will see only the components that can be added to the step selected in the start of the interaction process. The disadvantage of using Syntax Directed Editor is preventing us from making a radical change quickly so it’s (Optional).
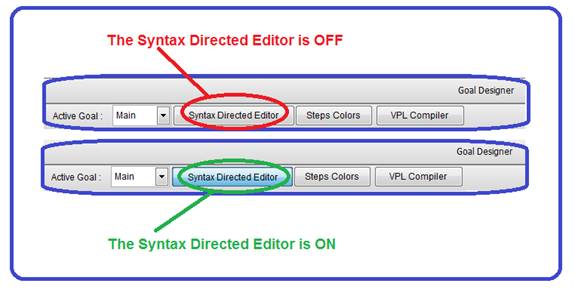
Figure (8) Set the Syntax Directed Editor ON/OFF
Inside PWCT, when the Syntax Directed Editor is OFF, we are using a Free Editor which means that we can make errors. This freedom is useful in special cases when we need to make radical changes to the visual source. But what will we do when we make errors and get syntax errors during the generated code compilation using the text based programming language compiler?
Instead of going to the text based programming language world, we have the VPL Compiler which can compile the visual source to discover the errors then return to us with messages that really help in fixing the errors.
To open the VPL Compiler, from the Goal Designer window click on the “VPL Compiler” button.
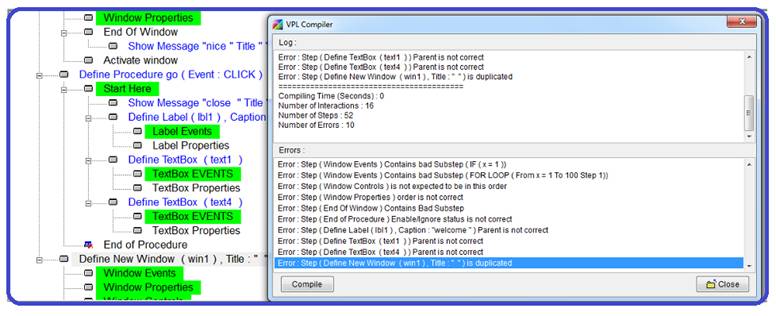
Figure (9) VPL Compiler